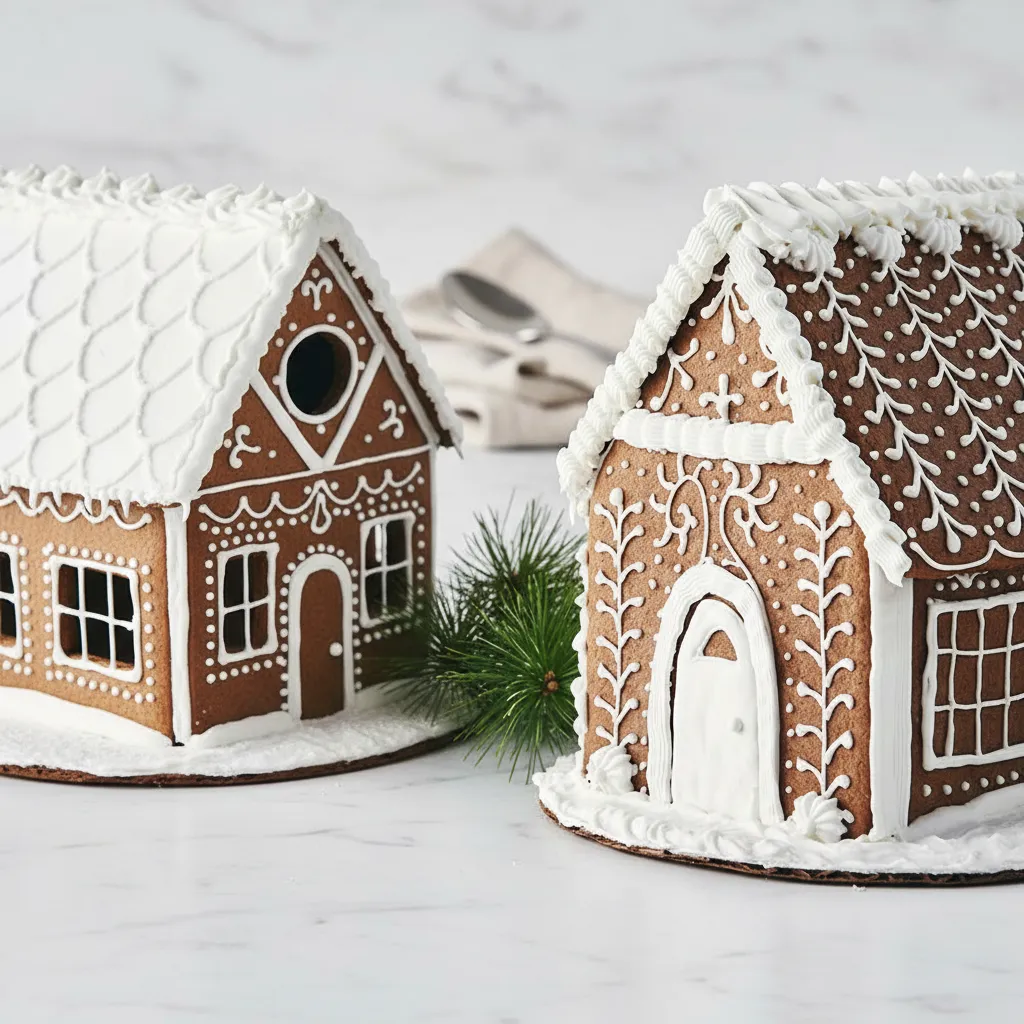
Have you ever spent hours baking and decorating, only to watch your beautiful gingerbread house slowly slide apart? It’s a holiday tragedy! Honestly, the key to a sturdy structure isn’t the gingerbread itself. It’s all about the glue.
That’s where this recipe for Icing For Gingerbread House construction comes in. This isn’t your average fluffy frosting. This is the real deal, a strong and reliable cement that will keep your candy canes and gumdrops exactly where you put them. Let’s get building!
Jump To:
Why You’ll Love This Recipe
First off, this is the Best Frosting For Gingerbread Houses because it dries rock hard. This is exactly what you want when you are building walls and attaching a roof. No more worrying about a sudden collapse.
It’s also incredibly simple. You only need a few basic ingredients that you might already have in your pantry. No fancy techniques are required. If you can use a mixer, you can make this icing.
Plus, it’s completely customizable. You can leave it a brilliant white for a snowy look or add food coloring to create any shade you can imagine. You can also add a touch of flavoring to make it extra tasty.
This is the ultimate Gingerbread House Frosting Glue. It provides the strength you need for building and the perfect texture for decorating. It’s a two in one solution for your holiday baking projects.
Ingredients
Making this amazing Icing For Gingerbread House is easier than you think. Here is what you will need to gather from your kitchen.
- 3 large egg whites*
- 1/2 teaspoon cream of tartar
- 4 cups (454g) confectioners’ sugar, unsifted
- Natural food coloring, optional
- Peppermint extract, lemon extract, or vanilla extract, optional
A quick note on ingredients. You can substitute the egg whites with 1/4 cup meringue powder combined with 1/2 cup cold water if you prefer. Both options work wonderfully.
Step By Step Instructions
Ready to create the Best Frosting For Gingerbread Houses? Let’s walk through the process together. It’s quite straightforward, so don’t you worry!
Step 1: Prepare The Egg Whites
In a large, clean mixing bowl, combine the egg whites and the cream of tartar. It is very important that your bowl is completely free of any grease or oil, as this can prevent the egg whites from whipping up properly.
Using an electric mixer with the whisk attachment, beat the egg whites and cream of tartar on medium speed. Continue mixing until they become frothy and form soft peaks. This should take just a few minutes.
Step 2: Gradually Add The Sugar
Once you have soft peaks, turn the mixer down to a low speed. Begin adding the confectioners’ sugar one cup at a time. This slow addition is key. It helps the sugar dissolve fully without overwhelming the mixture.
Wait for each cup of sugar to be mostly incorporated before adding the next one. This process ensures your final Icing For Gingerbread House will be smooth and strong.
Step 3: Whip To Stiff Peaks
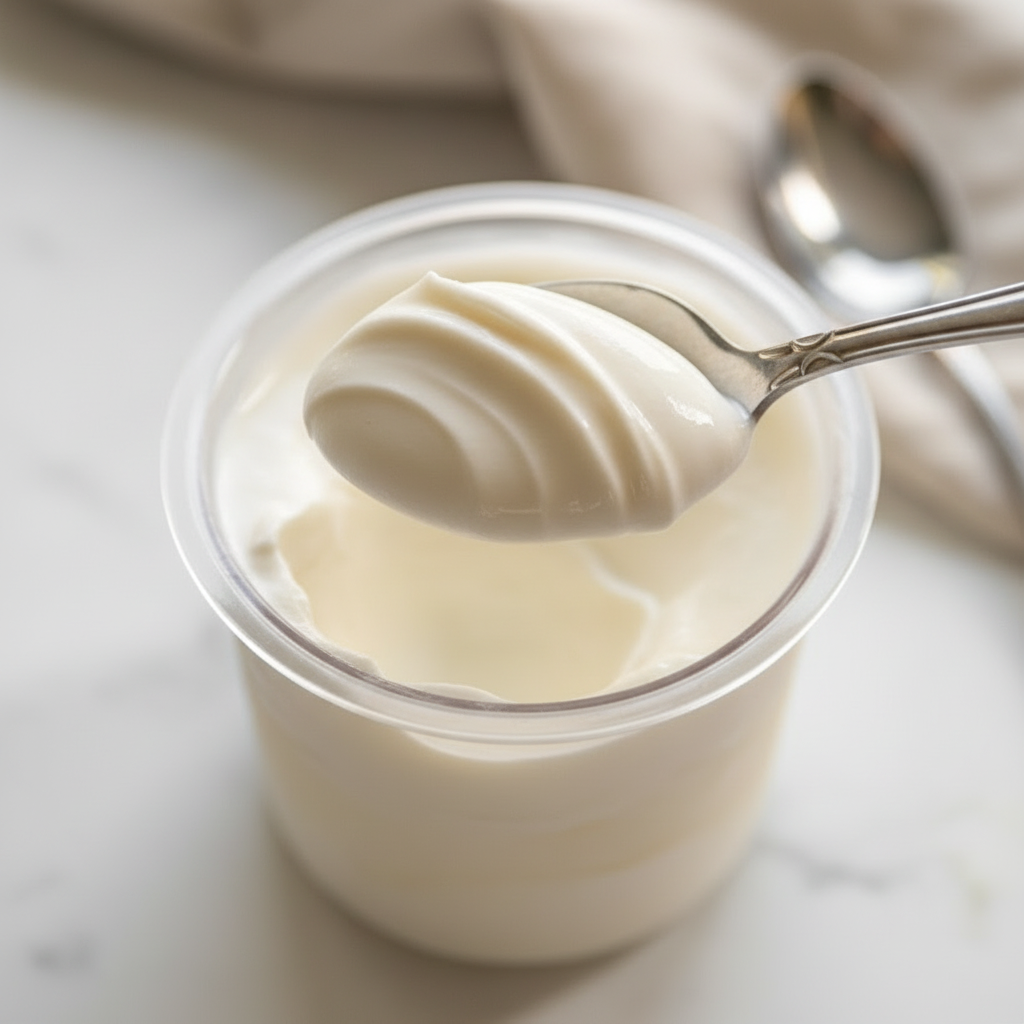
After all the sugar is added, increase the mixer speed to high. Beat the mixture for about 5 to 7 minutes. You are looking for a thick, glossy consistency with very stiff peaks. A great test is to lift the whisk out of the icing. The peak that forms should stand straight up without falling over.
At this stage, your Gingerbread House Frosting Glue is ready for construction. It should be very thick and sturdy. If you plan to add any coloring or flavoring, now is the time to do it. Gently mix it in until just combined.
Step 4: Use Or Store Immediately
This icing begins to harden as soon as it is exposed to air. For best results, use it right away. Transfer the icing to a piping bag for easy application when building your gingerbread house.
If you are not using it all at once, cover the bowl with a damp cloth or plastic wrap pressed directly onto the surface of the icing. This prevents a crust from forming. Keep it covered while you work!


How To Store Leftovers
Got some leftover Icing For Gingerbread House? No problem at all. You can easily store it for later use. The most important thing is to keep it from drying out.
Place any extra icing in an airtight container. Before sealing the lid, press a piece of plastic wrap directly against the surface of the icing. This creates a barrier and stops a hard crust from forming on top.
You can store it at room temperature for up to a few days. If you need to keep it longer, you can refrigerate it for about a week. Before using it again, you might need to let it come to room temperature and give it a quick whip with your mixer to restore its original texture.
Tips
Here are a few extra pointers to make sure you get the Best Frosting For Gingerbread Houses every single time.
First, if your icing seems too thick, you can add a tiny bit of water, about half a teaspoon at a time, until it reaches the consistency you want. But be careful. A little water goes a long way!
On the other hand, if your icing feels too thin, just add a little more confectioners’ sugar. Add it one tablespoon at a time and mix well until it thickens up. This helps you get the perfect strength for your Gingerbread House Frosting Glue.
When decorating, you might want two different consistencies. A very thick icing for construction and a slightly thinner icing for delicate details like icicles or writing. Simply separate your batch and thin a small portion with a few drops of water.
Always keep your icing covered when you are not actively using it. A damp paper towel over the bowl works wonders. This is probably the most important tip to remember. It hardens fast!
Conclusion
And there you have it! This Ginger Bread House Icing Recipe Easy is your ticket to a successful and fun holiday project. No more structural issues, just pure creative joy.
This recipe gives you the confidence to build big and decorate boldly. It’s the reliable foundation every gingerbread architect needs. I hope this guide helps you create your most beautiful and sturdy gingerbread house yet.
So go ahead, whip up a batch of this fantastic Icing For Gingerbread House and start building those sweet memories. Happy decorating!
FAQ
How Long Does This Icing Take To Dry?
This icing starts to form a crust quite quickly, within about 15 to 20 minutes. For it to harden completely for structural purposes, it’s best to give it at least a few hours. For maximum strength, let your constructed house dry overnight before decorating.
Can I Make This Icing In Advance?
Absolutely! You can prepare this Icing For Gingerbread House a day or two ahead of time. Just store it in an airtight container with plastic wrap pressed on the surface and keep it in the refrigerator. Let it come to room temperature and re whip it before using.
Is This Icing Safe To Eat?
Yes, it is completely edible. If you are concerned about using raw egg whites, you can use pasteurized egg whites, which are available in cartons at most grocery stores. The meringue powder option is also a great alternative that avoids raw eggs entirely.
My Icing Is Not Getting Stiff. What Did I Do Wrong?
The most common reason for icing not stiffening is any trace of grease or fat in the mixing bowl or on the utensils. Even a tiny bit of egg yolk can ruin it. Always start with spotlessly clean equipment. Another possibility is that it just needs more mixing time or a little more sugar.
Icing For Gingerbread House
This strong, reliable icing is the perfect glue for gingerbread house construction and decorating, drying rock hard for a sturdy finish. It’s incredibly simple to make with just a few basic ingredients.
Requirements


Ingredients
Instructions
- In a large, clean mixing bowl, combine egg whites and cream of tartar. Using an electric mixer, beat on medium speed until frothy with soft peaks.
- Reduce mixer speed to low. Gradually add confectioners’ sugar, one cup at a time, ensuring each addition is mostly incorporated.
- Increase mixer speed to high. Beat for 5-7 minutes until thick, glossy, and very stiff peaks form (they should stand straight up).
- Use immediately. If adding coloring or flavoring, gently mix in. Cover unused icing tightly with plastic wrap pressed directly on the surface to prevent hardening.
Notes
This icing starts to form a crust quite quickly, within about 15 to 20 minutes. For it to harden completely for structural purposes, it’s best to give it at least a few hours. For maximum strength, let your constructed house dry overnight before decorating.
You can prepare this icing a day or two ahead of time. Store it in an airtight container with plastic wrap pressed on the surface and keep it in the refrigerator. Let it come to room temperature and re-whip it before using.
If your icing seems too thick, you can add a tiny bit of water, about half a teaspoon at a time, until it reaches the consistency you want. If too thin, add a little more confectioners’ sugar, one tablespoon at a time.
The most common reason for icing not stiffening is any trace of grease or fat in the mixing bowl or on the utensils. Always start with spotlessly clean equipment. Another possibility is that it just needs more mixing time or a little more sugar.
Nutrition
Calories
Sugar
Fat
Carbs