Have you ever found yourself staring into the freezer, wishing for a scoop of rich, creamy ice cream? But then, the sensible part of your brain kicks in, reminding you of your fitness goals. It’s a classic struggle, right? Well, what if I told you that you could have both? You can enjoy a delicious frozen dessert that is also packed with protein. It sounds too good to be true, but it is entirely possible with a little kitchen magic.
That is where the Ninja Creami comes into play. This amazing gadget has completely changed how we think about homemade frozen treats. Today, I am so excited to share one of my favorite Protein Ice Cream Ninja Creami Recipes. This recipe is a chocolatey, nutty creation that will satisfy your sweet tooth and support your healthy lifestyle. Get ready to make the creamiest, most flavorful protein ice cream you have ever had.
Jump To:
Why You’ll Love This Recipe
First off, the flavor is just fantastic. We are talking about a rich chocolate base loaded with crunchy almonds and soft, sugar free marshmallows. It is like a healthier rocky road ice cream. Each spoonful is a wonderful mix of textures and tastes. It is a dessert that truly feels indulgent, even though it is good for you.
Another huge plus is the protein content. With a full scoop of protein powder in the base, this ice cream becomes a powerhouse. It is a great way to refuel after a workout or to simply add more protein to your day. This makes it one of the best Ninja Creami recipes for anyone focused on nutrition. It helps you feel full and satisfied, curbing those late night snack cravings.
This recipe is also incredibly easy to make. You just blend a few ingredients, pour the mixture into the pint container, and let your freezer and the Ninja Creami do the rest. There is no complex churning or constant checking. It is a straightforward process that even a complete beginner in the kitchen can handle with confidence. You get amazing results with very little effort.
Plus, it is so easy to customize. Don’t have almonds? Try walnuts or pecans. Not a fan of marshmallows? Swap them for sugar free chocolate chips or coconut flakes. You can adjust the mix ins to whatever you are craving. This flexibility is what makes homemade Protein Ice Cream Ninja Creami Recipes so much fun. You can create a new version every single week.
Finally, this is one of those great Ninja Creami ice cream recipes high protein low cal. It fits so well into a balanced diet. You get all the enjoyment of a decadent dessert without the high sugar and calorie count typically found in store bought ice cream. It is a treat you can feel genuinely good about eating anytime you want.
Ingredients
Before we start, let’s gather everything we need. The ingredient list is simple, which is another reason to love this recipe. You might already have most of these items in your pantry and fridge.
- ½ cup heavy cream
- ¾ cup almond milk
- 1 tbsp sugar free chocolate pudding mix
- 1 scoop chocolate protein powder
- ¼ cup chopped almonds
- ¼ cup sugar free mini marshmallows
Let’s talk a little bit about each ingredient. The heavy cream is what gives our ice cream its rich, satisfying mouthfeel. It adds the fat content needed for a smooth, creamy texture. Without it, you might get a more icy result. If you need a lighter option, you can use half and half, but heavy cream gives the best taste.
Almond milk helps keep the base light and lower in calories. I use unsweetened vanilla almond milk for a hint of extra flavor, but plain works just as well. You could also use cashew milk, soy milk, or regular dairy milk if you prefer. Each will slightly alter the final flavor and texture.
The sugar free chocolate pudding mix is a fantastic addition. It acts as a stabilizer, preventing ice crystals from forming. This ensures your ice cream is incredibly smooth and never grainy. It also deepens the chocolate flavor, making it extra rich and delicious. Make sure you get the instant kind.
Of course, the star of our Ninja Creami Protein Powder Ice Cream is the protein powder itself. I recommend a high quality whey or casein blend for the creamiest results. Casein tends to create a thicker base. A good chocolate flavor is key, so use one you genuinely enjoy drinking as a shake. The taste will be very prominent in the final product.
For mix ins, chopped almonds add a lovely crunch and nutty flavor. They contrast so well with the creamy base. The sugar free mini marshmallows add a soft, chewy texture that completes the rocky road experience. Feel free to toast the almonds lightly before adding them for an even deeper, more complex flavor. It really makes a difference.
Step By Step Instructions
Ready to make some ice cream? This process is so simple. Just follow these steps, and you will have a delicious frozen treat ready to go. I will walk you through everything, so do not worry if this is your first time using a Ninja Creami.
Step 1: Blend The Base
First, grab your blender. You can use a standard blender or even an immersion blender for this. Combine the heavy cream, almond milk, sugar free chocolate pudding mix, and the chocolate protein powder. You want to blend these ingredients until the mixture is completely smooth and there are no clumps of powder left.
This usually takes about 30 to 60 seconds on a medium speed. Scrape down the sides of the blender once or twice to make sure everything is incorporated. The goal is a silky, liquid base. A smooth base is essential for a creamy final product, so take your time with this step. It’s the foundation for our amazing Protein Ice Cream Ninja Creami Recipes.
Step 2: Freeze Overnight
Once your base is perfectly blended, pour it into a Ninja Creami pint container. Be careful not to fill past the max fill line. Secure the lid tightly. Now, place the pint in the freezer. It is very important to place it on a flat surface. An uneven surface can cause the block to freeze at an angle, which can damage the machine’s blade.
You will need to freeze the base for at least 24 hours. I know, waiting is the hardest part. But this long freeze time is crucial for the Ninja Creami to work its magic. A fully frozen block is what allows the machine to shave the mixture into a creamy texture instead of just blending it.
Step 3: First Spin
After the long wait, it is time for the fun part. Take the pint out of the freezer. Remove the lid and place the pint into the outer bowl of the Ninja Creami. Secure the outer bowl lid with the paddle attached. Lock it into the machine and select the Lite Ice Cream setting. The machine will be loud, but that is normal. It is working hard.
After the cycle finishes, check the texture. Sometimes, especially with protein bases, the result can look a bit dry or powdery. If this happens, do not panic. It is an easy fix. Simply add about two tablespoons of heavy cream or almond milk to the pint. Then, put it back in the machine and run the Re Spin cycle. This usually solves the problem and gives you a smooth, scoopable texture.
This is a common step for many Protein Ice Cream Ninja Creami Recipes. The extra liquid helps the mixture come together beautifully.
Step 4: Add Mix Ins
Now that your ice cream base is creamy, it is time to add the goodies. Use a spoon to create a small well in the center of the ice cream, about an inch or so wide. This is where you will add your chopped almonds and sugar free mini marshmallows. Try to get them down into the well you created.
Place the pint back into the outer bowl and lock it into the machine again. This time, select the Mix In cycle. This cycle is much shorter and is designed to gently fold your additions into the ice cream without completely pulverizing them. We want to keep those nice textures from the nuts and marshmallows.
Step 5: Serve
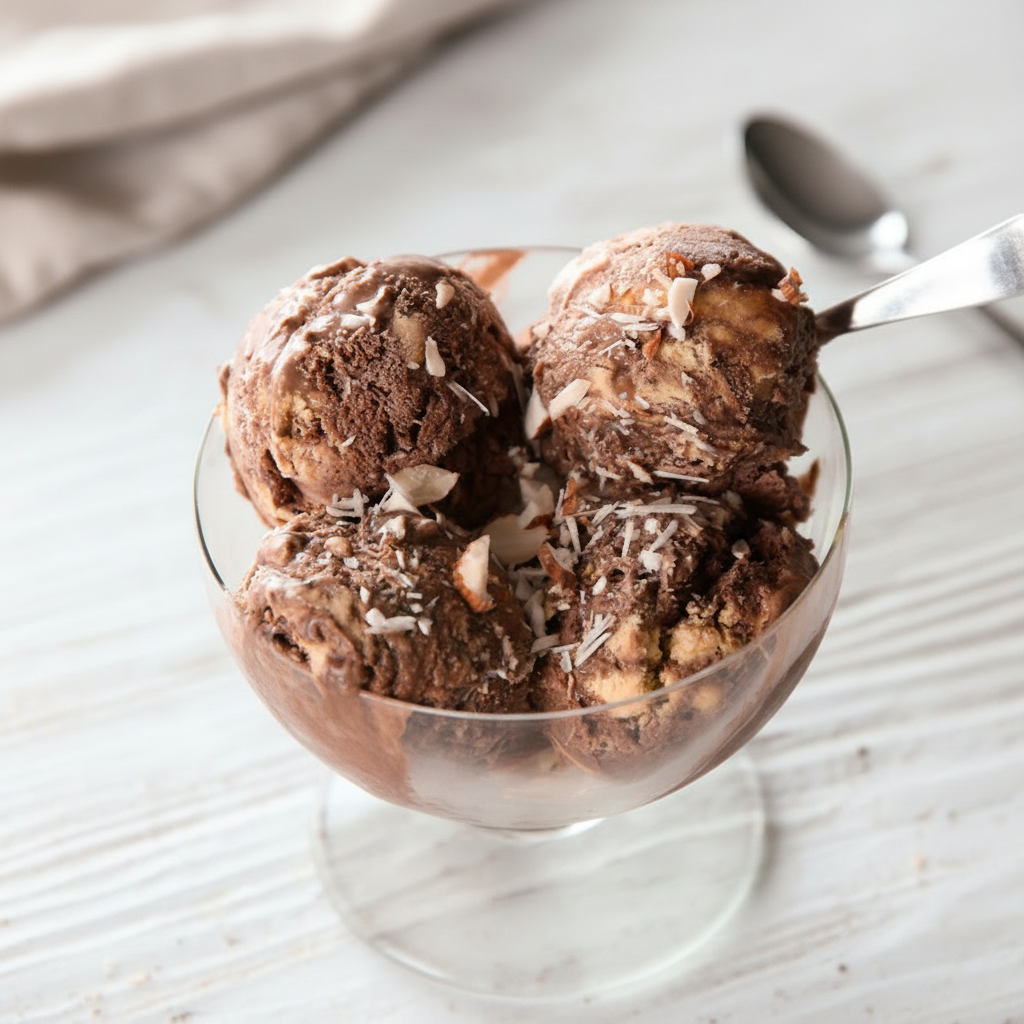
And that’s it! Once the Mix In cycle is done, your high protein rocky road ice cream is ready to enjoy. You can scoop it directly from the pint into bowls. For a little extra flair, you can top it with a few more mini marshmallows and a sprinkle of chopped almonds. Serve it immediately for the best creamy texture.


How To Store Leftovers
If you happen to have any leftovers, storing them is easy. Just smooth the top of the ice cream in the pint container as flat as you can. Place the original lid back on securely and pop it back into the freezer. It is as simple as that. The pint containers are designed for both freezing and storing.
When you are ready for another serving, you will likely find that the ice cream has frozen very hard again. This is normal for low sugar, high protein recipes. You will probably need to process it in the Ninja Creami again to restore its creamy texture. Just run it on the Lite Ice Cream or Re Spin cycle, and it should be good as new. Avoid microwaving the pint to soften it, as this can damage the container and create an uneven texture.
Tips
Want to make your Ninja Creami Protein Powder Ice Cream even better? Here are a few tips and tricks I have learned along the way. These small adjustments can make a big difference in the final product and let you get creative in the kitchen. These ideas can help you find your personal best Ninja Creami recipes.
First, experiment with different protein powders. The type and brand of protein powder can significantly impact both the flavor and texture of your ice cream. Some powders are sweeter, while others have a more subtle taste. A whey casein blend often yields the creamiest results due to how it freezes.
Do not be afraid to try other flavors. While this recipe uses chocolate, you could easily make a vanilla version by using vanilla protein powder and vanilla pudding mix. From there, the mix in possibilities are endless. Think berries, peanut butter cups, or cookie crumbles. This base is a blank canvas for your creativity.
For an even richer flavor, you can add a tablespoon of unsweetened cocoa powder to the base along with the chocolate protein powder. This will intensify the chocolate taste for all the true chocolate lovers out there. A tiny pinch of salt can also enhance the sweetness and overall flavor profile.
If you want a quicker option, consider using a premade protein shake. A Ninja Creami Fairlife Protein Ice Cream is a very popular choice. You can simply pour a Fairlife chocolate protein shake into the pint and freeze it. This eliminates the blending step and gives you a consistently creamy base. It’s a great shortcut for busy days.
Finally, always make sure your freezer is set to a very cold temperature. The colder the freezer, the faster and more solidly the base will freeze. This solid block is exactly what the Ninja Creami needs to do its job properly. A well frozen base is the key to avoiding a soupy or icy result after the first spin.
Conclusion
So there you have it, a simple and delicious way to make high protein ice cream at home. This recipe proves that you do not have to choose between a satisfying dessert and your health goals. With the Ninja Creami, you can create treats that are both flavorful and nutritious, right in your own kitchen. It’s a wonderful tool for anyone looking to enjoy healthier versions of their favorite foods.
I really hope you give these Protein Ice Cream Ninja Creami Recipes a try. It is a fun and rewarding process, and the result is a dessert that you can feel great about eating. Whether you are a fitness enthusiast or just someone who loves ice cream, this recipe is sure to become a new favorite. Enjoy every creamy, chocolatey, protein packed spoonful.
FAQ
Can I Use A Different Kind Of Milk?
Absolutely. While I used almond milk, you can substitute it with almost any other milk, dairy or non dairy. Cashew milk, soy milk, oat milk, or regular 2% or whole milk will all work well. Just keep in mind that the type of milk you use might slightly change the nutritional information and the final creaminess of the ice cream.
Why Is My Ice Cream Powdery After The First Spin?
A powdery or crumbly texture is very common, especially for Ninja Creami ice cream recipes high protein low cal. These recipes have lower fat and sugar content, which can lead to a drier frozen block. The fix is simple: just add a tablespoon or two of your liquid base (like milk or cream) and use the Re Spin function. This will help it smooth out into a perfectly creamy texture.
How Can I Make This Even Lower In Calories?
To reduce the calories further, you can make a few substitutions. You can replace the heavy cream with more almond milk or a lower fat milk, but be aware this may result in a less creamy, more icy texture. Also, be mindful of your mix ins, as they can add up in calories quickly. Sticking to the base recipe itself will keep it lean.
Can I Use A Premade Protein Shake?
Yes, you definitely can. Using a premade shake is a fantastic shortcut. A popular option is the Ninja Creami Fairlife Protein Ice Cream. Just pour one 11.5 ounce Fairlife protein shake into the pint container, freeze it for 24 hours, and then process it on the Lite Ice Cream setting. It creates a wonderfully smooth and creamy base with no blending required.
Ninja Creami Protein Ice Cream
A rich and creamy chocolate protein ice cream made easily in the Ninja Creami. This simple recipe combines a smooth chocolate base with crunchy almonds and soft marshmallows for a satisfying, high-protein dessert.
Ingredients
Instructions
- In a blender, combine the heavy cream, almond milk, sugar free chocolate pudding mix, and chocolate protein powder. Blend for 30-60 seconds until completely smooth with no clumps.
- Pour the smooth base into a Ninja Creami pint container, making sure not to fill past the max fill line. Secure the lid.
- Place the pint on a flat surface in the freezer and freeze for at least 24 hours until solid.
- Once frozen, remove the pint from the freezer, place it in the outer bowl, and install it into the Ninja Creami machine. Select the ‘Lite Ice Cream’ setting to process.
- After the first spin, if the texture is powdery, add one or two tablespoons of almond milk or cream and process again using the ‘Re-Spin’ cycle.
- Create a small well in the center of the ice cream. Add the chopped almonds and sugar free mini marshmallows.
- Reinstall the pint into the machine and select the ‘Mix-In’ cycle to combine the ingredients.
- Serve immediately for the best creamy texture, topping with extra almonds or marshmallows if desired.
Notes
A whey-casein blend protein powder often yields the creamiest results.
For a quicker option, you can pour a pre-made protein shake (like Fairlife) directly into the pint and freeze it, skipping the blending step.
Ensure your freezer is set to a very cold temperature for a solid freeze, which is key to a creamy texture.
Nutrition
Calories
Sugar
Fat
Carbs