There is something truly special about the smell of fresh bread baking in the oven. It fills the whole house with a warm, comforting aroma that just feels like home. If you have a sourdough starter bubbling away on your counter, you are already halfway to creating that magic.
This recipe for Authentic Sourdough Dinner Rolls From Starter (Perfectly Chewy) is a fantastic way to use your starter. These rolls are soft, pillowy, and have that subtle tangy flavor that makes sourdough so good. They are wonderful for any dinner table.
Jump To:
Why You’ll Love This Recipe
First off, the flavor is just unmatched. The slow fermentation from the sourdough starter gives these rolls a complex, slightly tangy taste that you just don’t get from commercial yeast. It’s a depth of flavor that is so satisfying.
The texture is another huge win. We are talking a soft, fluffy interior with a beautifully chewy bite. They are sturdy enough for a small sandwich but tender enough to melt in your mouth with a bit of butter.
This is a great beginner friendly Sourdough Rolls Recipe. While sourdough can seem intimidating, this process is very straightforward. Using a stand mixer does most of the heavy lifting for you.
These rolls are also incredibly versatile. Serve them alongside a hearty soup, use them for sliders, or enjoy them for breakfast with jam. They are a welcome addition to any meal, any time of day.
And let’s be honest, there is a huge sense of accomplishment that comes with baking your own bread. Placing a basket of these warm, golden Sourdough Bread Rolls on the table is a moment of pure pride.
Ingredients
The ingredient list for these Sourdough Rolls From Starter is simple and wholesome. You probably have most of these items in your pantry already. Let’s take a look at what you will need.
- 1 cup (240 ml) whole milk or any plant based milk (like oat, almond, or soy milk)
- ½ cup (113 g) mature sourdough starter
- 6 tablespoons (85 g) butter or clarified butter (ghee), room temperature, plus more for greasing the pan
- 2 tablespoons (25 g) sugar
- 1½ teaspoons kosher salt
- 3 cups (360 g) all purpose flour
For the optional wash, which gives the rolls a beautiful shine:
- 1 large egg or 3 tablespoons plant based milk or melted butter or ghee
A quick word on the ingredients. Using whole milk adds a bit of richness, but a good quality plant based milk works just as well. Your sourdough starter should be active and bubbly. This means you should have fed it a few hours before you plan to mix your dough.
The butter should be at room temperature so it can incorporate into the dough smoothly. This helps create that wonderfully soft and tender crumb we are looking for. Don’t skip the salt, as it is crucial for flavor and for controlling the fermentation.
Step By Step Instructions
Ready to get baking? Follow these instructions closely, and you will be rewarded with the most amazing homemade dinner rolls. We will walk through it together, one step at a time.
Step 1: Warm The Milk
First, gently warm your milk. You can do this in a small saucepan over low heat or in the microwave. We are aiming for lukewarm, around 100°F or 38°C. It should feel warm to the touch, but not hot.
Heating it for about 30 seconds in the microwave is usually enough. If it’s still cool, give it another 15 seconds. This warmth helps give your sourdough starter a cozy environment to get active.
Step 2: Mix The Dough
Now for the fun part. In the bowl of your stand mixer, attach the dough hook. Add the warm milk, your bubbly sourdough starter, the softened butter, sugar, salt, and all purpose flour.
Turn the mixer on to a low speed and let it run for about a minute. The ingredients will come together into a shaggy, rough looking dough. This is exactly what you want to see at this stage.
Once it comes together, increase the speed to medium. Let the mixer knead the dough for about 7 to 10 minutes. This is a very important step, as it develops the gluten that gives the Sourdough Bread Rolls their structure and chew.
You will know the dough is ready when it becomes smooth and elastic. It should start to pull away from the sides of the bowl. It might still stick a little at the bottom, and that is perfectly okay.
Step 3: Bulk Fermentation
Bulk fermentation is just a fancy term for the first rise. Lightly oil a clean bowl and transfer your smooth dough into it. Cover the bowl with a clean cloth or plastic wrap.
Let the dough rise at room temperature for about 4 hours. You are looking for it to become noticeably puffy and airy. Unlike some recipes, it does not need to fully double in size. Sourdough rises a bit slower.
If after 4 hours the dough still seems dense, don’t worry. Just give it another 30 minutes to an hour. The temperature of your kitchen will affect how quickly it rises.
Step 4: Prepare The Pan
While your dough is rising, you can get your baking pan ready. You will need a 9 by 13 inch baking dish. Grease it generously with butter, ghee, or even olive oil. This will prevent the rolls from sticking.
Step 5: Shape The Rolls
Once the dough is puffy, turn it out onto a lightly floured or oiled work surface. Gently press it down to release some of the air. Then, divide the dough into 15 equal pieces. Using a kitchen scale helps make them uniform.
Take each piece of dough and shape it into a smooth, tight ball. You can do this by pulling the edges of the dough down and pinching them together at the bottom. This creates surface tension, which helps the rolls rise upwards.
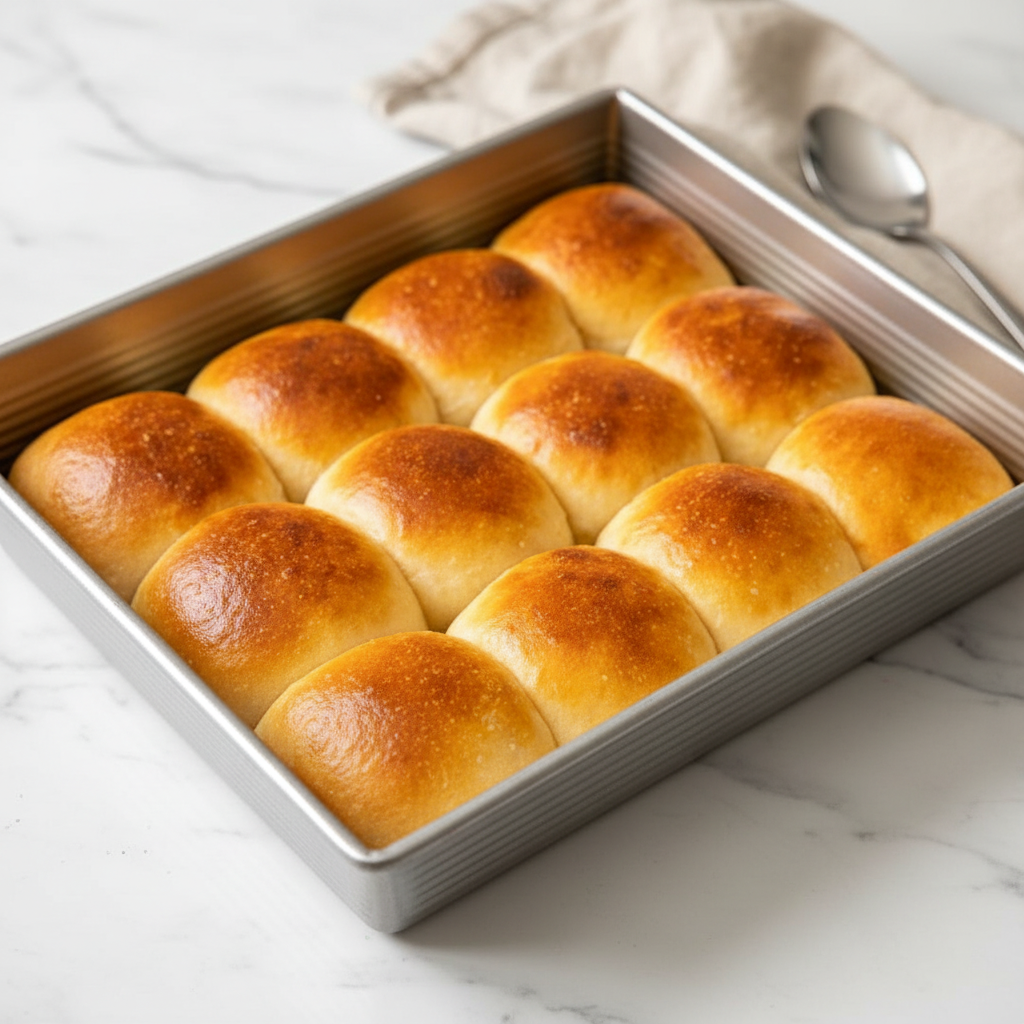
Arrange the shaped rolls evenly in your prepared baking dish. A 3 by 5 arrangement usually works best. If the dough is very sticky and hard to handle, pop it in the refrigerator for 30 minutes. Chilled dough is much easier to shape.
Step 6: The Final Proof
Once all the rolls are in the pan, they need a second rise, or a final proof. Cover the pan and let them sit at room temperature for another 1 to 2 hours. They should puff up again and start to touch each other.
Step 7: Bake To Golden Perfection
Preheat your oven to 375°F or 190°C. If you want that beautiful, shiny top, now is the time for the optional wash. Whisk the egg and gently brush it over the tops of the rolls. For a non egg option, use melted butter or plant based milk.
Place the pan in the preheated oven and bake for 20 to 25 minutes. The Authentic Sourdough Dinner Rolls From Starter (Perfectly Chewy) are done when they are a deep golden brown on top. Let them cool in the pan for a few minutes before serving.
How To Store Leftovers
If you happen to have any leftover rolls, storing them properly will keep them fresh. Let the rolls cool completely before you store them. Storing warm bread can create condensation and make them soggy.
For short term storage, place them in an airtight container or a zip top bag. They will stay soft at room temperature for up to 3 days. There is no need to refrigerate them, as that can actually make them go stale faster.
These Sourdough Rolls From Starter also freeze beautifully. Wrap them tightly in plastic wrap and then place them in a freezer safe bag. They can be frozen for up to 3 months. To reheat, let them thaw at room temperature or warm them gently in the oven.
Tips
Here are a few extra tips to make sure your Sourdough Rolls Recipe is a smashing success. First, make sure your sourdough starter is at its peak activity when you use it. A lively starter is key to a good rise.
Be patient with the fermentation process. Sourdough works on its own schedule, and rise times can vary based on the temperature of your kitchen. Watch for the visual cues, like puffy dough, rather than strictly following the clock.
For the most accurate measurements, especially for flour, use a kitchen scale. It really makes a difference in getting the consistency of the dough just right. Baking is a science, after all.
Feel free to get creative. You can add chopped herbs like rosemary or thyme to the dough for extra flavor. A cup of shredded cheddar cheese would also be a delicious addition. Just mix them in with the other ingredients.
When shaping the rolls, try to make them as uniform in size as possible. This ensures they all bake evenly. A kitchen scale is your best friend for this task.
Conclusion
Baking these Authentic Sourdough Dinner Rolls From Starter (Perfectly Chewy) is such a rewarding experience. From mixing the dough to pulling the golden, puffy rolls from the oven, every step is filled with simple joy.
This recipe proves that you don’t need to be a professional baker to create amazing bread at home. With a healthy starter and a little bit of patience, you can serve up these delicious rolls that will impress everyone at your table.
So go ahead, feed your starter, and get ready to bake. You are going to love the incredible flavor and texture of these homemade sourdough rolls.
FAQ
Can I Make These Rolls By Hand?
Yes, you absolutely can. It will require some elbow grease. After mixing the ingredients into a shaggy dough, turn it out onto a work surface and knead by hand for 10 to 15 minutes, until it’s smooth and elastic.
My Sourdough Starter Is Not Very Active. Can I Still Use It?
It is best to use a starter that is active and bubbly. A sluggish starter won’t have the power to lift the dough properly, which could result in dense rolls. I recommend feeding your starter 4 to 8 hours before you plan to mix the dough to ensure it’s at its peak.
Can I Prepare The Dough Ahead Of Time?
Yes. Sourdough is very flexible. After the bulk fermentation, you can place the covered bowl of dough in the refrigerator for up to 24 hours. This cold fermentation will develop even more flavor. Just let it sit at room temperature for an hour before shaping.
Why Are My Rolls Dense?
Dense rolls are usually caused by a few common issues. Your starter might not have been active enough, the dough may have been underproofed (not allowed to rise long enough), or it wasn’t kneaded sufficiently to develop the gluten structure.
Authentic Sourdough Dinner Rolls
A straightforward recipe for soft, chewy sourdough dinner rolls with a subtle tangy flavor. These homemade rolls are a comforting addition to any dinner table.
Ingredients
Instructions
- Gently warm the milk to a lukewarm temperature (around 100°F or 38°C).
- In the bowl of a stand mixer with the dough hook attached, combine the warm milk, sourdough starter, softened butter, sugar, salt, and all-purpose flour. Mix on low speed until a shaggy dough forms, then increase to medium and knead for 7-10 minutes until the dough is smooth and elastic.
- Transfer the dough to a lightly oiled bowl, cover it, and let it rise at room temperature for about 4 hours, or until noticeably puffy.
- Grease a 9×13 inch baking dish. Turn the dough out onto a lightly floured surface, gently press it down, and divide it into 15 equal pieces.
- Shape each piece into a smooth, tight ball and arrange them in the prepared baking dish. Cover the dish and let the rolls proof for another 1-2 hours, until they are puffy and touching each other.
- Preheat your oven to 375°F (190°C). For a shiny top, whisk the egg and gently brush it over the rolls. Bake for 20-25 minutes, until deep golden brown. Let cool in the pan for a few minutes before serving.
Notes
Ensure your sourdough starter is active and bubbly for the best rise. Feed it a few hours before starting.
A kitchen scale is recommended for accurate flour measurement to get the right dough consistency.
Store leftover rolls in an airtight container at room temperature for up to 3 days.
Nutrition
Calories
Sugar
Fat
Carbs


