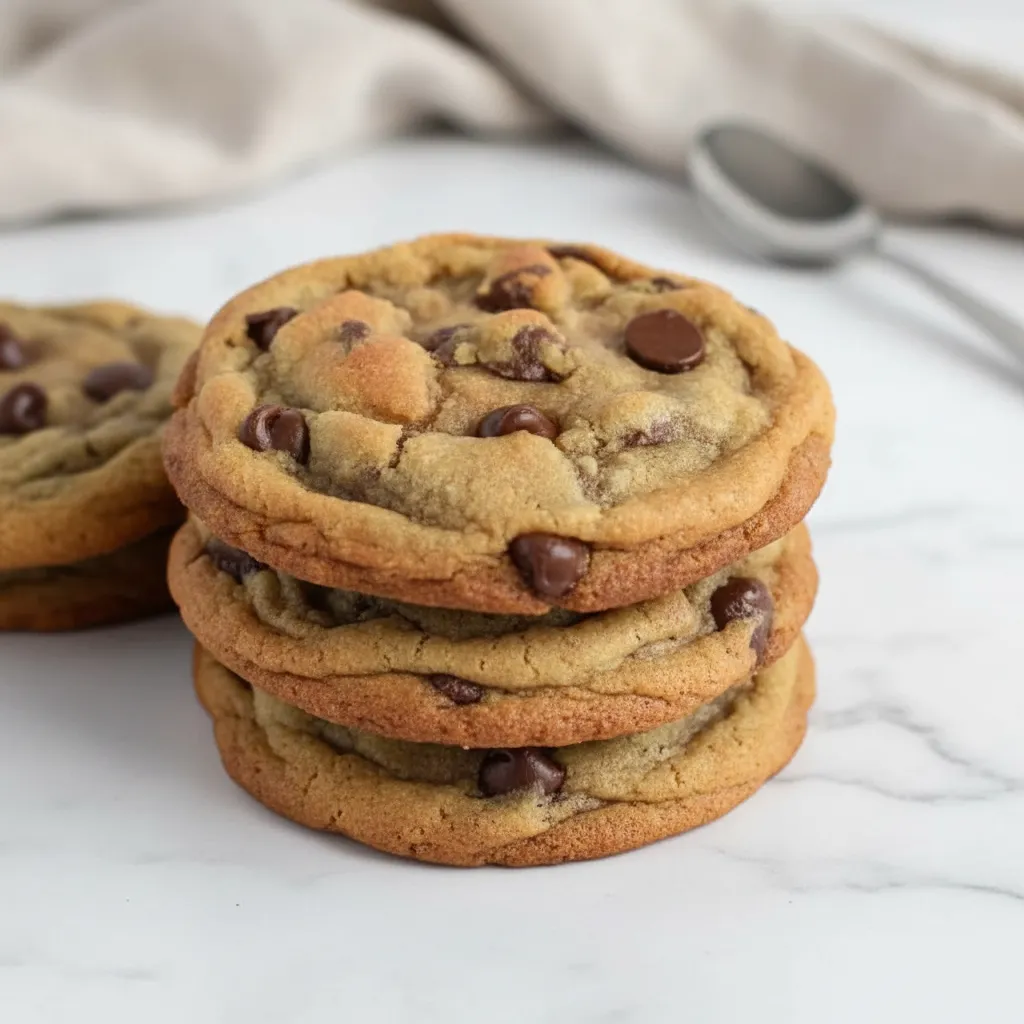
You know that feeling when a sudden craving hits? It is usually for something sweet, comforting, and familiar. Well, I have just the thing for you today. These Brown Butter Chocolate Chip Cookies are completely delicious. They take a classic treat and add a depth of flavor that is truly hard to beat.
There is something special about the aroma of butter browning on the stove. It fills the kitchen with a nutty and rich scent that promises something amazing is on the way. If you have never tried browning butter before, do not worry. It is actually quite simple to do.
This recipe transforms everyday ingredients into a bakery style dessert. You get that wonderful mix of a soft center and crispy edges. Plus, the deep toffee notes from the butter pair perfectly with the melted chocolate. It really is a treat that feels fancy but is easy to pull off at home.
Jump To:
Why You’ll Love This Recipe
First of all, the flavor profile here is incredible. Regular cookies are great, but Brown Butter Chocolate Chip Cookies are on another level. The browning process toasts the milk solids in the butter. This creates a savory and nutty undertone that balances the sugar beautifully.
You will also appreciate the texture. These are Soft Brown Butter Chocolate Chip Cookies through and through. They stay chewy for days if you store them right. No one likes a rock hard cookie, and this recipe ensures you get that tender bite every single time.
Another reason to love this recipe is how approachable it is. You do not need fancy equipment or hard to find ingredients. If you have a saucepan, a mixing bowl, and an oven, you are pretty much set. It is a fantastic baking project for beginners who want to try something new.
These cookies are also very customizable. You can swap out the chocolate chips for chunks or even add nuts if you like extra crunch. It is a versatile base that welcomes creativity. You can really make them your own.
Finally, this is a budget friendly option for a high quality dessert. You are using standard pantry staples like flour, sugar, and eggs. The magic comes from technique rather than expensive add ins. It proves that you can make top tier treats without spending a fortune.
Ingredients
Here is what you need to make these Easy Brown Butter Chocolate Chip Cookies. The list is simple, but each ingredient plays a big role in the final result.
- 1 ¼ cup butter (280 grams)
- ¾ cup granulated sugar (150 grams)
- 1 cup firmly packed brown sugar (200 grams)
- 2 large eggs
- 1 teaspoon vanilla extract
- 2 ¾ cups flour (357 grams)
- ½ teaspoon salt (see notes below on butter type)
- 2 teaspoons baking soda
- 2 to 2 ½ cups semisweet chocolate chips (360 to 480 grams)
Let’s talk about the butter for a second. You will use quite a bit here because some volume is lost during the browning process. The water content evaporates, leaving you with pure golden fat and toasted milk solids. This is why we start with 1 ¼ cups.
For the sugars, the combination of brown and white sugar is crucial. Brown sugar adds moisture and that caramel flavor we all love. White sugar helps the edges crisp up just enough. Packing the brown sugar ensures you get the right amount for that chewy texture.
When it comes to flour, measuring correctly is key. If you scoop directly from the bag, you might pack it down and end up with dry cookies. It is best to spoon the flour into your cup and level it off. Or better yet, use a kitchen scale if you have one.
Chocolate choice matters too. Semisweet chips are the classic choice because they are not too sweet. However, you can use milk chocolate if you have a serious sweet tooth. Some people even like to chop up a bar of chocolate for irregular pools of melted goodness.
Step-By-Step Instructions
Making Brown Butter Chocolate Chip Cookies Soft and delicious is all about following the steps. Do not rush the cooling process for the butter. That is the secret to success.
Step 1: Brown the Butter
Grab a medium to large saucepan. Place your 1 ¼ cups of butter inside and set the heat to medium high. You need to stay right there at the stove. Do not walk away.
Stir the butter constantly as it melts. It will start to foam up and sizzle. This is normal. Keep stirring. You are waiting for the milk solids to turn a deep honey color. You will smell a nutty aroma when it is ready. Once you see those brown bits at the bottom, remove it from the heat immediately so it does not burn.
Step 2: Cool the Butter
Pour the hot butter into your mixing bowl. Make sure you scrape all those tasty toasted bits from the pan into the bowl. They hold all the flavor.
Now, you must let the butter cool. Place the bowl in the fridge or freezer. You want the butter to return to a solid room temperature consistency. This is critical. If you use liquid butter, your cookies will spread too much and end up flat.
Step 3: Preheat and Prep
While the butter is cooling, get your oven ready. Preheat it to 375 degrees Fahrenheit. Prepare your baking sheets by greasing them with cooking spray or lining them with parchment paper or silicone mats.
Step 4: Cream the Butter and Sugars
Check your butter. Is it solidified but soft? Good. Add the ¾ cup of granulated sugar and 1 cup of brown sugar to the bowl.
Cream the mixture together for about 1 minute. You can use a hand mixer or a stand mixer for this. Then, add the 2 large eggs and 1 teaspoon of vanilla. Mix for another 2 to 3 minutes. You want the batter to look pale and fluffy.
Step 5: Add Dry Ingredients
It is time for the dry ingredients. Add the 2 ¾ cups of flour, 2 teaspoons of baking soda, and ½ teaspoon of salt. Mix these in until they are just barely combined.
Be careful here. Over mixing the dough can lead to tough cookies. You want to stop mixing as soon as the white streaks of flour disappear.
Step 6: Fold in Chocolate
Pour in your 2 to 2 ½ cups of semisweet chocolate chips. Use a spatula or wooden spoon to gently fold them into the dough. Distribute them evenly so every cookie gets plenty of chocolate.
Step 7: Scoop and Bake
Take about ¼ cup of dough (roughly 68 grams) for each cookie. Shape them into round balls. Place them on your prepared baking sheets, leaving some space for spreading.
Bake the cookies for 8 to 10 minutes at 375 degrees Fahrenheit. You are looking for the tops and edges to be just golden brown. The centers might still look slightly soft, which is fine. They will set as they cool.
Step 8: Cool and Serve
Let the cookies sit on the baking sheet for 2 to 3 minutes after taking them out of the oven. This helps them firm up so they do not break when you move them.
Transfer them to a wire cooling rack to finish cooling. Or, if you are like me, enjoy one while it is still warm and gooey.


How To Store Leftovers
If you somehow manage to have leftovers of these Brown Butter Chocolate Chip Cookies, you are in luck. They store very well. To keep them fresh, place them in an airtight container at room temperature.
They will stay soft and tasty for about 3 to 4 days. If you want to keep them longer, you can add a slice of white bread to the container. The cookies will absorb moisture from the bread and stay soft longer.
You can also freeze the baked cookies. Let them cool completely first. Stack them in a freezer safe bag or container. They will last for up to 3 months frozen. Just let them thaw on the counter for a an hour before eating.
Another great option is freezing the dough balls. Follow the recipe up until the baking step. Scoop the balls and freeze them on a tray. Once solid, move them to a bag. You can bake them straight from frozen, just add an extra minute or two to the bake time.
Tips
Making Brown Butter Chocolate Chip Cookies is easy, but a few tips can ensure they turn out amazing every time. The most important thing is the butter temperature. I cannot stress this enough. If your browned butter is warm or liquid, the dough will be greasy and the cookies will spread into thin puddles.
Be patient and let that butter solidify in the fridge. It acts just like softened butter in a standard recipe once it cools down.
Watch the browning process closely. Butter can go from perfect to burnt in a matter of seconds. Use a light colored pan if you have one. It makes it much easier to see the color change compared to a dark nonstick pan.
Regarding the salt. The recipe calls for ½ teaspoon of salt. This assumes you are using salted butter. If you only have unsalted butter on hand, you should increase the added salt to ¾ teaspoon. The salt is vital for balancing the sweetness and popping that chocolate flavor.
Do not over bake these. They might look a little underdone in the center when you pull them out. That is actually what you want. The residual heat on the baking pan will finish cooking them gently. This keeps them soft.
Finally, measure your flour by weight if possible. 357 grams is the sweet spot. If you use a cup, fluff the flour up, spoon it in, and level it. Heavy dough leads to cakey cookies, and we want chewy ones.
Conclusion
These Brown Butter Chocolate Chip Cookies are truly a joy to bake and eat. The extra step of browning the butter pays off with a flavor that is deep, complex, and comforting. It is a simple way to make a standard dessert feel special.
Whether you are making them for a family movie night, a holiday party, or just because it is Tuesday, they are sure to be a hit. The combination of soft centers, melted chocolate, and that signature nutty butter taste is delightful.
Give this recipe a try this week. Grab your ingredients, take your time with the butter, and enjoy the process. I bet these will become a new favorite in your house very quickly.
FAQ
Why did my cookies turn out flat?
The most common reason for flat cookies in this recipe is the butter. If you used the brown butter while it was still melted or too warm, the dough structure cannot hold up in the oven. Make sure to cool the butter until it is solid again before creaming it with the sugar.
Can I make this recipe gluten free?
Yes, you can usually swap the regular flour for a high quality gluten free 1 to 1 baking flour blend. Measure it by weight (357 grams) for the best results. The texture might change slightly, but the flavor will still be great.
Do I really need to chill the dough?
This recipe does not explicitly require chilling the final dough if you have cooled your butter properly first. However, if your kitchen is very hot or your dough feels sticky, chilling the dough balls for 30 minutes before baking can help them hold their shape better.
Can I use dark chocolate instead?
Absolutely. If you prefer a less sweet cookie, dark chocolate is a wonderful option. The bitterness of dark chocolate pairs really well with the caramel notes of the brown butter and brown sugar.
Ninja Creami Chocolate Protein Ice Cream
Craft a delightful and healthy treat with this Ninja Creami Chocolate Protein Ice Cream recipe. It’s designed for ease, using simple ingredients to create a creamy, protein-packed dessert perfect for any time.
Requirements


Ingredients
Instructions
- In a Ninja Creami pint, combine the protein shake, protein powder, cocoa powder, sweetener, and salt. Add optional guar gum or pudding mix for extra creaminess.
- Mix with a frother or whisk until the base is completely smooth with no clumps.
- Secure the lid and freeze on a level surface for at least 24 hours until solid.
- Place the frozen pint into the machine and process using the ‘Lite Ice Cream’ setting.
- If the texture is crumbly, add a tablespoon of milk or shake and use the ‘Re-Spin’ function.
- If desired, create a well in the center, add mix-ins, and use the ‘Mix-In’ function to combine. Enjoy immediately!
Notes
Taste the base before freezing and adjust sweetener if needed. Frozen desserts tastes less sweet, so aim for slightly sweeter than you prefer.
Do not fill the pint past the max fill line, as the mixture will expand during freezing and processing.
A full 24-hour freeze is essential for the best, creamiest texture. Rushing this step can result in an icy or soupy consistency.
Feel free to experiment with other flavors like vanilla protein with frozen berries or adding mint extract for a mint-chip version.
Nutrition
Calories
Sugar
Fat
Carbs