Turning eighteen is a massive milestone. It marks the official crossover into adulthood and the start of a whole new chapter. Naturally, such a big occasion calls for a dessert that feels just as special. If you have been looking for the right recipe to mark the day, this 18Th Birthday Cake is exactly what you need.
Planning a party can feel overwhelming with so many details to manage. You want the food to be great and the vibes to be right. Finding Birthday Cake Ideas that strike the balance between sophisticated and fun can be tricky. This cake does both effortlessly. It combines the nostalgia of a classic birthday cake with a grown up look that fits any party theme.
Many people search for Bday Cakes Aesthetic on social media, hoping to find something that looks beautiful in photos. This recipe delivers that visual appeal without requiring professional skills. You get distinct layers of chocolate and vanilla, all covered in a rich, creamy frosting. It is a showstopper that tastes like it came from a high end bakery.
Whether you are baking this for a friend, a family member, or even yourself, the process is straightforward. You do not need fancy equipment or hard to find ingredients. This 18Th Birthday Cake proves that you can make something memorable right in your own kitchen.
Jump To:
Why You’ll Love This Recipe
There is a lot to love about this recipe. First, it solves the age old debate of chocolate versus vanilla. By including layers of both, everyone gets what they want. The vanilla layers are tender and aromatic, while the chocolate layers are deep and fudgy. It is a crowd pleaser in every sense.
Texture is everything in a cake. Thanks to the addition of Greek yogurt and buttermilk, this 18Th Birthday Cake stays incredibly moist for days. You will not have to worry about serving dry, crumbly slices to your guests. Every bite is soft and melts in your mouth.
Another reason this recipe works so well is its versatility. While it is one of the best Birthday Cakes For Women turning eighteen, it works for any gender or theme. The frosting is easy to manipulate, so you can swirl it for a rustic look or smooth it out for a clean finish.
Finally, this recipe is forgiving. If you are new to baking layer cakes, this is a great place to start. The batter is sturdy enough to handle, and the frosting covers any minor imperfections. You get a professional result without the stress.
Ingredients
To make this delicious 18Th Birthday Cake, you will need standard pantry staples. Make sure your cold ingredients are brought to room temperature before you start.
For The Cake
- 3 cups all purpose flour
- 1 1/2 teaspoons baking powder
- 1 teaspoon baking soda
- 1 1/2 teaspoons kosher salt
- 3 sticks (1 1/2 cups) unsalted butter, at room temperature
- 2 cups granulated sugar
- 4 large eggs
- 1/4 cup greek yogurt
- 1 1/2 cups whole milk or buttermilk
- 1 tablespoon vanilla extract
- 3/4 cup cocoa powder
- 1/4 cup hot black coffee
For The Frosting
- 4 sticks (2 cups) salted butter, softened to room temperature
- 4 cups powdered sugar
- 1 tablespoon vanilla extract
- 1/2 cup unsweetened cocoa powder
- 1/4 cup heavy cream
Step-By-Step Instructions
Follow these steps closely to ensure your 18Th Birthday Cake turns out tall, fluffy, and delicious. Take your time with the mixing process.
Step 1: Prepare The Oven And Pans
Start by preheating your oven to 350° F. This temperature ensures an even bake. While the oven heats up, prepare your baking pans. You will need three 8 inch round cake pans. Grease them generously with butter. Then, line the bottom of each pan with parchment paper. This step is crucial so your cakes release easily later.
Step 2: Mix Dry Ingredients
Grab a medium size bowl. Combine the all purpose flour, baking powder, baking soda, and kosher salt. Whisk these together gently. This helps aerate the flour and ensures the leavening agents are distributed evenly throughout the batter. Set this bowl aside for a moment.
Step 3: Cream Butter And Add Wet Ingredients
In the bowl of a stand mixer, place your room temperature butter and granulated sugar. If you do not have a stand mixer, a hand held mixer works fine too. Beat the butter and sugar together until the mixture looks light and fluffy. This usually takes about 3 to 5 minutes.
Turn the mixer to low speed. Add the eggs one at a time. Wait until each egg is fully incorporated before adding the next one. Once the eggs are in, add the greek yogurt and vanilla extract. Beat until everything is combined and smooth.
Now, keep the mixer on low. Slowly add the dry ingredients mixture to the wet ingredients. Do this in parts, alternating with the buttermilk. Start with flour, then milk, then flour again. Continue this until you end with flour. Mix only until just combined to keep the cake tender.
Step 4: Separate The Vanilla Batter
You are making a two tone 18Th Birthday Cake, so you need to divide the batter. Remove about one third of the batter, which is roughly 3 cups. Spread this plain vanilla batter into one of your prepared cake pans. Smooth the top with a spatula and set it aside.
Step 5: Create The Chocolate Batter
Take the remaining batter still in the mixer bowl. Add the cocoa powder and the hot black coffee. Beat this mixture gently until the cocoa is fully blended and the batter turns a rich chocolate color. The hot coffee helps bloom the cocoa, making the chocolate flavor deeper.
Divide this chocolate batter evenly between the two remaining cake pans. You should now have one pan of vanilla batter and two pans of chocolate batter. Place all three pans in the oven.
Step 6: Bake And Cool
Bake the cakes for 25 to 30 minutes. You will know they are done when the tops are set and no longer wiggly in the center. You can also insert a toothpick; if it comes out clean, they are ready. Remove the pans from the oven and let them cool on a rack for five minutes. Then, run a knife around the edges and flip the cakes out onto the cooling rack. Let them cool completely before you start frosting.
Step 7: Make The Base Frosting
While the cakes cool, prepare the frosting. Clean your mixer bowl. Add the softened salted butter and powdered sugar. Beat this mixture for about 4 minutes until it is very light and fluffy. Add the vanilla extract and beat until combined.
At this point, remove 1 cup of this plain vanilla frosting and set it aside in a small bowl. You will use this for the filling later.
Step 8: Make Chocolate Frosting And Assemble
To the remaining frosting in the mixer, add the cocoa powder and heavy cream. Whip this for another 2 to 4 minutes until it is light, fluffy, and spreadable. Now you are ready to build the 18Th Birthday Cake.
Place one chocolate cake layer on your serving plate or cake stand. Spread a layer of the chocolate frosting over the top. Next, place the vanilla cake layer on top of that. Spread the reserved vanilla frosting over this layer. Finally, add the second chocolate cake layer on top.
Use the remaining chocolate frosting to cover the top and sides of the entire cake. You can smooth it out or create swirls with the back of a spoon. Slice and serve to your happy guests.


How To Store Leftovers
After the party is over, you might have some slices of this 18Th Birthday Cake left. Storing it properly ensures it stays fresh for late night snacking.
If you plan to eat the leftovers within two days, you can store the cake at room temperature. Use a cake keeper or cover the cut sections with plastic wrap to prevent them from drying out. The high sugar and fat content keeps it safe on the counter for a short time.
For longer storage, the refrigerator is your best bet. Place the cake in an airtight container or wrap slices individually in plastic wrap. It will stay fresh in the fridge for up to five days. When you are ready to eat it, let the slice sit on the counter for about 20 minutes. Cold cake can taste muted, so letting it warm up brings back the full flavor.
You can also freeze this cake. Wrap individual slices tightly in plastic wrap and then in aluminum foil. They can be frozen for up to two months. Thaw them in the fridge overnight before enjoying.
Tips
Making a bakery quality 18Th Birthday Cake is easier when you know a few secrets. These tips will help you avoid common mistakes and ensure your cake is the highlight of the party.
First, room temperature ingredients are non negotiable. When your butter, eggs, and milk are all at the same temperature, they emulsify much better. This creates a smooth batter that rises evenly in the oven. If your butter is too cold, you will get lumps. If it is melted, the cake will be greasy.
Do not skip the hot coffee in the chocolate batter. Some people worry their cake will taste like a morning brew, but it will not. Coffee enhances the cocoa flavor, making the chocolate taste more intense and rich. It acts like a flavor booster rather than a distinct ingredient.
When measuring flour, try to use a spoon to scoop it into your measuring cup and then level it off. Dipping the cup directly into the flour bag packs it down, which can lead to a dry, dense cake. Light and fluffy layers depend on accurate measuring.
Allow the cakes to cool completely before assembling. This is the most common mistake people make. If the cake is even slightly warm, the butter in the frosting will melt, causing the layers to slide around. Patience is key here.
If you want to achieve those trendy Bday Cakes Aesthetic vibes, try using an offset spatula for frosting. It gives you better control than a regular knife. You can create smooth sides or rustic swirls with ease.
Conclusion
Celebrating an eighteenth birthday is a big deal, and having the right dessert makes it even better. This 18Th Birthday Cake offers everything you want in a celebratory treat. It is visually stunning with its contrasting layers and incredibly flavorful with its mix of chocolate and vanilla.
Whether you are looking for Birthday Cake Ideas for a large gathering or a small family dinner, this recipe fits the bill. It is simple enough for home bakers but impressive enough to look professional. The combination of moist sponge and creamy frosting is a winner every time.
So, gather your ingredients and get baking. There is no better way to welcome adulthood than with a slice of homemade cake made with love. Enjoy the process and the delicious results!
FAQ
Here are some common questions about making this 18Th Birthday Cake to help you get the best results.
Can I Make This Cake Ahead Of Time?
Yes, you can. You can bake the cake layers a day in advance. Wrap them tightly in plastic wrap once they are cool and store them at room temperature. You can also make the frosting ahead of time and store it in the fridge; just let it come to room temperature and re-whip it before using.
What If I Do Not Have Buttermilk?
If you are out of buttermilk, you can make a simple substitute. Add one tablespoon of lemon juice or white vinegar to a measuring cup, then fill it to the 1 cup line with whole milk. Let it sit for 5 minutes until it curdles slightly. This mimics the acidity of buttermilk nicely.
Can I Use Decaf Coffee?
Absolutely. The caffeine content does not affect the chemistry of the cake. You can use decaf coffee or even hot water mixed with a teaspoon of instant espresso powder. The goal is simply to use a hot liquid to bloom the cocoa.
Is This Recipe Suitable For Beginners?
Yes, this is one of the more approachable Birthday Cakes For Women or men to make at home. The instructions are straightforward, and the batter is very forgiving. Just follow the steps one by one, and you will have a great result.
Can I Make This Gluten Free?
You can swap the all purpose flour for a high quality gluten free 1 to 1 baking flour blend. Make sure the blend contains xanthan gum for structure. The texture might be slightly different, but it will still be delicious.
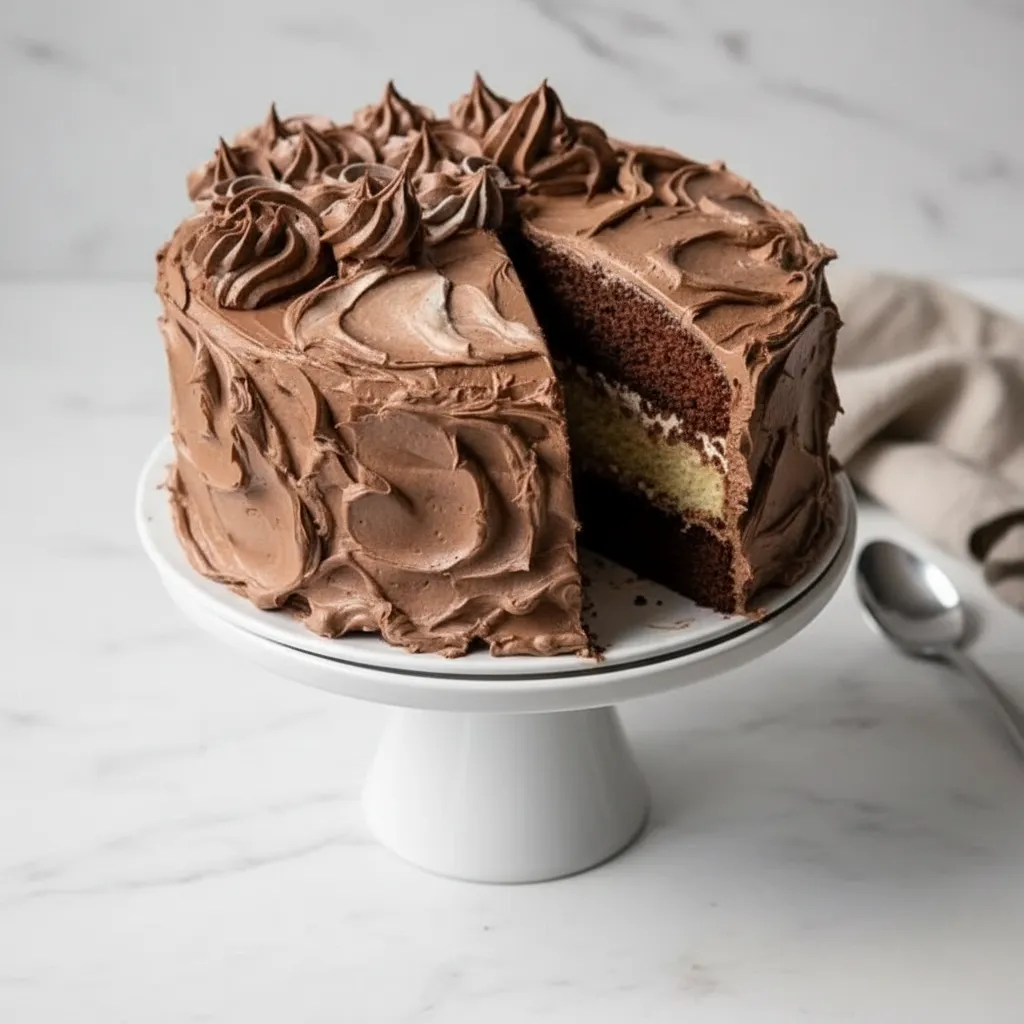
18th Birthday Cake
This stunning two-layer 18th Birthday Cake combines moist chocolate and tender vanilla sponge with rich, creamy frosting. Easy to make yet impressive, it’s the ideal centerpiece for any celebration, delivering bakery-quality taste and an appealing aesthetic right from your kitchen.
Requirements


Ingredients
Instructions
- Preheat your oven to 350° F. Grease three 8-inch round cake pans generously with butter and line the bottom of each with parchment paper.
- In a medium size bowl, whisk together the all purpose flour, baking powder, baking soda, and kosher salt. Set aside.
- In the bowl of a stand mixer, beat the room temperature unsalted butter and granulated sugar until light and fluffy (3-5 minutes). Add eggs one at a time, then Greek yogurt and vanilla extract, beating until smooth.
- With the mixer on low, slowly add the dry ingredients mixture alternately with the buttermilk, starting and ending with flour. Mix until just combined.
- Remove about one third (roughly 3 cups) of the vanilla batter and spread it into one prepared cake pan. Smooth the top.
- To the remaining batter in the mixer, add cocoa powder and hot black coffee. Beat gently until cocoa is fully blended and the batter is a rich chocolate color.
- Divide the chocolate batter evenly between the two remaining cake pans. Place all three pans in the oven and bake for 25 to 30 minutes, or until a toothpick comes out clean.
- Cool cakes on a rack for 5 minutes, then run a knife around the edges and flip them out onto the cooling rack to cool completely.
- For frosting, clean the mixer bowl. Beat softened salted butter and powdered sugar for about 4 minutes until very light and fluffy. Add vanilla extract and beat until combined.
- Remove 1 cup of plain vanilla frosting and set aside.
- To the remaining frosting in the mixer, add cocoa powder and heavy cream. Whip for 2-4 minutes until light, fluffy, and spreadable.
- Assemble: Place one chocolate cake layer on a serving plate. Spread a layer of chocolate frosting. Add the vanilla cake layer and spread the reserved vanilla frosting. Top with the second chocolate cake layer.
- Use the remaining chocolate frosting to cover the top and sides of the entire cake. Slice and serve.
Notes
After the party, store any leftover slices at room temperature for up to two days in a cake keeper or covered with plastic wrap.
For longer storage, refrigerate in an airtight container for up to five days. Let slices warm up for 20 minutes before serving.
Individual slices can be wrapped in plastic wrap and aluminum foil and frozen for up to two months. Thaw overnight in the fridge.
Ensure all cold ingredients are at room temperature for better emulsification and an even rise.
Hot coffee enhances cocoa flavor; it will not make the cake taste like coffee.
Measure flour by spooning it into the measuring cup and leveling it off to avoid a dense cake.
Cool cakes completely before frosting to prevent melting and sliding.
Use an offset spatula for easy frosting application and a professional finish.
Nutrition
Calories
Sugar
Fat
Carbs