Mother’s Day is just around the corner, and you know what that means? It’s time to celebrate the amazing moms in our lives! While store-bought gifts are nice, nothing says “I love you” quite like a homemade treat.
This year, let’s ditch the bakery aisle and whip up something truly special. We’re talking about a beautiful, delicious Mother’s Day cake that’s not only impressive but totally doable, even if you’re new to baking. Get ready to impress your mom with a cake that’s made with love, straight from your own kitchen.
Jump To:
Why You’ll Love This Recipe
This isn’t just any cake recipe; it’s your new go-to for showing appreciation. It’s designed for home bakers, focusing on flavor and that charming, personalized touch that makes a gift truly memorable. Plus, it’s a fantastic way to create a beautiful aesthetic birthday cake for mom.
Imagine presenting your mom with a cake that looks like it came from a trendy bakery but was made by you. That’s the magic we’re going for here! It’s a cake for mum that feels extra special because of the effort and love poured into it.
Ingredients
Vanilla Sponge
- 2 large eggs, room temperature
- 1/3 cup (65g) granulated sugar
- 1/2 tsp vanilla extract
- 1/2 cup (60g) cake flour (or all-purpose flour sifted with 1 tsp cornstarch)
- 2 tbsp (30ml) milk, warm
- 1 tbsp (15g) unsalted butter, melted and cooled
- Pinch of salt
Whipped Cream Cheese Frosting
- 8 oz (225g) block cream cheese, cold
- 1/2 cup (60g) powdered sugar, sifted
- 1 cup (240ml) heavy whipping cream, cold
- 1 tsp vanilla extract
- Gel food coloring (Red, Pink, Moss Green)
Assembly & Decoration
- 2-3 tbsp fruit jam (strawberry or raspberry) for filling
- Simple syrup (1 tbsp sugar dissolved in 1 tbsp hot water)
Step-By-Step Instructions
Prepare the Cake Pans
First things first, let’s get that oven ready. Preheat it to 325 degrees Fahrenheit (160 degrees Celsius). Grab two 4-inch round cake pans or one 6-inch pan. Grease them well and line the bottoms with parchment paper. This makes sure your cake comes out cleanly.
Create the Cake Batter Base
In a big heatproof bowl, whisk together your eggs and sugar. Set up a double boiler by placing this bowl over a pot of simmering water. Keep whisking until all that sugar is dissolved and the mixture feels warm to your touch.
Now, take the bowl off the heat. Grab your electric hand mixer and beat that egg mixture on high speed. You’ll want to whip it for about 5 to 8 minutes. It should become super pale, thick, and triple in volume. This is called the ribbon stage, and it’s key for a fluffy cake.
Gently whisk in your vanilla extract and that pinch of salt. Don’t go too wild; we want to keep that airiness.
Incorporate Dry and Wet Ingredients
Time for the flour! Sift it into your egg mixture in two separate additions. After each addition, use a spatula to gently fold it in. Be really careful not to knock out all the air you just whipped in.
In a small bowl, combine the warm milk and the melted, cooled butter. Take a small scoop of your cake batter and mix it into the milk and butter until it’s smooth. Then, gently fold this back into your main batter. Just mix until it’s barely combined.
Bake and Cool the Cakes
Divide your batter evenly between the prepared pans. Pop them into the preheated oven. Bake for about 18 to 22 minutes. You’ll know they’re done when a toothpick inserted into the center comes out clean.
Once they’re out of the oven, give the pans a little drop onto the counter from about 3 inches high. This neat trick helps prevent the cakes from shrinking too much. Let them cool completely on a wire rack before you even think about frosting them.
Whip Up the Frosting
While the cakes are doing their thing cooling down, let’s make that dreamy frosting. Get your cold cream cheese and sifted powdered sugar into a bowl. Beat them together until they’re super smooth and creamy. This usually takes about 2 minutes.
Now, pour in the cold heavy whipping cream slowly while your mixer is on low. Once it’s all in, crank the speed up to medium-high. Whip it until you see stiff peaks forming. Keep an eye on it; if you overbeat, it can curdle, and nobody wants that!
Stir in the vanilla extract. If you’re planning on coloring portions of your frosting, do that now. Divide the frosting into smaller bowls and add your gel food coloring. You’ll want red, pink, and moss green. Save a tiny bit of frosting for piping text, maybe a dark brown or black.
Assemble Your Masterpiece
Take your completely cooled cakes and slice each one horizontally into two layers. This gives you four thin layers to work with. Brush the cut sides lightly with the simple syrup. This little step adds extra moisture, making your birthday cake mom extra delicious.
On your bottom cake layer, spread a nice layer of the white frosting. Then, pipe a ring of frosting around the edge. This acts as a dam to hold your jam filling. Spoon your fruit jam into the center and spread it gently.
Carefully place the second cake layer on top. Repeat the frosting and jam process for the remaining layers. Once all layers are stacked, give the entire cake a thin, smooth coating of white frosting. This is called a crumb coat, and it seals in any loose crumbs.
Pop the cake into the refrigerator for about 15 minutes to let that crumb coat set. Once chilled, apply a final, smooth layer of white frosting all over the cake. Aim for a clean, even finish.
Decorate with Flair
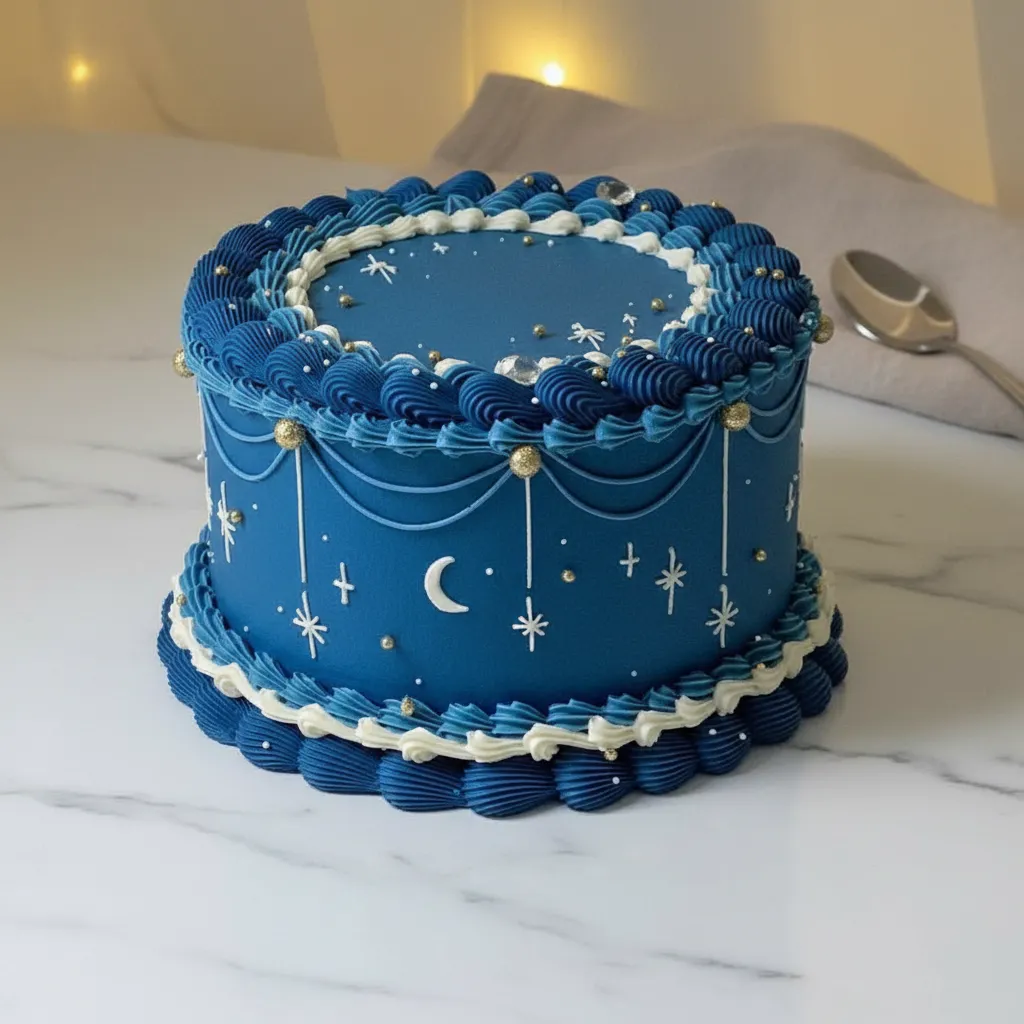
Now for the fun part! Grab your colored frostings. Using a small petal tip, like a Wilton 104, pipe those beautiful ruffled flowers, often called carnations, in your red and pink hues. They look so pretty and add that Korean cake birthday mom vibe.
Next, switch to a leaf tip, perhaps a Wilton 352, to create the green stems and leaves. This brings your floral design to life. It’s like painting with frosting!
Finally, use a very fine round tip, like a Wilton 1 or 2, to pipe your message in the center. This is where you can add “Happy Mother’s Day” or “Love You Mom.” For a truly special touch, you could even pipe the Russian phrase “To the world you are just ‘MOM’, but to us you are the WHOLE WORLD,” just like the authentic bento cake design mothers day.


How To Store Leftovers
Because this mothers day cake uses cream cheese frosting, it needs to stay chilled. Store any leftovers in an airtight container in the refrigerator. It’s best to take the cake out about 20 minutes before you plan to serve it again. This lets the frosting and cake come to a better temperature for enjoying.
Tips
Want to make this cake for mom even more special? Here are a few ideas. If you don’t have cake flour, sifting all-purpose flour with cornstarch is a great substitute. Always use room temperature eggs for better volume in your sponge.
For the jam filling, any favorite fruit jam works. Strawberry or raspberry are classic choices. Using a simple syrup is a pro move to ensure your cake layers stay wonderfully moist. Don’t be afraid to experiment with different piping tips for unique textures on your decorations.
Remember, the goal is a beautiful, heartfelt mom bday cake. It doesn’t have to be perfect; the love behind it is what truly matters. You can even get the kids involved in piping the flowers or adding sprinkles!
Conclusion
There you have it – a guide to creating a stunning, personalized mothers day cake that will surely make your mom feel cherished. Baking this cake is more than just a recipe; it’s a way to express your love and gratitude in a delicious, tangible form. It’s a wonderful cake for mother in law too!
So gather your ingredients, put on your favorite apron, and get baking. You’ve got this! Your mom deserves a treat as wonderful as she is, and this homemade cake is the perfect way to deliver it. Happy baking!
FAQ
Can I make this cake ahead of time?
Yes, you can bake the cake layers a day in advance and store them wrapped tightly at room temperature. The frosting can also be made a day ahead and refrigerated, but you’ll need to let it soften slightly and re whip it before frosting the cake.
What if I don’t have round cake pans?
You can use a single square pan (like an 8×8 inch) or even a loaf pan. Adjust the baking time accordingly, as different pan shapes and sizes will affect how the cake bakes. A toothpick test is always your best friend here.
Can I use a different frosting?
Absolutely! While the cream cheese frosting is delicious, you can substitute it with a buttercream, whipped cream, or even a simple glaze. Just ensure it complements the cake flavor and is something your mom enjoys.
How do I get the perfect ‘aesthetic’ look?
The aesthetic comes from the clean frosting, the delicate piped flowers, and the message. Using pastel colors for the flowers and keeping the base frosting smooth will give you that trendy look. Think of it as a miniature canvas!
Aesthetic Mother’s Day Cake
This Mother’s Day, ditch the bakery aisle and whip up a tasty, homemade treat. This vanilla sponge with whipped cream cheese frosting is a no-fuss way to show you care. It’s designed for home bakers to look like a trendy bakery cake but is totally doable in your own kitchen.
Requirements


Ingredients
Instructions
- Preheat your oven to 325 degrees Fahrenheit (160 degrees Celsius). Grease two 4-inch round cake pans or one 6-inch pan well and line the bottoms with parchment paper.
- In a large heatproof bowl, whisk together the eggs and sugar. Place the bowl over a pot of simmering water (double boiler) and whisk until the sugar is dissolved and the mixture feels warm.
- Remove from heat. Using an electric hand mixer, beat the mixture on high speed for 5 to 8 minutes until pale, thick, and tripled in volume (ribbon stage). Gently whisk in vanilla and salt.
- Sift the flour into the egg mixture in two additions. After each addition, gently fold with a spatula to keep the air in the batter.
- In a small bowl, combine warm milk and melted butter. Mix a small scoop of cake batter into this liquid until smooth, then gently fold it back into the main batter until just combined.
- Divide batter evenly between pans and bake for 18 to 22 minutes (toothpick should come out clean). Drop pans on the counter from 3 inches high to prevent shrinking, then cool completely on a wire rack.
- Beat cold cream cheese and powdered sugar until smooth (about 2 minutes). Slowly pour in cold heavy whipping cream, then whip to stiff peaks. Stir in vanilla and color portions as desired.
- Slice cooled cakes horizontally. Brush cut sides with simple syrup. Fill layers with a ring of frosting and fruit jam in the center.
- Stack layers, apply a thin crumb coat of white frosting, and chill for 15 minutes. Apply a final smooth coat and pipe decorations using colored frosting.
Notes
Store leftovers in an airtight container in the refrigerator. Take the cake out about 20 minutes before serving for the best texture.
If you don’t have cake flour, sift all-purpose flour with cornstarch as a substitute.
Always use room temperature eggs to ensure better volume in your sponge.
Any favorite fruit jam works for the filling, but strawberry and raspberry are classic choices.
Nutrition
Calories
Sugar
Fat
Carbs