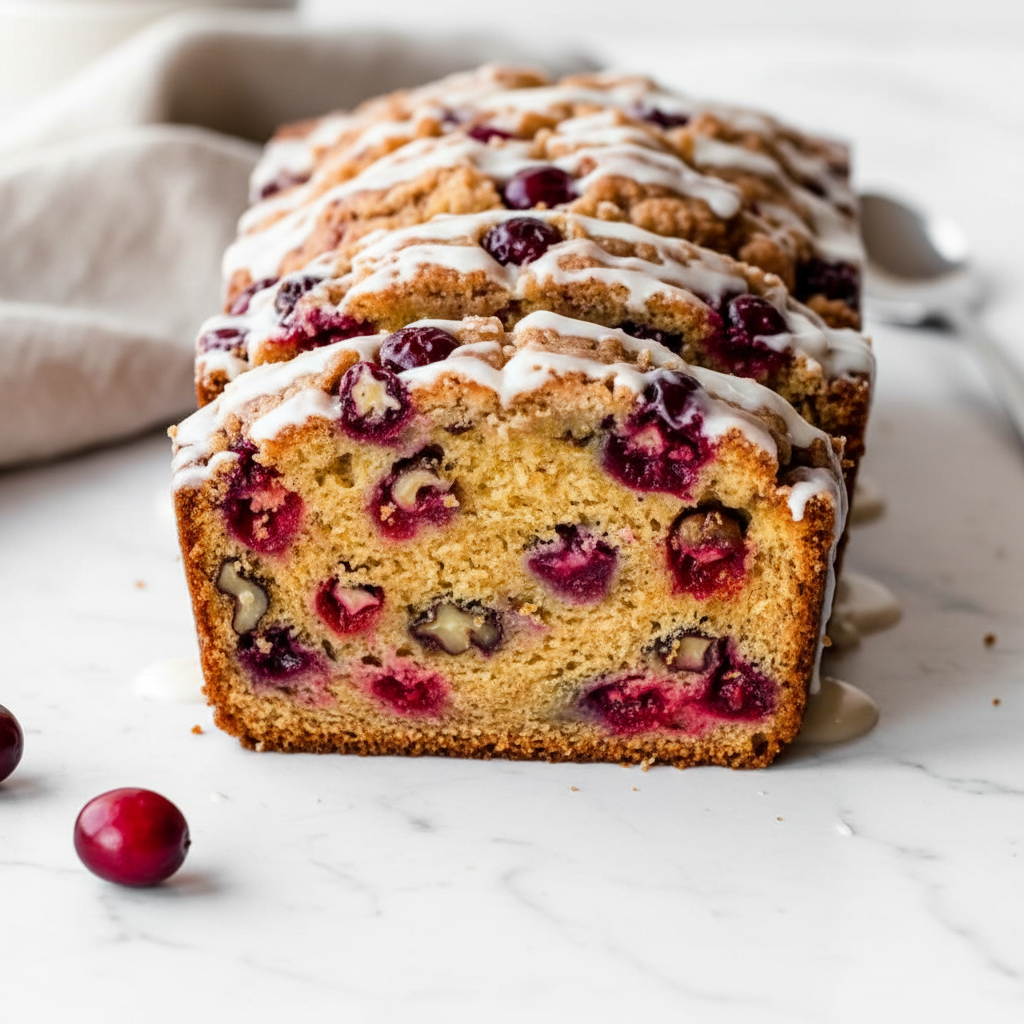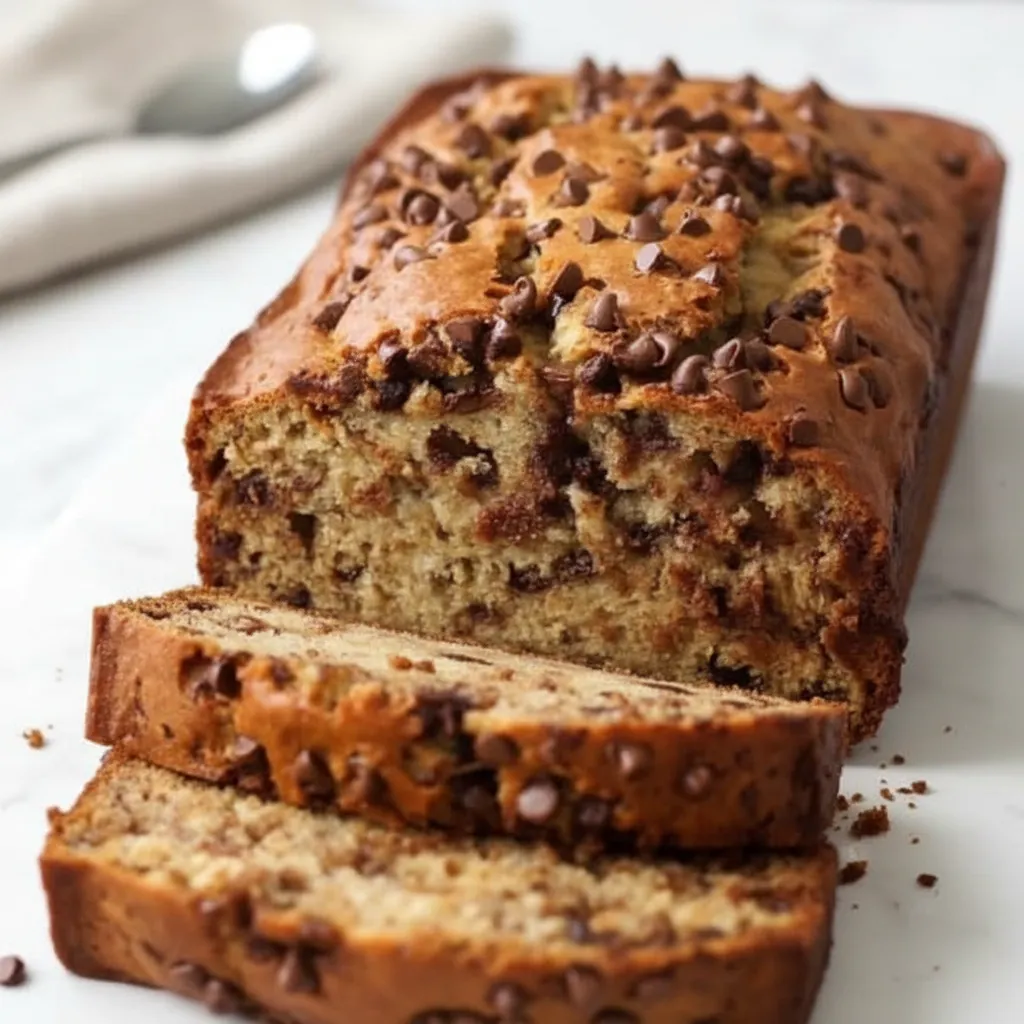
There is something so comforting about the smell of a freshly baked Banana Bread filling the house. It’s one of those simple pleasures, right? You know those bananas sitting on the counter, the ones that are a little too spotty for your morning cereal? This recipe is their moment to shine.
We are going to walk through making a truly wonderful Banana Loaf together. It’s simple, honest, and doesn’t require any fancy equipment. Just a bowl, a spoon, and a little bit of time. Let’s get baking!
Jump To:
Why You’ll Love This Recipe
First off, this recipe is incredibly easy to follow. If you are new to baking, this is a wonderful place to start. There are no complicated steps or techniques. It’s a straightforward mix and bake situation.
The results are just so rewarding. You get a moist, tender crumb every single time. The sweetness comes mostly from the bananas themselves, which is a big plus. It’s a classic for a reason.
It is also a fantastic way to reduce food waste. Those overripe bananas don’t need to be tossed out. They can become the star of this delicious Breakfast Bread. It feels good to use what you have.
Customization is another big win here. While this version uses chocolate chips, you can easily add your own favorite mix ins. Think walnuts, pecans, or even a sprinkle of cinnamon. Make it your own!
And let’s talk about the aroma. The scent of bananas and baking spices wafting from your oven is almost as good as the first bite. It makes your home feel cozy and welcoming. It’s pure comfort.
This Banana Bread is great for any occasion. Serve a warm slice with butter for breakfast. Enjoy it as an afternoon snack with a cup of tea. It’s even a lovely, simple dessert. It just always fits.
Ingredients
The ingredients for this Banana Bread are probably already in your kitchen. It’s all about simple, wholesome items. No need for a special trip to the store. Here is what you will need to gather.
The key, of course, is the bananas. You want them to be very ripe. We’re talking more brown and black spots than yellow. This is one of the best Ripe Banana Recipes because those bananas provide amazing sweetness and moisture.
- 3 ripe bananas
- ⅓ cup (75 g) butter, melted
- ½ cup (100 g) sugar
- 1 egg, beaten
- 1 teaspoon vanilla extract
- 1 teaspoon baking soda
- salt, to taste
- 1 ½ cups (185 g) all purpose flour
- ½ cup (85 g) mini chocolate chips
Step By Step Instructions
Ready to turn those ingredients into a beautiful loaf? Follow along with these simple steps. I’ll guide you through each part of the process, making sure it’s clear and easy.
Step 1: Get Everything Ready
First things first, let’s get that oven preheating. Set it to 350˚F or 180˚C. Getting your oven to the right temperature before the batter goes in is really important for an even bake.
While the oven warms up, grab a medium sized bowl. This is where the magic begins. Add your three ripe bananas to the bowl. Now for the fun part, mash them up until they are mostly smooth. A few small lumps are totally fine!
Next, pour in the melted butter. Give it a good stir with a fork or a spatula until it is all mixed in with the mashed bananas. This combination creates the moist base for our Banana Loaf.
Step 2: Mix The Batter
Now we will add the rest of the wet ingredients and the sugar. Add the sugar, the beaten egg, and the vanilla extract to the banana mixture. Stir everything together until it is well combined.
It’s time for the dry ingredients. Add the baking soda, a pinch of salt, and the all purpose flour directly into the same bowl. No need to use a separate one. We are keeping things simple.
Gently stir the dry ingredients into the wet mixture. Be careful not to overmix here. Just stir until you no longer see streaks of flour. A few lumps are okay. Overmixing can make the final Banana Bread tough.
Step 3: Add Chocolate And Prepare The Pan
Gently fold in the mini chocolate chips. Use a spatula to scrape the bottom of the bowl, making sure they are distributed evenly throughout the batter. You can save a few to sprinkle on top if you like.
Grab your loaf pan and make sure it is greased well. You can use butter, oil, or a non stick cooking spray. This step is crucial to make sure your beautiful Banana Bread comes out easily after baking.
Pour the batter into your prepared loaf pan. Use your spatula to spread it out evenly. If you saved some chocolate chips, now is the time to sprinkle them over the top. It makes the finished loaf look extra special.
Step 4: Bake To Golden Brown
Place the loaf pan in your preheated oven. Let it bake for about 50 minutes to an hour. The exact time can vary a little depending on your oven, so it is a good idea to keep an eye on it.
How do you know when it is done? The easiest way is the toothpick test. Carefully insert a toothpick into the center of the loaf. If it comes out clean, or with a few moist crumbs attached, your Banana Bread is ready.
If the top starts to get too dark before the inside is cooked, you can loosely cover it with a piece of aluminum foil. This will protect the top from browning further while the inside finishes baking.
Step 5: Cool Completely
Once it is done baking, carefully remove the loaf from the oven. Let it cool in the pan for about 10 to 15 minutes. This allows it to set up a little, making it easier to remove.
After its initial cooling, turn the loaf out onto a wire rack to cool completely. I know it is tempting to slice into it right away, but letting it cool is important. It helps the slices hold their shape.


How To Store Leftovers
If you have any leftover Banana Bread, storing it properly will keep it fresh and delicious. You have a few options depending on how long you want to keep it around.
For short term storage, you can keep the loaf at room temperature for up to three days. Make sure to wrap it tightly in plastic wrap or store it in an airtight container. This prevents it from drying out.
If you want to extend its freshness for a little longer, the refrigerator is a good option. Wrapped well, the Banana Loaf will last for about a week in the fridge. Just be aware it can sometimes dry it out slightly.
For long term storage, the freezer is your best friend. You can freeze the entire loaf or individual slices. Wrap them well in plastic wrap and then a layer of aluminum foil. It will keep for up to three months.
Tips
Want to make your Banana Bread even better? Here are a few little tips and tricks I have learned along the way. They are simple things that can make a big difference in your baking.
Always use the ripest bananas you can find. I cannot stress this enough for Ripe Banana Recipes. The darker and spottier they are, the more sugar they contain. This means more flavor and natural sweetness for your bread.
Be gentle when you mix the batter. Once you add the flour, you want to stir just until everything is combined. Overmixing develops the gluten in the flour, which can lead to a dense and tough Breakfast Bread.
Feel free to get creative with your add ins. While mini chocolate chips are great, chopped walnuts or pecans add a wonderful crunch. A teaspoon of cinnamon or a dash of nutmeg can also add a lovely warmth.
Make sure your baking soda is fresh. Baking soda helps the bread rise and become light. If it is old, it won’t be as effective. A simple test is to drop a little in some vinegar. If it fizzes, it is still good!
Don’t be afraid to let it cool completely. Slicing into a warm loaf can cause it to crumble and fall apart. Patience is key here. A fully cooled loaf will give you clean, beautiful slices every time.
Conclusion
And there you have it. A simple, straightforward path to a delicious homemade Banana Bread. It’s a recipe that is all about comfort, simplicity, and using what you have to create something wonderful.
Baking doesn’t have to be complicated. With just a handful of basic ingredients, you can create a treat that will bring a smile to anyone’s face. I hope you enjoy every single bite of your freshly baked loaf.
So next time you see those bananas getting a little too ripe, you will know exactly what to do. Happy baking, everyone! Enjoy your amazing Banana Bread.
FAQ
Can I Use Frozen Bananas?
Absolutely! Using frozen bananas is a great idea. Just make sure to thaw them completely before you use them. You can thaw them on the counter or in the microwave. Don’t forget to include any liquid that comes out as they thaw.
Why Did My Banana Bread Sink In The Middle?
A sunken middle in a Banana Bread can happen for a few reasons. It could be that it was slightly underbaked. It might also be from opening the oven door too often during baking, which causes the temperature to drop.
Can I Make This Recipe Into Muffins?
Yes, you can easily turn this recipe into banana muffins. Simply divide the batter among a lined muffin tin, filling each cup about two thirds full. The baking time will be much shorter, around 20 to 25 minutes.
What If I Don’t Have Mini Chocolate Chips?
No problem at all. You can use regular sized chocolate chips, or even chop up a chocolate bar. You could also leave them out entirely for a more classic Banana Loaf. Or, swap them for nuts or dried fruit.
Classic Homemade Banana Bread
A comforting and easy-to-make homemade banana bread, perfect for using up ripe bananas. This recipe delivers a moist, tender loaf every time with simple ingredients and no fancy equipment required.
Requirements


Ingredients
Instructions
- First things first, let’s get that oven preheating. Set it to 350˚F or 180˚C. Getting your oven to the right temperature before the batter goes in is really important for an even bake.
- While the oven warms up, grab a medium sized bowl. This is where the magic begins. Add your three ripe bananas to the bowl. Now for the fun part, mash them up until they are mostly smooth. A few small lumps are totally fine!
- Next, pour in the melted butter. Give it a good stir with a fork or a spatula until it is all mixed in with the mashed bananas. This combination creates the moist base for our Banana Loaf.
- Now we will add the rest of the wet ingredients and the sugar. Add the sugar, the beaten egg, and the vanilla extract to the banana mixture. Stir everything together until it is well combined.
- It’s time for the dry ingredients. Add the baking soda, a pinch of salt, and the all purpose flour directly into the same bowl. No need to use a separate one. We are keeping things simple.
- Gently stir the dry ingredients into the wet mixture. Be careful not to overmix here. Just stir until you no longer see streaks of flour. A few lumps are okay. Overmixing can make the final Banana Bread tough.
- Gently fold in the mini chocolate chips. Use a spatula to scrape the bottom of the bowl, making sure they are distributed evenly throughout the batter. You can save a few to sprinkle on top if you like.
- Grab your loaf pan and make sure it is greased well. You can use butter, oil, or a non stick cooking spray. This step is crucial to make sure your beautiful Banana Bread comes out easily after baking.
- Pour the batter into your prepared loaf pan. Use your spatula to spread it out evenly. If you saved some chocolate chips, now is the time to sprinkle them over the top. It makes the finished loaf look extra special.
- Place the loaf pan in your preheated oven. Let it bake for about 50 minutes to an hour. The exact time can vary a little depending on your oven, so it is a good idea to keep an eye on it.
- How do you know when it is done? The easiest way is the toothpick test. Carefully insert a toothpick into the center of the loaf. If it comes out clean, or with a few moist crumbs attached, your Banana Bread is ready.
- If the top starts to get too dark before the inside is cooked, you can loosely cover it with a piece of aluminum foil. This will protect the top from browning further while the inside finishes baking.
- Once it is done baking, carefully remove the loaf from the oven. Let it cool in the pan for about 10 to 15 minutes. This allows it to set up a little, making it easier to remove.
- After its initial cooling, turn the loaf out onto a wire rack to cool completely. I know it is tempting to slice into it right away, but letting it cool is important. It helps the slices hold their shape.
Notes
For short-term storage, wrap tightly in plastic wrap or an airtight container; keeps for up to three days at room temperature.
For extended freshness, refrigerate for about a week, wrapped well.
For long-term storage, freeze whole or sliced, wrapped in plastic wrap then aluminum foil; keeps for up to three months.
Always use very ripe (brown/black spotted) bananas for best flavor and sweetness.
Do not overmix the batter after adding flour to avoid a dense, tough bread.
Customize with walnuts, pecans, cinnamon, or nutmeg.
Ensure baking soda is fresh for proper rise (test with vinegar if unsure).
Cool completely before slicing to maintain shape and prevent crumbling.
Nutrition
Calories
Sugar
Fat
Carbs