The holiday season is filled with so much joy, but let’s be honest, it can also get a little busy. Sometimes you want to create something delicious and festive for your family without spending hours in the kitchen. That is where this recipe comes in to save the day.
We are making one of the most Fun Christmas Desserts Easy enough for even the most novice cook to master. This beautiful chocolate bark is a holiday staple in my house. It looks so impressive, but it comes together in just a few minutes with very little effort. It is a win win.
Jump To:
Why You’ll Love This Recipe
First off, this recipe is incredibly versatile. You can truly make it your own by swapping out the nuts, seeds, and dried fruits for your personal favorites. It is a fantastic way to use up any leftover pantry items you might have hanging around. A great canvas for your creativity.
It is also a no bake wonder. That is right, you do not need to turn on your oven. This makes it one of those amazing Simple Christmas Desserts you can whip up anytime. It is especially great when your oven is already working overtime on other holiday dishes.
Need a last minute gift idea? This chocolate bark is the answer. Break it into festive pieces, package it in a clear bag with a pretty ribbon, and you have a thoughtful homemade present. People always appreciate a delicious, edible gift during the holidays.
Plus, it is just so much fun to make. Sprinkling the toppings over the melted chocolate is a really satisfying process. It is a wonderful recipe to get kids involved with. They will have a blast adding their favorite goodies and creating their own masterpiece.
Ingredients
The beauty of this recipe is its simplicity. You only need a few core ingredients to create something truly special. Let’s talk about what you will need to get started on these Easy Christmas Sweets.
For the chocolate, I suggest using a quality brand. Since it is the main star of the show, its flavor really shines through. Bittersweet or dark chocolate with around 60% cacao content provides a rich, balanced flavor that is not overly sweet. It pairs beautifully with the other toppings.
- 12 ounces quality chocolate chips or chopped chocolate
- ¾ cup raw nuts or seeds (almonds, pecans, hazelnuts, pistachios, and pepitas work well)
- ¼ cup dried cranberries or other dried fruit
- About ½ teaspoon flaky sea salt, optional but recommended
Step By Step Instructions
Ready to make one of the best Quick And Easy Christmas Treats ever? Let’s walk through the process together. It is so simple, you will be amazed at how fast it comes together.
Step 1: Toast The Nuts
This first step is optional, but I highly recommend it if you have a few extra minutes. Toasting the nuts and seeds really brings out their flavor and adds a delightful crunch to the bark. It makes a big difference in the final taste.
Start by preheating your oven to 350 degrees Fahrenheit. Spread your chosen nuts and seeds on a rimmed baking sheet in a single layer. Pop them in the oven for about 6 to 9 minutes. You will know they are ready when they smell fragrant and look lightly golden.
Once toasted, carefully remove them from the oven and transfer them to a cutting board to cool slightly. Then, give them a rough chop. You want a variety of sizes for good texture.
Step 2: Melt The Chocolate
While the nuts are toasting, you can get the chocolate ready. The easiest way to melt it is in the microwave. Place your chocolate chips or chopped chocolate in a microwave safe bowl. Heat it in 30 second increments, stirring well after each one.
The key here is to not overheat the chocolate. Stop heating when it is about 90 percent melted. Just keep stirring off the heat, and the residual warmth will melt the remaining pieces into a smooth, glossy liquid. It is a simple trick to prevent scorching.
If you prefer, you can also use a double boiler method. Just place the chocolate in a heat proof bowl set over a saucepan of gently simmering water. Stir continuously until it is smooth and melted. This method gives you a lot of control.
Step 3: Spread And Sprinkle
Now for the really fun part. Line a large, rimmed baking sheet with parchment paper. This is very important for easy removal later on. Pour the beautifully melted chocolate onto the center of the prepared baking sheet.
Use a silicone or rubber spatula to spread the chocolate into an even layer. Aim for about a quarter inch thickness. Do not worry about spreading it all the way to the edges of the pan. An organic, freeform shape looks much more rustic and appealing.
Working quickly while the chocolate is still wet, sprinkle your chopped nuts evenly over the top. Follow that with the dried fruit. This is a great moment to be creative with your Christmas Dessert Ideas Easy. Think about color and texture as you sprinkle.
Step 4: Press And Set
If you are using flaky sea salt, crush it gently between your fingers as you sprinkle it over the chocolate. This little touch of salt really enhances the deep flavor of the chocolate and balances the sweetness of the fruit.
Once all your toppings are on, gently use the palms of your hands to lightly press them into the chocolate. This helps ensure they will stick to the bark as it hardens and will not fall off when you break it into pieces.
If you are in a hurry, you can place the pan on a flat surface in the refrigerator. It will harden up in about 15 minutes. If you have more time, just let it cool at room temperature for 2 to 4 hours until it is completely firm.
Step 5: Break And Serve
Once the chocolate is completely hard, it is time to break it apart. There is no need to be neat here. Just use your hands to snap the bark into about 25 rustic pieces of various shapes and sizes. This is part of its charm.
Your delicious creation is now ready to be served. Arrange the pieces on a festive platter and watch them disappear. It is one of those Fun Christmas Desserts Easy to share with everyone you love during the holiday season.


How To Store Leftovers
If you happen to have any leftovers, storing this chocolate bark is very simple. The best way is to keep it at room temperature in an airtight container. This will protect it from moisture and any other kitchen aromas.
Properly stored, the bark will stay fresh and delicious for up to one week. I like to place small pieces of parchment paper between the layers to prevent them from sticking together. It is an easy step that keeps the pieces looking their best.
Avoid storing it in the refrigerator if you can. The cold temperature can sometimes cause the chocolate to develop a whitish film called bloom. While it is still safe to eat, it just does not look as appealing. Room temperature is definitely the way to go.
Tips
Want to make this recipe even more special? Try adding a drizzle of melted white chocolate over the top after you have added the other toppings. It creates a beautiful contrast and adds another layer of flavor. Let it set completely before breaking.
For an extra festive touch, consider adding some holiday sprinkles or crushed peppermint candies. These additions bring a wonderful pop of color and a classic Christmas flavor that everyone enjoys. It’s a simple way to customize your bark.
If you need to make this recipe nut free, it is very easy to do. Simply substitute the nuts with an equal amount of seeds. Pepitas, which are pumpkin seeds, and sunflower seeds are both fantastic choices. They still provide that satisfying crunch.
You can also make a vegan or dairy free version of this treat. Just be sure to use a high quality vegan chocolate. There are many great brands available these days, so you will not have to sacrifice any flavor to meet your dietary needs.
Conclusion
And there you have it. One of the most enjoyable and Fun Christmas Desserts Easy enough for any occasion. This chocolate bark is proof that you do not need complicated recipes or special equipment to make something truly wonderful for the holidays.
It is a recipe that is all about simplicity, creativity, and sharing. Whether you make it as a gift, a party treat, or just a little something for your family to nibble on, it is sure to bring smiles to everyone’s faces. Happy holidays and happy creating!
FAQ
Can I Use White Or Milk Chocolate?
Absolutely. While the recipe calls for bittersweet chocolate, you can easily substitute it with white or milk chocolate. Just keep in mind that these chocolates are sweeter, so you might want to pair them with tart fruits or salty nuts to balance the flavors.
How Do I Get Clean Breaks In My Chocolate Bark?
The key to getting nice, snappy breaks is making sure the chocolate is fully hardened. Letting it set at room temperature often results in a better texture. If you do use the fridge, do not let it get too cold. Breaking it while it is firm but not frozen solid helps a lot.
Can I Make This Ahead Of Time For A Party?
Yes, this is a fantastic make ahead dessert. You can prepare it several days in advance. Just follow the storage instructions and keep it in an airtight container at room temperature. It will be ready to go when your guests arrive, saving you valuable time.
What Are Some Other Fun Topping Combinations?
The possibilities are endless. For some great Easy Christmas Sweets, try combinations like pistachios and dried cherries, pretzels and caramel bits, or even mini marshmallows and graham cracker pieces for a s’mores version. Let your imagination run wild and have fun with it.
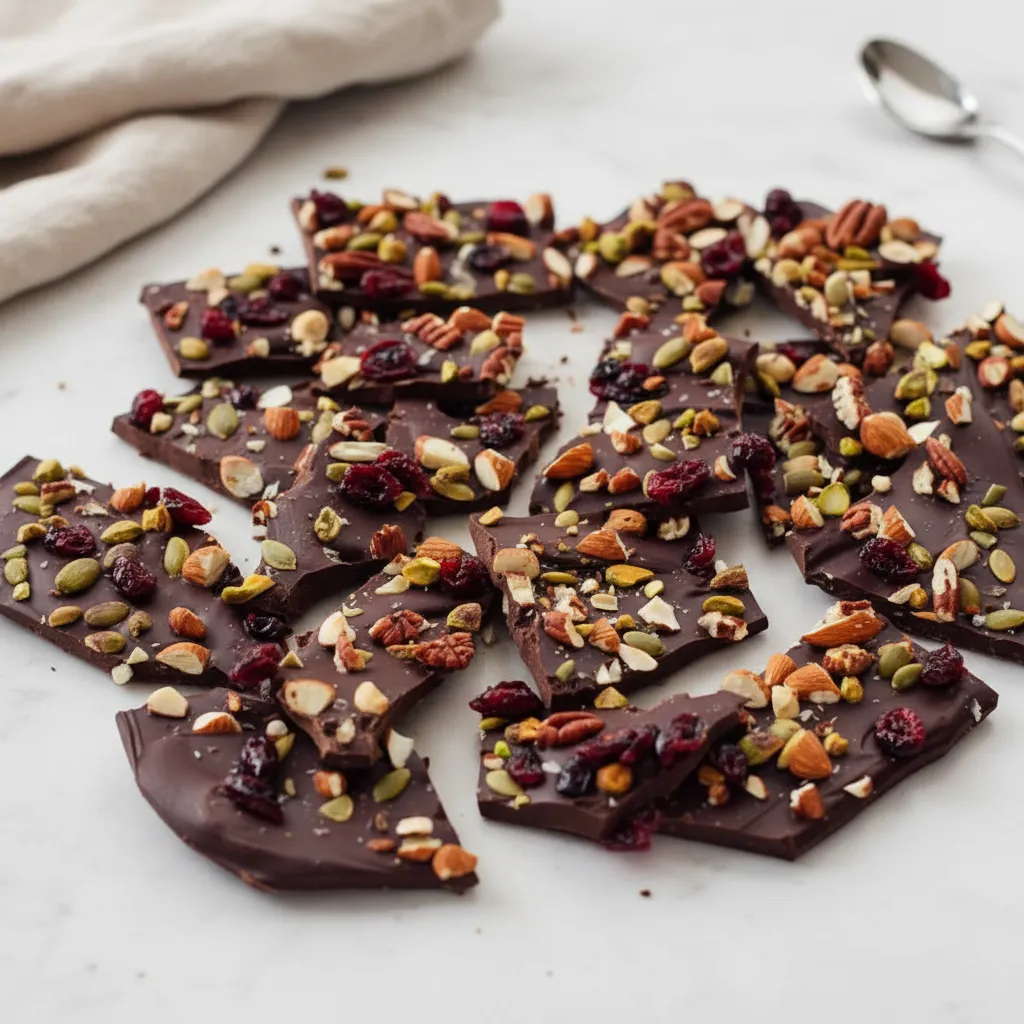
Easy Chocolate Christmas Bark
This easy chocolate Christmas bark recipe is a festive no-bake dessert that comes together in minutes. Loaded with crunchy nuts, sweet dried fruit, and a sprinkle of flaky sea salt, it’s a versatile treat and a thoughtful homemade gift for the holiday season.
Requirements


Ingredients
Instructions
- Toast Nuts (Optional): Preheat oven to 350°F (175°C). Spread nuts/seeds on a baking sheet; toast 6-9 minutes until fragrant. Cool slightly, then chop.
- Melt Chocolate: In a microwave-safe bowl, heat chocolate chips or chopped chocolate in 30-second increments, stirring until mostly melted. Stir off heat until smooth and glossy. Alternatively, use a double boiler.
- Spread & Sprinkle: Line a large, rimmed baking sheet with parchment paper. Pour melted chocolate onto the center and spread with a silicone or rubber spatula into an even, quarter-inch layer. Sprinkle chopped nuts and dried fruit evenly over the chocolate.
- Press & Set: If using, sprinkle flaky sea salt. Gently press toppings into the chocolate. Let set at room temperature for 2-4 hours until firm, or refrigerate for 15 minutes for faster setting.
- Break & Serve: Once completely hard, break the bark into rustic pieces. Serve immediately. Store leftovers in an airtight container at room temperature for up to one week, using parchment paper between layers to prevent sticking.
Notes
Toasting nuts and seeds is optional but highly recommended as it enhances their flavor and crunch.
For an extra festive touch, drizzle melted white chocolate over the top or add holiday sprinkles or crushed peppermint candies before setting.
This recipe is easily made nut-free by substituting nuts with an equal amount of seeds (like pepitas or sunflower seeds).
To make it vegan/dairy-free, ensure you use a high-quality vegan chocolate brand.
For clean breaks, ensure the chocolate is fully hardened. Setting at room temperature often yields better texture than chilling too long in the fridge.
This is a fantastic make-ahead dessert and stores well in an airtight container at room temperature for up to one week.
Nutrition
Calories
Sugar
Fat
Carbs