Let’s talk turkey. For many of us, the thought of roasting a whole turkey brings up a little bit of kitchen anxiety. Will it be dry? Will it cook on time? What if the skin isn’t crispy? I get it, I’ve been there too.
But what if I told you there’s a way to get a perfectly juicy, evenly cooked bird with the crispiest skin imaginable, all in way less time? Meet the Spatchcock Turkey. It might sound fancy, but it’s honestly one of the easiest ways to prepare a fantastic holiday meal.
Jump To:
Why You’ll Love This Recipe
So, what’s all the fuss about? Well, flattening the bird is a simple trick with big rewards. By removing the backbone, the turkey lays flat in the pan. This is a huge deal for a few reasons.
First, it cooks so much faster. We’re talking a 12 pound bird being done in under two hours. That frees up your oven for all those delicious side dishes you have planned. It’s a real time saver on a busy cooking day.
Second, everything cooks evenly. You know how the breast meat often dries out while you wait for the thighs to finish cooking? That problem is gone. With a spatchcock turkey, all the meat is at a similar thickness, so it cooks at the same rate.
And the skin! Oh, the skin. Because the entire surface is exposed to the direct heat of the oven, you get wall to wall golden brown, crispy skin. There are no soggy bottoms here. It’s the best part, right?
Ingredients
Here is what you will need to gather. This recipe keeps it simple with classic herbs and spices that let the flavor of the turkey shine through.
- 1 (10 to 12 lb) Turkey, whole, thawed
- ½ cup olive oil
- ¼ cup fresh chopped herbs (rosemary, thyme and sage work beautifully)
- 1 Tablespoon kosher salt
- 2 teaspoons garlic powder
- 1 teaspoon smoked paprika (optional, but adds nice color)
- 1 teaspoon freshly ground black pepper
Step By Step Instructions
Ready to get started? Let’s walk through the process together. Don’t worry, it’s easier than you think. Just follow along and you’ll be a pro in no time.
Step 1: Prep The Bird
First things first, remove your turkey from its packaging. Make sure to take out the neck and giblets from inside the cavity. You can save those to make a delicious gravy later on.
Now, pat the turkey completely dry all over with paper towels. This is a really important step for getting that super crispy skin we all love. Don’t be shy, get it as dry as you can.
Let the turkey sit on your counter at room temperature for about 45 minutes. This helps take the chill off the meat, which allows for more even cooking once it hits the hot oven.
Step 2: Remove The Backbone
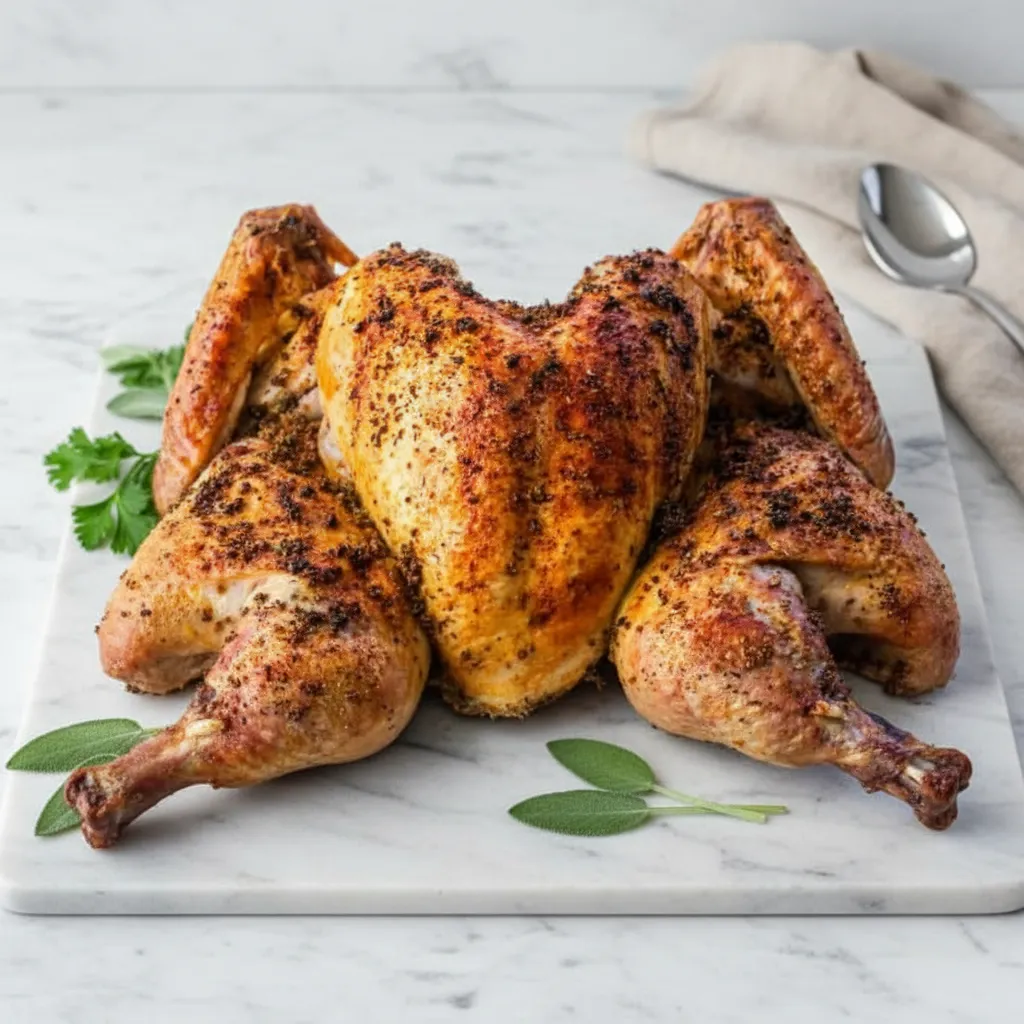
This is the main event of making a Spatchcock Turkey. Place the turkey breast side down on a cutting board or clean work surface. The legs should be facing you.
You’ll need a pair of sharp, sturdy kitchen shears. Seriously, good shears make this job a breeze. Starting at the tail end, cut along one side of the backbone, all the way up to the neck.
Now, repeat the cut on the other side of the backbone. Once you’ve cut through both sides, you can lift the backbone right out. Hang onto it for making stock or gravy. It’s full of flavor.
Step 3: Flatten The Turkey
Flip the turkey over so it is breast side up. It should look a little like an open book. Now for the satisfying part. Place the palms of your hands on the breast bone, right in the middle.
Press down firmly. You should hear a little crack. This is the breast bone breaking, which allows the bird to lie completely flat. Pull the thighs and legs outwards a bit to help it settle into its new shape.
Finally, tuck the wing tips under the breast. This prevents them from burning and helps the turkey look neat and tidy. Your Spatchcock Turkey Oven prep is almost done!
Step 4: Seasoning For Amazing Flavor
Preheat your oven to 425 degrees F. Place your flattened turkey on a large rimmed baking sheet. A big one is key so it can catch all those wonderful drippings.
In a small bowl, mix together your kosher salt, garlic powder, smoked paprika if you’re using it, and black pepper. Give your turkey one last pat with paper towels to make sure it’s dry.
Gently loosen the skin over the breasts. Rub some olive oil directly onto the breast meat, then sprinkle a little of your spice rub in there. This gets flavor right into the meat.
Now, rub the rest of the olive oil all over the outside of the turkey. Sprinkle the spice rub generously over every surface. Get it into all the nooks and crannies for maximum flavor.
Step 5: Roasting To Golden Perfection
Time for the Roasting Turkey In Oven part. Slide the baking sheet into your preheated oven. Let it roast for about 1 hour to 1 hour and 45 minutes. It’s a good idea to rotate the pan once halfway through cooking.
The turkey is done when a meat thermometer registers 165 degrees F. Make sure to test in a few places, especially the thickest part of the thigh, but avoid touching the bone.
I like to pull my turkey out when it reaches 160 degrees. The temperature will continue to rise as it rests, bringing it to a safe 165 degrees without overcooking.
If you notice the skin is getting too brown before the meat is cooked, just loosely place a piece of aluminum foil over the top. This will protect it from burning.
Step 6: The All Important Rest
Once you remove the turkey from the oven, please, please let it rest! This is not an optional step. Tent the turkey with aluminum foil and let it sit for about 20 minutes before you even think about carving.
This resting period allows all the juices to redistribute throughout the meat. If you cut into it right away, all that delicious moisture will run out onto your cutting board, leaving you with dry turkey. Patience is a virtue here!


How To Store Leftovers
Got leftovers? Lucky you! Carve any remaining meat off the bones and store it in an airtight container in the refrigerator. It will stay fresh for about 3 to 4 days, perfect for sandwiches, soups, or salads.
You can also freeze leftover turkey. Place it in a freezer safe bag or container. It will keep well for up to 3 months. It’s a great way to have cooked turkey on hand for quick meals later.
Tips
A few extra pointers can make your experience even better. For instance, we use olive oil instead of butter for a good reason. The high oven temperature for a Spatchcock Turkey would cause butter to burn. Olive oil has a higher smoke point, making it the better choice.
Want to get a head start? You can prep the turkey the night before. Remove the backbone, flatten it, and season it. Let it sit uncovered in the fridge on a rack. This acts as a Dry Brine Turkey, which results in even crispier skin and more flavorful meat.
Just remember, if you do a Dry Brine Turkey, you might want to reduce the amount of salt in your spice rub, as the turkey will have already absorbed some saltiness overnight. A little taste test of your rub can help you decide.
This method also works great on a grill or in a smoker. For a grill, use indirect heat around 350 degrees. For a smoker, set it to about 240 degrees and let it cook for around 4 hours. The flavor is incredible!
Conclusion
And there you have it! A straightforward guide to making the most delicious Spatchcock Turkey. It’s a method that delivers impressive results every single time, taking the stress out of holiday cooking.
Faster cooking, juicy meat, and crispy skin make this recipe a winner. I hope you give this spatchcock turkey technique a try for your next big meal. You might never go back to the old way of roasting a turkey again. Happy cooking!
FAQ
What Size Turkey Works Best For Spatchcocking?
A turkey in the 10 to 12 pound range is ideal. It’s manageable to handle, fits on a standard large baking sheet, and cooks relatively quickly. You can go larger, but it gets more difficult to cut through the backbone and find a pan big enough.
Do I Really Need Kitchen Shears?
Honestly, yes. Heavy duty poultry shears are the best tool for the job. They give you the leverage you need to cut through the ribs along the backbone safely. While a heavy cleaver could work, it’s much more challenging and less precise.
Can I Still Make Gravy?
Absolutely! The backbone you removed is packed with flavor. You can roast it alongside the turkey or use it to make a rich, homemade stock for your gravy. Plus, you’ll have plenty of delicious pan drippings from the Roasting Turkey In Oven process to work with.
Why Is My Turkey Skin Not Crispy?
The most common culprit is moisture. Make sure you pat the turkey skin incredibly dry with paper towels before you add the oil and seasonings. A wet skin will steam instead of roast. Also, ensure your oven is fully preheated to that high 425 degree temperature.
Spatchcock Turkey
Unlock the secret to a perfectly juicy, evenly cooked turkey with incredibly crispy skin in less time. This spatchcock method transforms your holiday meal preparation.
Requirements


Ingredients
Instructions
- First things first, remove your turkey from its packaging. Make sure to take out the neck and giblets from inside the cavity. You can save those to make a delicious gravy later on. Now, pat the turkey completely dry all over with paper towels. This is a really important step for getting that super crispy skin we all love. Don’t be shy, get it as dry as you can. Let the turkey sit on your counter at room temperature for about 45 minutes. This helps take the chill off the meat, which allows for more even cooking once it hits the hot oven.
- This is the main event of making a Spatchcock Turkey. Place the turkey breast side down on a cutting board or clean work surface. The legs should be facing you. You’ll need a pair of sharp, sturdy kitchen shears. Seriously, good shears make this job a breeze. Starting at the tail end, cut along one side of the backbone, all the way up to the neck. Now, repeat the cut on the other side of the backbone. Once you’ve cut through both sides, you can lift the backbone right out. Hang onto it for making stock or gravy. It’s full of flavor.
- Flip the turkey over so it is breast side up. It should look a little like an open book. Now for the satisfying part. Place the palms of your hands on the breast bone, right in the middle. Press down firmly. You should hear a little crack. This is the breast bone breaking, which allows the bird to lie completely flat. Pull the thighs and legs outwards a bit to help it settle into its new shape. Finally, tuck the wing tips under the breast. This prevents them from burning and helps the turkey look neat and tidy. Your Spatchcock Turkey Oven prep is almost done!
- Preheat your oven to 425 degrees F. Place your flattened turkey on a large rimmed baking sheet. A big one is key so it can catch all those wonderful drippings. In a small bowl, mix together your kosher salt, garlic powder, smoked paprika if you’re using it, and black pepper. Give your turkey one last pat with paper towels to make sure it’s dry. Gently loosen the skin over the breasts. Rub some olive oil directly onto the breast meat, then sprinkle a little of your spice rub in there. This gets flavor right into the meat. Now, rub the rest of the olive oil all over the outside of the turkey. Sprinkle the spice rub generously over every surface. Get it into all the nooks and crannies for maximum flavor.
- Time for the Roasting Turkey In Oven part. Slide the baking sheet into your preheated oven. Let it roast for about 1 hour to 1 hour and 45 minutes. It’s a good idea to rotate the pan once halfway through cooking. The turkey is done when a meat thermometer registers 165 degrees F. Make sure to test in a few places, especially the thickest part of the thigh, but avoid touching the bone. I like to pull my turkey out when it reaches 160 degrees. The temperature will continue to rise as it rests, bringing it to a safe 165 degrees without overcooking. If you notice the skin is getting too brown before the meat is cooked, just loosely place a piece of aluminum foil over the top. This will protect it from burning.
- Once you remove the turkey from the oven, please, please let it rest! This is not an optional step. Tent the turkey with aluminum foil and let it sit for about 20 minutes before you even think about carving. This resting period allows all the juices to redistribute throughout the meat. If you cut into it right away, all that delicious moisture will run out onto your cutting board, leaving you with dry turkey. Patience is a virtue here!
Notes
Got leftovers? Lucky you! Carve any remaining meat off the bones and store it in an airtight container in the refrigerator. It will stay fresh for about 3 to 4 days, perfect for sandwiches, soups, or salads.
You can also freeze leftover turkey. Place it in a freezer safe bag or container. It will keep well for up to 3 months. It’s a great way to have cooked turkey on hand for quick meals later.
A few extra pointers can make your experience even better. For instance, we use olive oil instead of butter for a good reason. The high oven temperature for a Spatchcock Turkey would cause butter to burn. Olive oil has a higher smoke point, making it the better choice.
Want to get a head start? You can prep the turkey the night before. Remove the backbone, flatten it, and season it. Let it sit uncovered in the fridge on a rack. This acts as a Dry Brine Turkey, which results in even crispier skin and more flavorful meat.
Just remember, if you do a Dry Brine Turkey, you might want to reduce the amount of salt in your spice rub, as the turkey will have already absorbed some saltiness overnight. A little taste test of your rub can help you decide.
This method also works great on a grill or in a smoker. For a grill, use indirect heat around 350 degrees. For a smoker, set it to about 240 degrees and let it cook for around 4 hours. The flavor is incredible!
Nutrition
Calories
Sugar
Fat
Carbs