Let’s talk turkey. For many of us, the thought of roasting a whole bird brings a tiny bit of kitchen anxiety. Will it be dry? Will the legs be done before the breast? It’s a holiday balancing act. But what if I told you there’s a straightforward way to get a juicy, flavorful turkey with crispy skin all over, in way less time? It’s true!
This Spatchcock Turkey Oven method is about to become your new favorite technique. By simply removing the backbone and flattening the bird, you create a more even surface. This allows it to cook faster and more uniformly. It’s a simple trick with big rewards, and I’m going to walk you through every single step. Get ready for one of the best Oven Roasted Turkey Recipes Thanksgiving has ever seen.
Jump To:
Why You’ll Love This Recipe
Honestly, once you try a spatchcock turkey, it’s hard to go back. The first thing you’ll notice is the cooking time. It’s so much faster than a traditional roast. This frees up your oven for all those delicious side dishes we love so much.
Then there’s the flavor. Because the turkey is flat, the heat circulates more evenly. This means no more dry breast meat while you wait for the thighs to cook through. Every single piece comes out moist and tender. It’s a total win.
And can we talk about that skin? Oh, the skin. With a traditional turkey, the underside often gets soggy. But with this Spatchcock Turkey Oven method, almost all the skin is exposed to the direct heat of the oven. The result is wall to wall crispy, golden brown skin. It’s absolutely amazing.
Plus, carving is a breeze. Without the backbone in the way, it’s incredibly easy to separate the legs, thighs, and wings. You can even remove the entire breast in one piece. It makes serving so much simpler and less stressful, especially on a busy holiday.
Ingredients
The beauty of this Spatchcock Turkey Oven recipe is its simplicity. We’re using a handful of fresh, classic ingredients to let the flavor of the turkey really shine. Fresh herbs are your best friend here.
- One 10 to 12 pound turkey
- ½ cup olive oil
- 2 sprigs rosemary, chopped
- 4 sprigs thyme, chopped
- 4 leaves sage, chopped
- 6 cloves garlic, minced
- 1 teaspoon salt, or to taste
- 1 teaspoon pepper, or to taste
Step-By-Step Instructions
Alright, let’s get into the fun part. Follow these steps, and you’ll have a fantastic bird ready for the table. Don’t be intimidated by the spatchcocking process. It’s easier than it sounds!
Step 1: Preheat Oven
First things first. Let’s get that oven roaring. Preheat it to 425°F. A nice hot oven is key to getting that skin super crispy right from the start. This is how you Bake Turkey In Oven for great results.
Step 2: Prep The Turkey
Now for the main event. Start by removing the neck and giblets from inside the turkey. You can save these for making gravy later. Place the turkey on a large cutting board, breast side down, with the legs pointing towards you.
You’ll need a good, sturdy pair of kitchen shears. Starting at the tail end, cut along one side of the backbone. You’ll be cutting through the rib bones, so use a little muscle. Continue all the way up to the neck.
Repeat on the other side of the backbone to remove it completely. Don’t throw it away. That backbone is packed with flavor and is wonderful for making stock or gravy. Open the turkey up like a book.
Flip the turkey over so it’s skin side up. Place the heel of your hand on the breastbone, right in the middle, and press down firmly. You should hear a little crack. This flattens the bird, which is exactly what we want for our spatchcock turkey. Lastly, just snip off the wing tips. They can burn easily.
Step 3: Season
Time to add all that amazing flavor. In a small bowl, mix together the olive oil, chopped rosemary, thyme, sage, minced garlic, salt, and pepper. Give it a good stir. The smell alone is incredible.
Using a brush, generously coat the inside of the turkey with this herb oil mixture. Flip the bird back over, skin side up. Now, brush the remaining mixture all over the outside. Make sure you get into every nook and cranny. This is what will make our Spatchcock Turkey Oven so delicious.
Step 4: Roast
Carefully place your seasoned turkey onto a large baking sheet, preferably one with a rim to catch all those tasty drippings. Transfer the baking sheet into your preheated oven.
Roast the turkey for about 1 hour and 15 minutes to 1 hour and 30 minutes. The exact time will depend on your oven and the size of your bird. Every 20 to 30 minutes, use a baster to spoon the pan drippings over the turkey. This helps the skin brown evenly.
The best way to know it’s done is with a meat thermometer. The thickest part of the thigh should register 185°F, and the breast should be at 165°F. This is the most reliable way to ensure a perfectly cooked turkey every time.
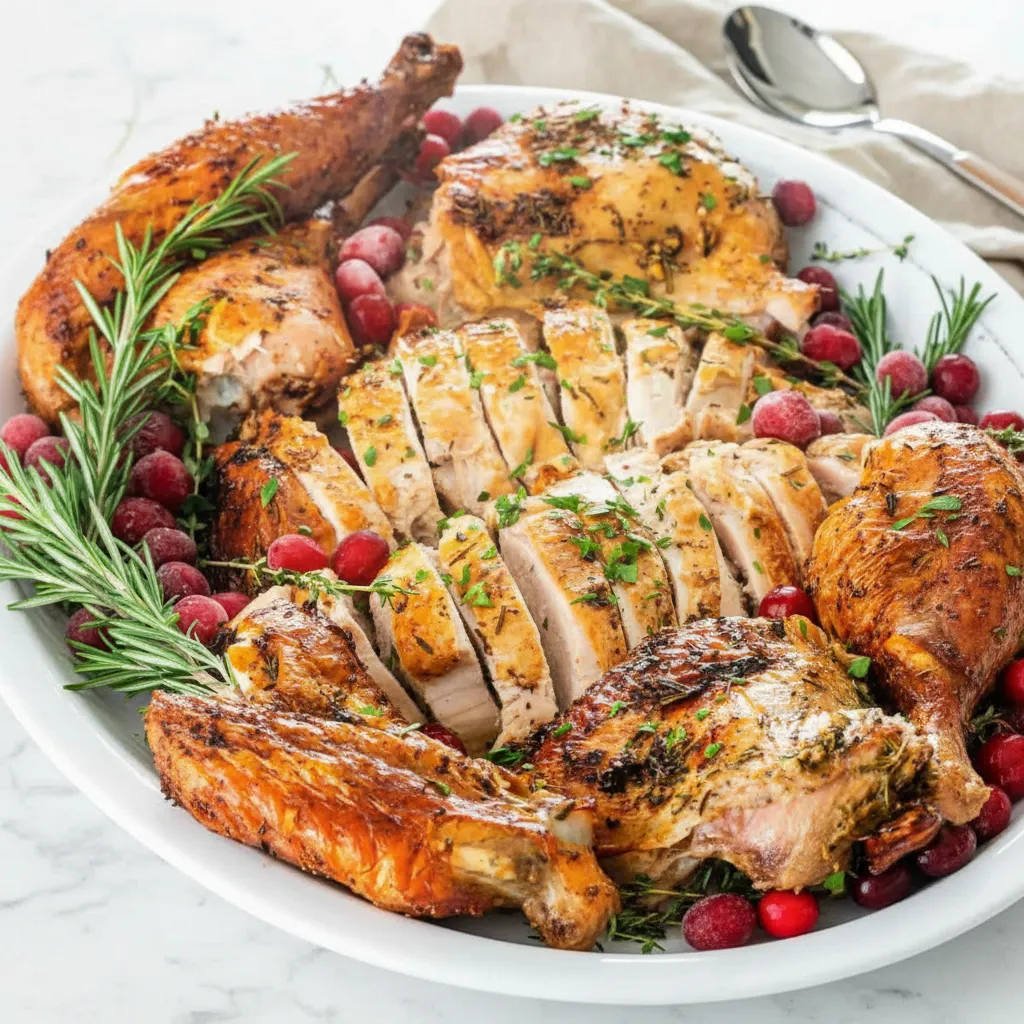
Step 5: Rest, Carve & Serve
This step is so important, please don’t skip it! Carefully remove the baking sheet from the oven. Loosely cover the turkey with a piece of aluminum foil. Now, let it rest for at least 15 minutes before you even think about carving.
Why? Resting allows all the juices inside to redistribute throughout the meat. If you cut into it right away, all that moisture will run out onto the cutting board, leaving you with dry turkey. After it has rested, you can carve and serve your beautiful Spatchcock Turkey Oven masterpiece.


How To Store Leftovers
If you’re lucky enough to have leftovers, storing them properly is key. Let the turkey cool down completely first. You can then place the leftover meat in an airtight container and keep it in the refrigerator for up to 5 days.
For longer storage, the freezer is your best bet. Place individual pieces into freezer safe bags or airtight containers. If you’re using bags, try to squeeze out as much air as possible before sealing. Leftovers will keep well in the freezer for up to 3 months. This is a great way to enjoy your Oven Roasted Turkey Recipes Thanksgiving meal again later.
Tips
Here are a few extra pointers to make your Spatchcock Turkey Oven experience even better. These little things can make a big difference.
- Sharp Shears Are A Must: I can’t say this enough. Using very sharp kitchen shears will make cutting through the bones so much easier and safer.
- Save That Backbone: Seriously, don’t throw it away! It’s full of flavor. You can use it to make an amazing turkey gravy, broth, or stock for soups.
- Fresh Herbs for the Win: While dried herbs work in a pinch, fresh herbs provide a much brighter and more vibrant flavor that really complements the turkey.
- Baste for Browning: Basting doesn’t actually make the meat more moist, but it does help the skin get that beautiful, even, golden brown color we all crave.
- Try a Compound Butter: For extra yumminess, mix softened butter with herbs, garlic, and maybe some smoked paprika. Gently loosen the skin over the breast and spread this butter underneath.
- A Thermometer is Your Friend: An instant read meat thermometer is a lifesaver. It takes all the guesswork out of knowing when your turkey is perfectly cooked.
- Let It Rest: Patience is a virtue. Letting the turkey rest for at least 15 minutes is crucial for juicy, tender meat.
Feel free to play around with the seasonings too. While this simple herb mix is classic, you could add a little citrus zest or other spices. You could even create a version of a Smoked Spatchcock Turkey by using smoked paprika and a touch of liquid smoke in your seasoning blend.
Conclusion
And there you have it. A straightforward guide to making the most delicious Spatchcock Turkey Oven recipe. It’s faster, easier to carve, and delivers incredibly consistent results with juicy meat and crispy skin every single time.
Whether you’re making this for Thanksgiving, a holiday feast, or just a special Sunday dinner, this method is sure to impress. It takes the stress out of cooking a large bird and leaves you with more time to enjoy with your family and friends. Give this spatchcock turkey a try. I know you’ll love it.
FAQ
What Is Spatchcocking?
Spatchcocking is a technique where you remove the backbone of a bird, like a turkey or chicken, and flatten it out. This allows the bird to cook more quickly and evenly than it would in its traditional shape. It’s a great method for roasting or grilling.
Can I Use Different Herbs?
Absolutely! This recipe is very flexible. You could use other woody herbs like marjoram or even some lemon zest for a brighter flavor. Feel free to use your favorite combinations to make this Spatchcock Turkey Oven recipe your own.
Do I Really Need A Meat Thermometer?
Yes, I highly recommend it. Ovens can vary, and a thermometer is the only surefire way to know if your turkey is cooked to a safe temperature without overcooking it. It’s a small tool that makes a huge difference in the final result.
What Size Turkey Works Best For This?
This recipe is designed for a 10 to 12 pound turkey. You can certainly use this method for larger birds, but you will need to adjust the roasting time accordingly. A larger bird will take longer to cook, so keep an eye on those temperatures.
How Do I Know When The Turkey Is Done?
The turkey is done when an instant read thermometer inserted into the thickest part of the thigh reads 185°F, and the breast reads 165°F. Checking both spots ensures the entire bird is cooked through safely. This is the golden rule for all Oven Roasted Turkey Recipes Thanksgiving dinners rely on.
Easy Spatchcock Turkey Recipe
This straightforward spatchcock turkey recipe guarantees a juicy, flavorful bird with crispy skin, all in less time. By flattening the turkey, it cooks faster and more evenly, making it a simple method for a holiday feast.
Requirements


Ingredients
Instructions
- Preheat your oven to 425°F. A hot oven is key for crispy skin.
- Prep the turkey: Remove neck and giblets. Place turkey breast-side down. Using sturdy kitchen shears, cut along both sides of the backbone to remove it. Flip the turkey skin-side up and press firmly on the breastbone to flatten it.
- Season the bird: In a small bowl, mix the olive oil, chopped rosemary, thyme, sage, minced garlic, salt, and pepper. Brush this mixture generously all over the turkey, including the inside.
- Roast the turkey: Place the seasoned turkey on a large, rimmed baking sheet. Roast for 1 hour and 15 minutes to 1 hour and 30 minutes. Baste with pan drippings every 20-30 minutes for even browning.
- Check for doneness: Use a meat thermometer to check temperatures. The thickest part of the thigh should be 185°F, and the breast should be 165°F.
- Rest before serving: Remove the turkey from the oven, loosely cover with foil, and let it rest for at least 15 minutes. This is crucial for retaining juices. Carve and serve.
Notes
Using very sharp kitchen shears will make cutting through the bones much easier and safer.
Don’t throw away the backbone! It’s full of flavor and can be used to make an amazing turkey gravy or stock.
An instant-read meat thermometer is the most reliable way to ensure your turkey is perfectly cooked without any guesswork.
Letting the turkey rest for at least 15 minutes is crucial. This allows the juices to redistribute for moist, tender meat.
Nutrition
Calories
Sugar
Fat
Carbs