Have you ever wanted to create one of those beautiful food displays you see online? The ones overflowing with cheeses, meats, and colorful fruits. It might seem complicated, but I am here to show you it is not. Creating a beautiful board is all about having fun with food.
This guide is packed with Charcuterie Board Ideas to get you started. We are going to walk through everything together. You will be making your own amazing grazing board ideas in no time at all. Let’s get started.
Jump To:
Why You’ll Love This Recipe
First off, there are no strict rules. That is the real beauty of a charcuterie board. It is completely customizable. You can use your favorite ingredients or try something new. It is a creative outlet you can eat.
It is also incredibly easy to assemble. There is no real cooking involved. You are just arranging delicious items on a board. This makes it a great option for entertaining. You can spend more time with your guests and less time in the kitchen.
These Food Boards For Parties are always a huge hit. They look so impressive. People love being able to pick and choose their own bites. It is a very social and interactive way to eat. A good board becomes the centerpiece of the gathering.
Plus, the Charcuterie Board Aesthetic is just wonderful. The mix of colors, textures, and shapes is so pleasing to the eye. It feels abundant and generous. It is a feast for the eyes before it is a feast for the stomach. This makes it a really special treat for any occasion.
You can also tailor it to any budget. You can choose affordable cheeses and meats or go for more high end options. You can use whatever fruits are in season. It is a very flexible concept.
Ingredients
The key to great Charcuterie Board Ideas is variety. You want a mix of flavors and textures. Think soft and hard cheeses, savory meats, sweet fruits, and crunchy crackers. Here are some suggestions to get you started.
Cheeses
- Cheddar
- Brie
- Gouda
- Goat Cheese
- Manchego
- Boursin Cheese
- Pepper Jack Cheese
- Gorgonzola or Blue Cheese
- Burrata or Marinated Mozzarella
- Parmigiano Reggiano
Cured Meats
- Beef Prosciutto
- Beef Salami
- Beef Soppresata
- Beef Capicola
- Beef Coppa
Fruits
- Apples (honeycrisp or fuji)
- Navel or Blood Oranges
- Pomegranates
- Fresh Figs
- Red Anjou or Bosc Pear
- Dates
- Berries (strawberries, blackberries, raspberries)
- Dried Fruits (apricots, oranges, cherries)
Accompaniments And Condiments
- Nuts
- Olives
- Dark Chocolate or Chocolate Covered Nuts
- Honeycomb or Honey
- Jams
- Spreads or Dips
- Pickles
- Mustard
Crackers And Bread
- Butter Crackers
- Water Crackers
- Nut and Seed Crackers
- Whole Grain Crackers
- Entertainment Cracker Assortment
- Crisps
- Rustic Bakery Sourdough Flatbread
- French Baguette Slices
- Sourdough Baguette Slices
Step By Step Instructions
Building your board is the fun part. Think of it like painting a picture. You are using food as your medium. Follow these steps to create your own beautiful charcuterie board.
Step 1: Choose The Right Board
Your board is your canvas. A wooden cutting board, a slate tile, or even a large platter will work. You want something large enough to hold all your goodies. But not so big that it looks sparse.
The shape does not matter too much. Round, square, or rectangular boards all look great. Just pick one that you love. The natural texture of wood or stone adds to the overall Charcuterie Board Aesthetic.
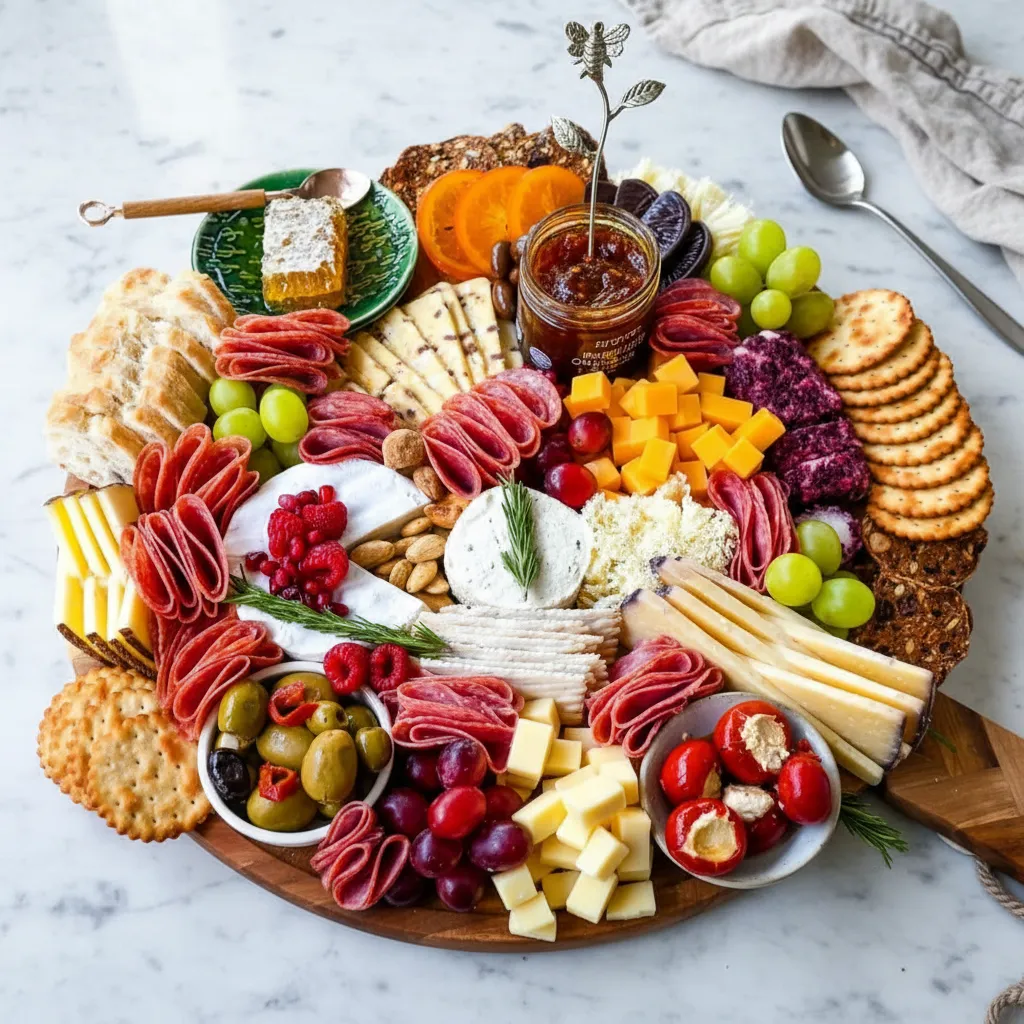
Step 2: Place Your Cheeses First
Cheeses are the anchors of your board. It is a good idea to place them first. Try to use an odd number of cheeses. Three or five usually looks best. Spread them out across the board to create balance.
Vary the shapes to add visual interest. You can leave a wheel of brie whole. Cut a block of cheddar into cubes. Slice some manchego into triangles. This simple trick makes the board look more dynamic.
Step 3: Add The Cured Meats
Now it is time for the meats. You can get creative here. Instead of just laying slices flat, try folding them. Fold salami slices in half, and then in half again. This creates a fluffy, ruffled look.
You can also create a salami river. Fold slices of salami and arrange them in a winding line across the board. It is a popular technique for a reason. It looks amazing. For prosciutto, you can gently bunch it into loose piles.
Place the meats near the cheeses they pair well with. This helps guide your guests. Creating little zones of flavor is one of the best Charcuterie Board Ideas.
Step 4: Create Pops Of Color With Fruit
Fruits bring life and color to your board. They also provide a sweet contrast to the savory meats and cheeses. Scatter handfuls of berries around the board. Add sliced apples or pears.
Grapes are a classic choice. Their cascading shape adds a nice flow. Figs, when in season, are a beautiful addition. Their deep purple color is lovely. Use a mix of fresh and dried fruits for different textures.
Step 5: Fill In The Gaps
Now look for any empty spaces on your board. This is where your smaller accompaniments come in. Fill these gaps with nuts, olives, and pickles. This makes the board look full and abundant.
A small pile of almonds here, a cluster of olives there. This step is what takes your grazing board ideas to the next level. It adds texture and ensures every part of the board has something interesting.
Step 6: Arrange Crackers And Bread
You need vehicles for all that cheese and meat. Fan out crackers in a few spots on the board. If you are using baguette slices, you can pile them in a small basket on the side. This prevents them from getting soggy.
Offer a variety of crackers. A simple water cracker, a buttery one, and maybe a seeded one. This gives your guests options. Part of good Food Boards For Parties is catering to different tastes.
Step 7: Add The Spreads And Dips
Spreads add another layer of flavor. Use small bowls or ramekins for things like honey, fig jam, or mustard. Placing these in bowls also helps contain them. This keeps your board from getting messy.
A small bowl of honey with a dipper is always a nice touch. A savory dip like hummus or a cheese spread can also be a great addition. These little details contribute to a thoughtful charcuterie board.
Step 8: Garnish For The Final Touch
The final step is the garnish. This is like adding jewelry. A few sprigs of fresh rosemary or thyme can make a big impact. They add a touch of green and a wonderful aroma.
Edible flowers are another beautiful option if you can find them. This last step really polishes the look. It shows you put extra care into creating your board. Now step back and admire your work.


How To Store Leftovers
If you have leftovers, which is rare, storing them correctly is important. The components should be stored separately. Wrap leftover cheeses in wax or parchment paper. Then place them in a container or a plastic bag.
Meats should be stored in an airtight container in the refrigerator. The same goes for fruits, olives, and pickles. Crackers and nuts should be stored in an airtight container at room temperature to keep them crisp.
Do not just cover the entire board with plastic wrap. This can make everything soggy. Taking a few extra minutes to store items properly will keep them fresh.
Tips
Here are a few extra tips to make your Charcuterie Board Ideas even better. First, let your cheeses sit at room temperature for about 30 minutes before serving. This really brings out their flavor.
Think about balance. You want a good mix of flavors. Salty, sweet, savory, and tangy. You also want a variety of textures. Creamy cheese, crunchy nuts, crisp crackers, and soft fruit.
Don’t be afraid to use what you have. Check your pantry and fridge before you go shopping. You might already have nuts, dried fruit, or a jar of jam that would be a great addition. This helps keep costs down.
Lastly, remember to provide small knives for the cheeses and spoons for the jams. This makes it easy for guests to serve themselves. Little details like this make the experience much more enjoyable for everyone.
Conclusion
Creating a beautiful charcuterie board is a simple pleasure. It is a chance to be creative and share delicious food with people you care about. It is more than just an appetizer. It is an experience.
I hope these Charcuterie Board Ideas have inspired you. Remember, there are no hard rules. Use this guide as a starting point. Then let your own tastes and creativity lead the way. Have fun with it.
FAQ
How Much Meat And Cheese Per Person?
A good guideline is about 2 to 3 ounces of cheese and 2 ounces of meat per person. This is for an appetizer portion. If the board is the main meal, you might want to increase that to 4 to 5 ounces of each per person.
Can I Make A Charcuterie Board Ahead Of Time?
Yes, you can do some prep work in advance. You can slice cheeses and meats a day ahead. Store them in separate airtight containers. You can also wash and prep your fruits. Assemble the board right before serving for the best freshness.
What If I Am On A Budget?
You can absolutely make a great board on a budget. Look for cheeses and meats that are on sale. Stores like Aldi and Trader Joe’s have great affordable options. Using seasonal fruits is also a good way to save money.
What Drinks Pair Well With A Charcuterie Board?
Wine is a classic pairing. A crisp Sauvignon Blanc or a light Pinot Noir are both great choices. For beer lovers, a light lager or a fruity saison works well. Sparkling water with a slice of lemon is also a refreshing non alcoholic option.
Easy Charcuterie Board Ideas
Creating a beautiful charcuterie board is a simple, creative way to entertain. This guide offers ideas for assembling a board with a variety of cheeses, meats, fruits, and accompaniments that is both visually appealing and delicious.
Requirements


Ingredients
Instructions
- Start by selecting a large board or platter as your canvas.
- Place the cheeses on the board first, spreading them out to create balance. Use an odd number for visual appeal.
- Arrange the cured meats. Fold salami into ruffles or create a ‘salami river’ flowing across the board.
- Add fruits like grapes, sliced apples, and figs to create pops of color and add sweetness.
- Fill in any empty spaces on the board with smaller items like nuts, olives, and pickles to make it look abundant.
- Fan out crackers in various spots on the board. You can also serve sliced bread in a separate basket.
- Place spreads like honey or jam into small bowls or ramekins and position them on the board.
- For a final touch, garnish with fresh sprigs of rosemary or thyme to add aroma and a touch of green.
Notes
For the best flavor, let your cheeses sit at room temperature for about 30 minutes before serving.
Aim for a balance of flavors (salty, sweet, savory, tangy) and textures (creamy, crunchy, crisp, soft).
Provide small knives for the cheeses and spoons for the jams to make serving easy for your guests.
Nutrition
Calories
Sugar
Fat
Carbs