Halloween is just around the corner, and you know what that means. It is time for costumes, spooky movies, and of course, some amazing food. If you are looking for a fun and easy way to delight your guests or family, I have just the thing for you. This Halloween Charcuterie Board is a total showstopper.
It is all about mixing and matching your favorite sweet and savory bites on one giant platter. There is truly no cooking required, just some creative assembly. Let’s get into making this festive and delicious Halloween Food Board.
Jump To:
Why You’ll Love This Recipe
Honestly, what is not to love about a giant board filled with snacks? This Halloween Charcuterie Board is a favorite for so many reasons, and I think it will be yours too.
First off, it is incredibly easy to put together. You do not need any special culinary skills. If you can open a bag and arrange things on a board, you can make this. It is all about having fun with it.
It is also completely customizable. Think of this recipe as a starting point, a fun suggestion. You can swap out any ingredient for something you like better. It is a great way to use up leftover candies or snacks you have in the pantry.
This board is a certified crowd pleaser. Kids go wild for the candy and fun treats, while adults appreciate the mix of savory options like chips and dip. It brings everyone together around the table, which is always a win in my book.
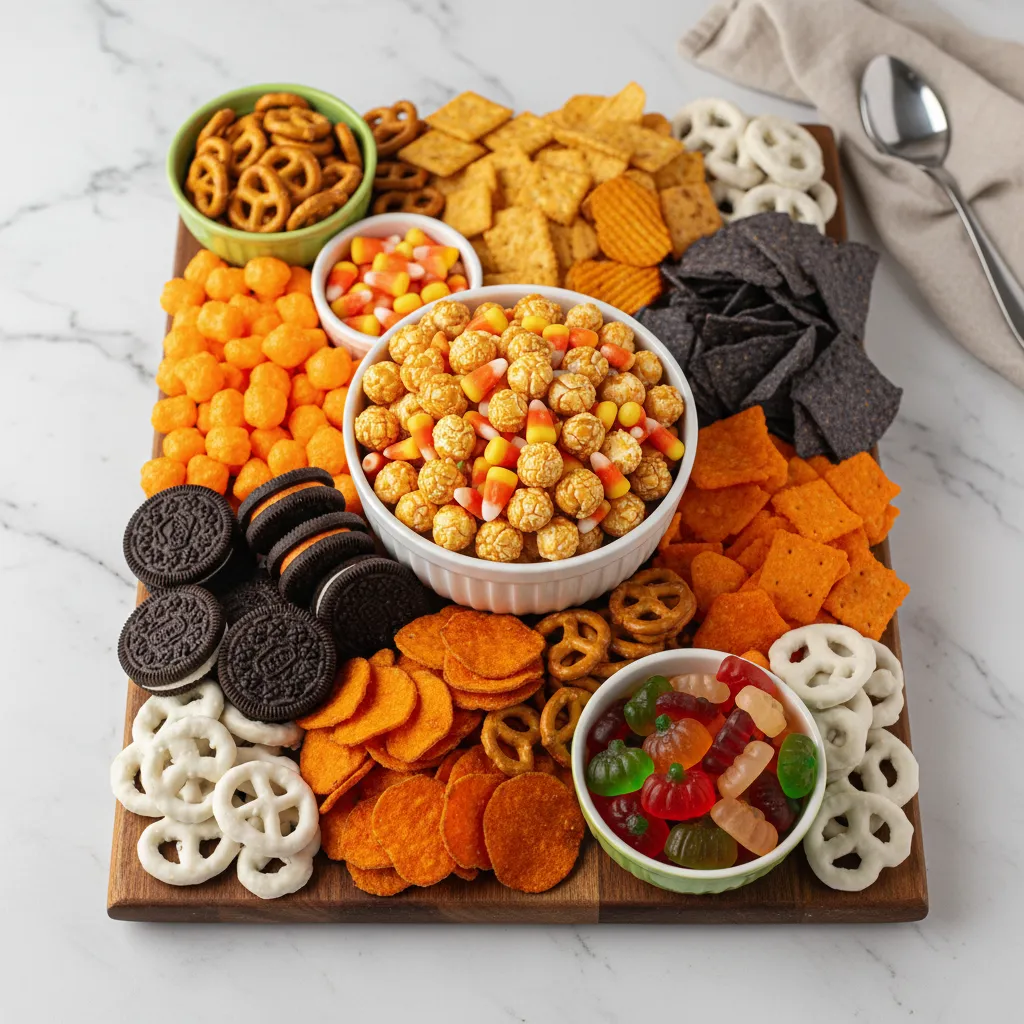
Another great thing is the visual appeal. This Spooky Charcuterie Board doubles as a festive centerpiece for your Halloween party. The bright oranges, deep blacks, and spooky shapes look amazing. Your guests will definitely be taking pictures of it.
Plus, the combination of flavors is just fantastic. You get the salty crunch from the chips and popcorn, the sweetness from the candies and caramel, and the freshness from the apple slices. It hits all the right notes for a satisfying snack experience.
It is also a wonderful activity to do with kids. Let them help arrange the candies and gummies. They will have a blast creating their own spooky patterns and designs on the board. It is a memory making activity for sure.
Ingredients
Here is a list of what I used for this particular Halloween Charcuterie Board. Remember, these are just ideas to get you started. Feel free to get creative with your own favorite Halloween treats.
- 2 cups white cheddar popcorn
- 1 cup mini marshmallows
- 1 cup candy corn
- 1 cup candy pumpkins
- 20 plant based gummy candies
- 1 large green apple, sliced
- ½ cup caramel dipping sauce
- 2 cups tortilla chips
- ½ cup queso dip
- 10 Oreo cookies
- 1 bar chocolate, broken into pieces
Feel free to add other things. Some spooky shaped pretzels, a few different kinds of crackers, or even some cheese cubes would be great additions. The goal is to have a variety of textures and flavors on your charcuterie board.
Step By Step Instructions
Putting together your Halloween Food Board is the best part. It is like making a delicious piece of art. Here is how I like to do it.
Step 1: Place Your Bowls
First, grab your board. This can be a cutting board, a large platter, or a dedicated charcuterie board. Place your small bowls on the board. I like to put them in opposite corners to create some balance.
These bowls will act as anchors for your design. Fill them with the dips like caramel and queso. You can also fill them with smaller items that might roll away, like the mini marshmallows or candy corn. This keeps everything tidy.
Step 2: Arrange The Larger Items
Next, start placing your larger ingredients around the bowls. Create sections for each item. For example, make a nice pile of tortilla chips next to the queso dip. Fan out the apple slices near the caramel sauce.
Think about colors and textures. You do not want all the orange items clumped together. Spread them out across the board to create visual interest. Place the white cheddar popcorn in a corner to add a different texture and color.
I like to create gentle curves or S shapes with items like the Oreo cookies. This is often called creating a river on the board. It helps guide the eye across all the delicious offerings and makes the board look more dynamic.
Step 3: Fill In The Gaps
Now for the final touch. Look for any empty spaces on your Spooky Charcuterie Board. Use your smaller items to fill these gaps. This is where the gummy candies, candy pumpkins, and extra marshmallows come in handy.
Tuck them into any little nook or cranny. This makes the board look abundant and full. You can sprinkle some candy corn around the edges or place broken chocolate pieces between the cookies and apples. Have fun with it until your board looks complete.


How To Store Leftovers
If you somehow have leftovers from your amazing Halloween Charcuterie Board, storing them is pretty simple. The key is to separate the different components to keep them fresh.
First, take everything off the board. Put the dips like queso and caramel back into airtight containers and place them in the refrigerator. They should stay good for a few days.
For the crunchy items like popcorn and tortilla chips, store them in sealed bags or containers at room temperature. This will prevent them from getting stale. The same goes for the Oreo cookies.
Candies and marshmallows can be stored together in a container or bag at room temperature. The sliced apples are best eaten fresh, but if you have leftovers, you can store them in the fridge. Just know they might turn a little brown.
It is best to disassemble the board soon after your party ends. This ensures everything stays as fresh as possible for you to enjoy later. A little bit of work now saves you from sad, stale snacks tomorrow.
Tips
Here are a few extra tips to make your Halloween Food Board experience even better. These are little things I have learned along the way.
If you are serving this board to a crowd with very small children, be mindful of choking hazards. Things like hard candies or even whole grapes if you add them can be tricky for little ones. Always supervise them while they are snacking.
Consider making a nut free board if you are unsure about guest allergies. It is a thoughtful touch that ensures everyone can enjoy the snacks without worry. Just check the labels on your packaged goods to be safe.
If you plan to serve your charcuterie board outside, think about the weather. On a hot day, chocolate and certain dips might melt. Also, sweet items can attract insects. It might be best to keep it indoors until it is time to eat.
Do not be afraid to add some non edible decorations. Small plastic spiders, a skeleton hand reaching out from a pile of popcorn, or some fake cobwebs can really add to the spooky vibe. Just make sure your guests know not to eat them.
For a truly cohesive look, try sticking to a color theme. A black, white, and orange theme is classic for Halloween. You can find candies, cookies, and even chips that fit this color scheme easily. It makes your board look very put together.
Conclusion
And there you have it. A simple, fun, and delicious Halloween Charcuterie Board that is sure to be a hit. It is the kind of recipe that is more about creativity and fun than it is about precise measurements and steps.
I hope you have a wonderful time creating your own spooky snack masterpiece. It is one of my favorite Halloween treats to make, and I am sure it will become a tradition in your home too. Happy Halloween and happy snacking.
FAQ
Can I Make This Halloween Food Board Ahead Of Time?
You can definitely do some prep work in advance. You can wash and slice your apples, portion out your candies, and get your dips ready. Store everything in separate airtight containers in the fridge.
However, I recommend assembling the full charcuterie board just before serving. This keeps everything fresh, especially the crunchy items like chips and popcorn. Assembly only takes a few minutes, so it is easy to do right before your guests arrive.
What Kind Of Board Should I Use?
You can use almost any large, flat surface. A wooden cutting board is a classic choice. A large ceramic platter, a baking sheet, or even a clean piece of slate will work just as well. The most important thing is that it is food safe and large enough to hold all your goodies.
How Do I Make My Board Look Extra Spooky?
There are so many fun ways to add a spooky touch. Look for gummy candies shaped like worms, eyeballs, or spiders. You can use a cookie cutter to cut fun shapes out of cheese slices. Adding small plastic spiders or skeleton decorations around the board also adds a great festive element to your Spooky Charcuterie Board.
What Are Some Good Savory Additions?
If you want to balance out the sweetness, there are plenty of savory options. You could add some cheese cubes, like cheddar or monterey jack. Different types of crackers or pretzels are always a great choice. You could also include some cured meats like salami or pepperoni for a more traditional charcuterie board feel.
Halloween Charcuterie Board
This fun and easy Halloween Charcuterie Board is the perfect no-cook centerpiece for any party. A festive mix of sweet and savory treats that everyone will love.
Requirements


Ingredients
Instructions
- Place small bowls for dips (like caramel and queso) on your charcuterie board, typically in opposite corners to act as anchors.
- Arrange the larger items around the bowls. Create sections for the tortilla chips next to the queso, fan out apple slices near the caramel, and make piles of popcorn and cookies.
- Fill in all the empty spaces with the smaller items. Tuck candy corn, gummy candies, candy pumpkins, and broken chocolate pieces into any gaps to make the board look full and abundant.
Notes
For an extra spooky touch, use Halloween-themed cookie cutters on cheese slices or add non-edible decorations like plastic spiders.
Feel free to customize! Add other items like pretzels, crackers, or different types of candy to make the board your own.
If serving to small children, be mindful of choking hazards like hard candies and supervise them while snacking.
Nutrition
Calories
Sugar
Fat
Carbs