Have you ever craved ice cream but wanted to stick to your health goals? I have been there so many times. You want something sweet, cold, and creamy, but not all the sugar and calories that come with it. It feels like an impossible choice sometimes, right?
Well, what if I told you that you could have amazing ice cream that is packed with protein? It sounds too good to be true, I know. But with this Ninja Creami Protein Ice Cream Recipe, it is totally possible. This machine has seriously changed my dessert routine for the better.
Jump To:
Why You’ll Love This Recipe
Let’s talk about why this recipe is so special. First off, the texture is unbelievable. It is so smooth and creamy, just like traditional ice cream. You will not believe it came from a protein shake. It is a fantastic way to satisfy your sweet tooth without any guilt.
Another huge plus is how simple it is. We are talking about just three ingredients. Yes, three! You do not need a long list of complicated items. This makes it a go to option for a quick and easy treat. It is one of my favorite High Protein Meals when I need something satisfying.
It is also incredibly versatile. You can enjoy this as a post workout snack to refuel your body. Or, serve it as a light dessert after dinner. I have even had it for breakfast on warm days. Seriously, it is a great addition to your list of Breakfast Ideas.
The customization options are endless too. While this is one of my favorite Vanilla Ninja Creami Ice Cream Recipes Protein based, you can switch it up. Use different shake flavors or add fun mix ins. You get to be creative and make it exactly how you like it.
Finally, it is a recipe that actually supports your fitness goals. Getting enough protein can be a challenge. This Ninja Creami Protein Ice Cream Recipe makes it enjoyable. It feels like a treat, but it is helping you build muscle and stay full longer. What is not to love?
Ingredients
Getting started is super simple. Here is what you will need to create this amazing protein packed dessert. I have included options for both the standard and deluxe sized Ninja Creami pints.
For a Standard Pint
- 14 ounces Fairlife Core Power Vanilla Protein Shake
- 1 tablespoon Stevia sweetener blend
- 1 tablespoon sugar free instant vanilla pudding mix
For a Deluxe Pint
- 21 ounces Fairlife Core Power Vanilla Protein Shake
- 1 ½ tablespoons Stevia sweetener blend
- 1 ½ tablespoons sugar free instant vanilla pudding mix
A quick note on the ingredients. The Fairlife protein shake is a great choice because it is already creamy and has a fantastic vanilla flavor. The sugar free pudding mix is the key to getting that super smooth texture. It helps prevent ice crystals from forming, which gives you that classic ice cream feel.
Step By Step Instructions
Ready to make some magic? Follow these simple steps to create your own delicious Ninja Creami Protein Ice Cream Recipe. It is easier than you think!
Step 1: Mix The Base
First, grab a mixing bowl. Pour in the protein shake, the Stevia sweetener, and the sugar free pudding mix. Use a whisk to combine everything really well. Keep whisking until the Stevia has completely dissolved.
You will notice that the pudding mix might not fully dissolve, and that is perfectly okay. You might also see some bubbles forming from whisking. Just let the mixture sit for about a minute to let those bubbles settle down. This helps create a smoother final product.
Step 2: Freeze The Pint
Once your base is mixed, carefully pour it into a clean Ninja Creami pint. Be sure not to fill past the max fill line. Secure the lid on the pint. Now for the most important part: the freeze.
Place the pint on a completely level surface in your freezer. This is crucial for the machine to process it correctly later. Let it freeze for a minimum of 12 hours. Honestly, 24 hours is even better if you can wait. A solid freeze is key.
Step 3: Process In The Ninja Creami
After the long wait, it is time for the fun part. Take the frozen pint out of the freezer and remove the lid. Place the pint into the outer bowl of your Ninja Creami machine. Attach the Creamerizer Paddle to the outer bowl lid and lock it into place.
Slide the entire bowl assembly into the machine’s motor base. Twist it to the right until it locks securely. Then, press the power button and select the Ice Cream program. Let the machine work its magic!
Step 4: Re Spin For Creaminess
Once the first cycle is complete, unlock and remove the bowl assembly. When you look inside, the mixture will probably look dry or crumbly. Do not panic! This is completely normal for a lite ice cream recipe like this.
To get that dreamy, creamy texture, you will need to re spin it. Just put it back in the machine and press the Re Spin button. You might even need to do this two or three times. Keep re spinning until it reaches a smooth, scoopable consistency. It is so worth it.
Step 5: Add Mix Ins (Optional)
If you want to add some extra flair, now is the time. After you have achieved your creamy base, use a spoon to create a small tunnel down the center of the ice cream. Add your favorite mix ins, like chocolate chips, crushed cookies, or nuts.
Place the pint back into the machine and use the Mix In program. This will evenly distribute your additions throughout the ice cream without overmixing. Then, it is ready to serve immediately. Enjoy your homemade protein ice cream!


How To Store Leftovers
If you happen to have any leftovers, storing them is easy. Just use a spoon to smooth out the top surface of the ice cream in the pint. This helps prevent freezer burn and makes it easier to process later.
Place the storage lid back on the pint and pop it back into the freezer on a level surface. When you are ready to eat it again, you will need to re process it. Just put it back in the Ninja Creami and use the Ice Cream or Re Spin function until it is creamy again. It will taste just as good as the first time.
Tips
Here are a few extra tips to make sure your Ninja Creami Protein Ice Cream Recipe turns out amazing every single time. These little tricks can make a big difference.
Do not skip the pudding mix. It might seem like a small ingredient, but it is the secret to getting that ultra creamy texture. It acts as a binder and stabilizer, preventing the ice cream from becoming too icy.
Always freeze on a level surface. I mentioned this before, but it is so important. If the pint freezes at an angle, the blade can be damaged when you process it. So, find a flat spot in your freezer.
Be patient with the freezing time. A minimum of 12 hours is needed, but longer is better. A rock solid base gives the machine something to work with, resulting in a much smoother final product. Rushing this step will lead to disappointment.
Feel free to experiment with other flavors. This is one of the most fun Vanilla Ninja Creami Ice Cream Recipes Protein lovers can try, but do not stop there. You can use a chocolate protein shake and chocolate pudding mix for a rich, decadent treat. The possibilities are endless.
If the base is too hard after the first spin, add a splash of milk or more protein shake. Just a tablespoon is enough. This can help the mixture become creamier during the re spin cycle. This is a great trick for very low fat recipes.
Conclusion
So there you have it! A simple, delicious, and healthy way to enjoy ice cream. This Ninja Creami Protein Ice Cream Recipe is proof that you do not have to give up your favorite treats to stay on track with your goals. It is a fantastic way to enjoy one of many High Protein Meals.
Whether you need a quick breakfast idea, a post workout recovery snack, or just a guilt free dessert, this recipe has you covered. It is creamy, flavorful, and so easy to make. I hope you give it a try and love it as much as I do. Happy churning!
FAQ
Can I Use A Different Protein Shake?
Yes, you can definitely use other protein shakes. However, the final texture and taste might be different. Fairlife shakes are known for being very creamy, which contributes to a great result. If you use a different brand, you may need to adjust the amount of pudding mix or add a little something extra for creaminess.
Why Is My Ice Cream Icy?
If your ice cream is icy or crumbly, it almost always just needs a re spin. Lite and protein based ice creams often look this way after the first spin. Run it through the Re Spin cycle one or two more times. Adding a tablespoon of liquid like milk or more protein shake can also help achieve that smooth consistency.
Can I Make This Without A Ninja Creami?
Unfortunately, this specific Ninja Creami Protein Ice Cream Recipe is designed for the Ninja Creami machine. The machine’s process of shaving and churning a frozen block is what creates the unique creamy texture. You will not get the same results with a traditional ice cream maker or blender.
How Long Does It Need To Freeze?
For the best results, you need to freeze the pint for a minimum of 12 hours. I personally recommend freezing it for a full 24 hours if possible. This ensures the base is frozen completely solid, which is essential for the Ninja Creami to work its magic and create a super smooth texture.
What Are Some Good Mix In Ideas?
The sky is the limit for mix ins! Some popular choices include mini chocolate chips, crushed protein cookies, sprinkles, a swirl of peanut butter, or chopped nuts. Just remember to use the Mix In function on the machine to incorporate them gently after you have created your creamy ice cream base.
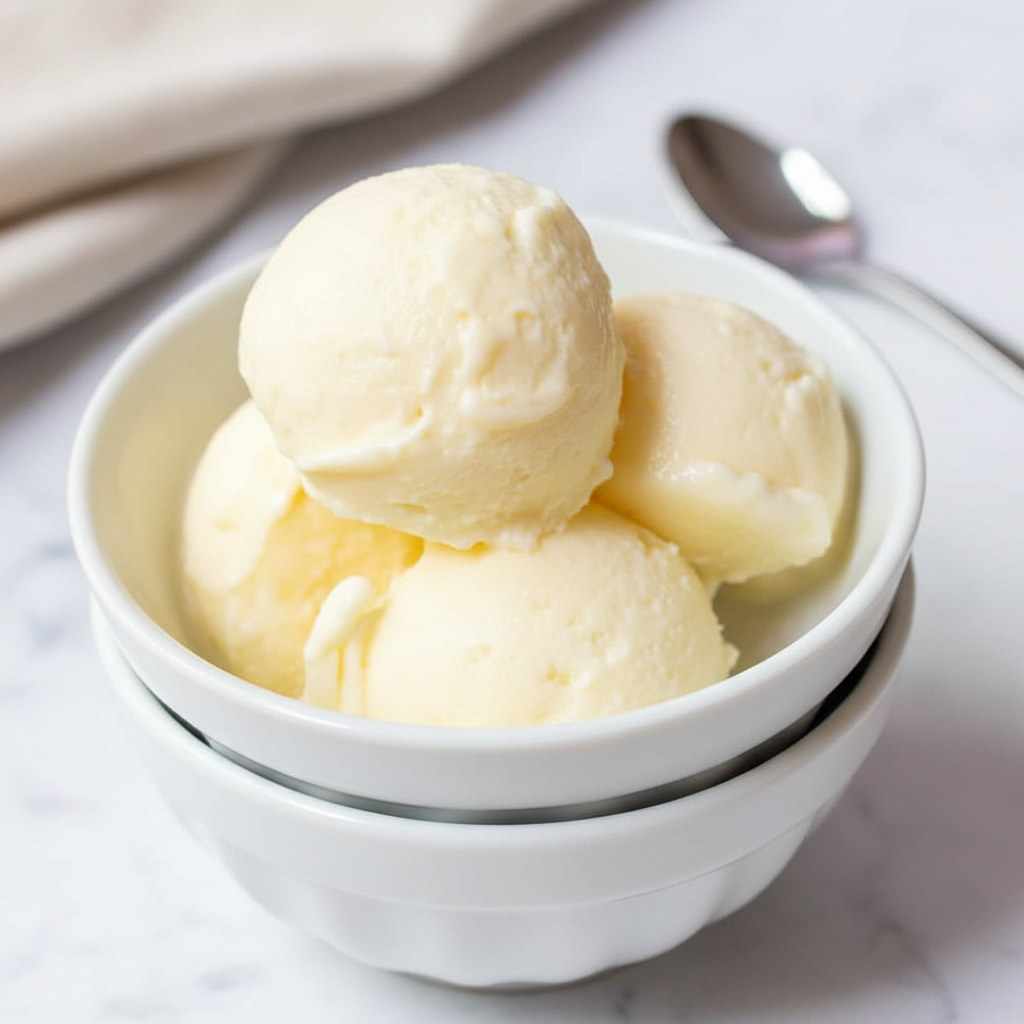
Ninja Creami Protein Ice Cream
A simple and delicious way to enjoy a high-protein treat. This creamy vanilla ice cream is easy to make with just three ingredients and is a fantastic guilt-free dessert or post-workout snack.
Ingredients
Instructions
- Mix Base: In a bowl, whisk protein shake, Stevia, and pudding mix until fully dissolved. Let sit for 1 minute.
- Freeze: Pour into a Creami pint (below the fill line). Freeze on a level surface for 12-24 hours until solid.
- Process: Install the frozen pint in the Ninja Creami and run the ‘Ice Cream’ program.
- Re-Spin: The mixture will likely be crumbly. This is normal. Run the ‘Re-Spin’ cycle 1-3 times until the texture is smooth and creamy.
- Add Mix-Ins (Optional): If desired, create a hole in the center, add your mix-ins, and run the ‘Mix-In’ function.
- Serve immediately and enjoy your homemade high-protein ice cream.
Notes
For a Deluxe Pint: Use 21 oz protein shake, 1 ½ tbsp Stevia blend, and 1 ½ tbsp pudding mix.
The sugar-free pudding mix is essential for creating a smooth, creamy texture and preventing ice crystals.
If the ice cream is still too crumbly after re-spinning, add 1 tablespoon of milk or more protein shake to help it process.
Nutrition (per serving)
Calories
Sugar
Fat
Protein