Have you ever found yourself staring into the freezer, craving a scoop of rich, creamy ice cream but not the sugar crash that comes with it? I have been there more times than I can count. Finding a treat that feels indulgent but fits a healthy lifestyle can be a real challenge. That all changed when I discovered the magic of making my own frozen desserts at home.
If you have a Ninja Creami, you are in for a real treat. We are about to dive into some amazing Ninja Creami Ice Cream Recipes that will change your dessert game. Get ready for a simple, tasty way to enjoy a guilt free sweet treat whenever you want. This is one of the best easy recipes Ninja Creami fans will love.
Jump To:
Why You’ll Love This Recipe
Honestly, what is not to love about homemade ice cream that is actually good for you? This recipe is a standout for so many reasons. First, it is incredibly simple. You do not need to be a kitchen whiz to get a perfect scoop every single time. It is a fantastic starting point for anyone new to making their own frozen treats.
The customization is where the real fun begins. You can change the flavor, the mix ins, and the texture to match your exact cravings. Whether you are in the mood for something chocolatey, fruity, or nutty, you can make it happen. This makes it one of the most versatile Ninja Creami Ice Cream Recipes you will find.
Plus, this is a fantastic protein ice cream. It is a wonderful way to satisfy your sweet tooth while still hitting your protein goals for the day. This recipe is designed to be one of those Ninja Creami Ice Cream Recipes high protein low cal options that do not taste like a compromise. It is creamy, flavorful, and so satisfying.
It is also a budget friendly option. Those little pints of specialty healthy ice cream from the store can add up quickly. Making your own at home is much more economical in the long run. You get to control the ingredients, avoid unwanted additives, and save a little money. It is a win win situation.
Ingredients
The beauty of these Ninja Cremini Recipes Protein style is the short and simple ingredient list. You likely have most of these items in your kitchen already. Here is what you will need to get started.
- 1 protein shake (around 11 to 11.5 ounces). Choose one made with dairy or a plant based milk. Make sure it has no alcohol based flavoring.
- 1 tablespoon sugar free pudding mix. Any flavor works, so pick your favorite. Chocolate, vanilla, and caramel are all great choices.
- 1 tablespoon cream cheese. Neufchâtel or regular cream cheese both work just fine.
- 1 tablespoon milk or plant based milk (optional). Almond, oat, or soy milk help create a smoother texture.
- Mix ins (optional). This is where you can get creative. Think chopped nuts, sugar free chocolate chips, fruit bits, or nut butter swirls.
Let’s talk a little about these ingredients. The protein shake is your base. A high quality, good tasting shake will make a huge difference in the final product. I personally like using vanilla or chocolate as a starting point because they are so versatile.
The sugar free pudding mix is a clever addition. It acts as a stabilizer, helping to give the ice cream a wonderfully smooth and creamy texture. It prevents those pesky ice crystals from forming, which is key for a great consistency. Plus, it adds an extra layer of flavor.
What about the cream cheese? It might sound a little strange, but it adds a richness and slight tang that balances the sweetness. It also contributes to that creamy mouthfeel we are all looking for in a good protein ice cream. Just a small amount makes a big impact on the overall texture.
Step-By-Step Instructions
Alright, let’s get down to the business of making some delicious ice cream. Following these steps will give you a creamy and delightful result every time. These are truly some of the most rewarding easy recipes Ninja Creami can handle.
Step 1: Blend The Base
First things first, you need to create your ice cream base. Grab your Ninja Creami pint. Pour in the protein shake, then add the tablespoon of sugar free pudding mix and the tablespoon of cream cheese. It is important to get this mixture as smooth as possible.
The best tool for this job is an immersion blender. You can stick it right into the pint and blend everything until it is completely smooth and uniform. This helps ensure there are no little lumps of cream cheese or pudding mix hiding in there. A smooth base leads to a smooth ice cream.
If you do not have an immersion blender, do not worry. You can simply pour all the base ingredients into a regular blender. Blend until everything is well combined, then pour the mixture back into the Ninja Creami pint. It works just as well.
Step 2: Freeze
Now for the hardest part: waiting. Secure the lid on your pint and place it in the freezer. It needs to sit on a level surface to freeze evenly. You will need to freeze the base for a full 24 hours. I know, it feels like a long time, but this step is so important.
The mixture needs to be frozen completely solid for the Ninja Creami to work its magic. If the base is not hard enough, the machine will not be able to process it correctly, and you will not get that signature creamy texture. So, be patient. It will be worth it.
Step 3: First Cycle
After 24 hours, it is time for the fun to begin. Take your frozen pint out of the freezer. Place it into the outer bowl of the Ninja Creami, attach the lid with the blade, and lock it into the machine. Select the Lite Ice Cream cycle and let it run.
When the first cycle is finished, remove the pint and take a look. It will probably look dry and crumbly, almost like powder. Do not panic. This is completely normal for Ninja Creami Ice Cream Recipes, especially those with a high protein content. We are not done yet.
Step 4: Re Spin For Creaminess
This is the step that transforms the crumbly mixture into a creamy dream. Add one tablespoon of milk or a little bit of your protein shake directly to the pint. This added liquid helps the machine reprocess the base into a smoother consistency.
Put the pint back into the machine and run the Re Spin cycle. Check it again after the cycle finishes. It should be much creamier. Sometimes, depending on your freezer temperature and ingredients, you might need to run the Re Spin cycle one or two more times. Keep going until it reaches that smooth, scoopable texture you see in the pictures.
Step 5: Add Mix Ins (Optional)
If you want to add some extra texture and flavor, now is the time. Use a spoon to create a small hole in the center of your ice cream, going all the way down to the bottom of the pint. This is where you will add your mix ins.
Sprinkle in your chosen additions. Some of my favorites are chopped walnuts for a nice crunch, a swirl of peanut butter for richness, or a few sugar free dark chocolate chips for a classic touch. Once your mix ins are in the pint, place it back in the machine and run the Mix In cycle. This will distribute them evenly throughout the ice cream.
Step 6: Serve And Enjoy
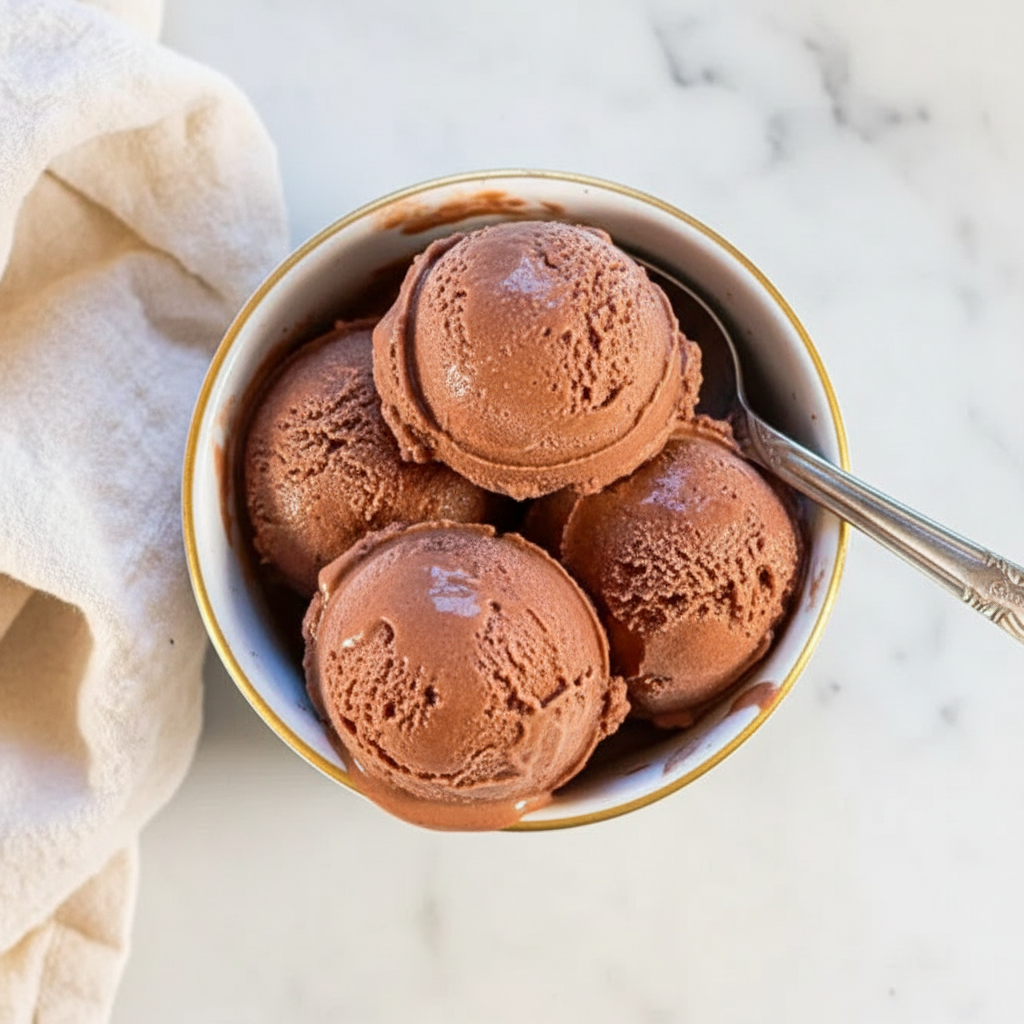
Your delicious homemade protein ice cream is ready to eat. You can enjoy it right away for a soft serve like texture. It will be smooth, creamy, and so satisfying. This is one of my favorite ways to enjoy these Ninja Cremini Recipes Protein style.
If you prefer a firmer, more traditional scoopable ice cream, you can put the pint back in the freezer for about 30 to 60 minutes. This will allow it to firm up a bit more without becoming rock solid. Then, scoop and enjoy your amazing creation.


How To Store Leftovers
So, you have made a delicious pint of ice cream, but you cannot finish it all in one sitting. No problem at all. Storing leftovers is simple, but there is a right way to do it to keep your ice cream tasting great.
First, make sure to smooth out the top surface of the remaining ice cream in the pint. A level surface helps prevent large ice crystals from forming. Then, just pop the original lid back on and place it back in the freezer. It is as easy as that.
When you are ready for another scoop, your ice cream will be frozen solid again. You will need to reprocess it to get it back to that creamy state. Just place the pint back into the Ninja Creami and run the Re Spin cycle. You might need to add a splash of milk again, just like before. It will be just as good as the first time.
Tips
Over time, I have picked up a few extra tips and tricks that help make these Ninja Creami Ice Cream Recipes even better. Here are some of my go to suggestions for getting the best results.
For the best Ninja Creami Ice Cream Recipes high protein low cal outcome, pay attention to your protein shake. A shake that is higher in protein and lower in sugar tends to produce a better texture. The type of protein, like whey or casein, can also affect the final creaminess.
If you want an even richer, more decadent texture, try blending in one teaspoon of coconut cream with your base ingredients before freezing. It adds a little extra fat, which results in a smoother, more luxurious mouthfeel. It is a small change that makes a big difference.
For a nut free version, you can still enjoy delicious mix ins. Skip the chopped nuts and nut butters. Instead, try using crushed pumpkin seeds or sunflower seeds for a nice crunch. Crushed sugar free cookies or shredded coconut are also fantastic options.
Do not be afraid to experiment with extracts. A tiny splash of vanilla extract can enhance a chocolate base, while a drop of peppermint extract can turn it into a refreshing mint chip flavor. Just be sure to use extracts that are not alcohol based, as alcohol can interfere with the freezing process.
Conclusion
And there you have it. A simple, delicious, and healthy way to make amazing ice cream at home. These Ninja Creami Ice Cream Recipes are a fantastic way to enjoy a favorite dessert without any of the guilt. It is all about having fun in the kitchen and creating something you truly love.
Whether you are a seasoned pro or just starting your journey with easy recipes Ninja Creami can create, this method is for you. The ability to customize your flavors and mix ins means you will never get bored. You can create endless combinations to suit any mood or craving.
So go ahead, grab your protein shake and get blending. I hope you enjoy every creamy, delicious scoop of your homemade protein ice cream. It is a wonderful way to treat yourself well. Happy churning!
FAQ
Can I Make This Recipe Dairy Free?
Yes, absolutely. To make this dairy free, simply use a plant based protein shake made with almond, soy, or oat milk. Choose a dairy free cream cheese alternative and use a plant based milk for the re spin process. The results are just as creamy and delicious.
Why Is My Ice Cream Icy Instead Of Creamy?
An icy texture usually means the base needs more fat or protein to stabilize it, or it needs another re spin. Make sure your protein shake is high quality. Adding a small amount of cream cheese or coconut cream can help. Also, do not be shy with the Re Spin button. Sometimes it takes two or three spins to get it just right.
Can I Use A Different Sweetener?
This recipe gets its sweetness from the protein shake and pudding mix, which are usually sweetened with sugar alternatives. If you want it sweeter, you can add a tablespoon of a powdered sweetener like erythritol or a few drops of liquid stevia to the base before freezing. Avoid liquid sweeteners like maple syrup, as they can affect the texture.
Do I Really Need To Freeze It For 24 Hours?
Yes, this is a crucial step. The Ninja Creami works by shaving super thin layers off a completely frozen block. If your base is not solid all the way through, the machine cannot process it properly, and you will end up with a slushy or uneven texture instead of creamy ice cream.
What Are Some Good Mix In Combinations?
The possibilities are endless. For a chocolate base, try adding peanut butter cups and a swirl of caramel. For a vanilla base, fresh berries and white chocolate chips are a great choice. You could also try brownie chunks, cookie dough pieces, or even a swirl of fruit jam. Have fun with it.
High Protein Ninja Creami Ice Cream
A simple and tasty recipe for a creamy, high-protein ice cream made in a Ninja Creami. This healthy treat is fully customizable and perfect for a guilt-free dessert that doesn’t compromise on flavor.
Ingredients
Instructions
- Blend the Base: In the Ninja Creami pint, combine the protein shake, sugar-free pudding mix, and cream cheese. Use an immersion blender or regular blender to mix until completely smooth.
- Freeze: Secure the lid on the pint and place it on a level surface in the freezer. Freeze for at least 24 hours until completely solid.
- First Cycle: Place the frozen pint into the outer bowl, attach the blade lid, and lock it into the Ninja Creami machine. Select and run the ‘Lite Ice Cream’ cycle. The mixture will likely look dry or crumbly after this step.
- Re-Spin for Creaminess: Add 1 tablespoon of milk or a bit of your protein shake to the pint. Install it back into the machine and run the ‘Re-Spin’ cycle. You may need to run the re-spin cycle more than once to achieve a smooth, creamy texture.
- Add Mix-Ins (Optional): If adding mix-ins, create a hole down the center of the ice cream. Add your desired ingredients, and then run the ‘Mix-In’ cycle to distribute them evenly.
- Serve and Enjoy: You can serve the ice cream immediately for a soft-serve texture, or return it to the freezer for 30-60 minutes for a firmer, more scoopable consistency.
Notes
For the best texture, use a high-quality protein shake that is higher in protein and lower in sugar.
For a richer, more decadent texture, blend in one teaspoon of coconut cream with the base ingredients before freezing.
Experiment with non-alcohol-based extracts like vanilla or peppermint to create new flavor combinations.
Nutrition
Calories
Sugar
Fat
Carbs