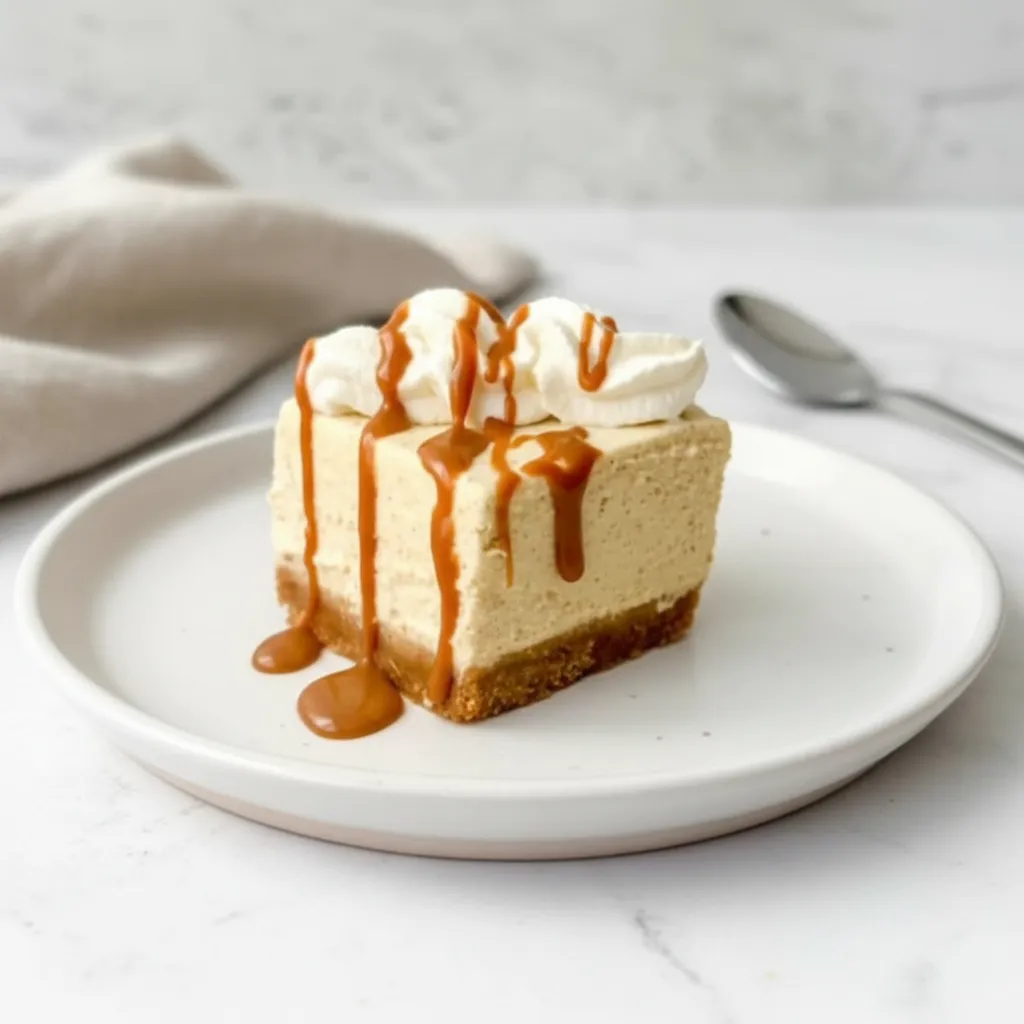
Fall is in the air, and you know what that means: pumpkin everything! But let’s be real, sometimes you want all those warm, cozy flavors without spending hours in the kitchen or even turning on your oven. That’s where these incredible Gluten-Free No Bake Pumpkin Cheesecake Bars come into play. They are seriously simple, delightfully creamy, and bursting with all the spiced pumpkin goodness you could ask for. Whether you are a baking beginner or just looking for an easy win, these No Bake Pumpkin Cheesecake Recipes are a game changer.
Imagine a crisp, ginger spiced crust topped with a dreamy, smooth pumpkin cheesecake filling, all without breaking a sweat. It is a fantastic option for anyone needing a Gluten Free Pumpkin Cheesecake and a definite crowd pleaser for any autumn gathering. So, let’s dive in and whip up some pure seasonal joy that everyone can enjoy!
Jump To:
Why You’ll Love This Recipe
Honestly, what is not to love? First off, it is a No Bake Cheesecake Recipe, which means less time hovering over a hot oven and more time enjoying those crisp fall days. That alone is a huge win in my book, especially when you are craving something sweet but want an effortless fall treat.
These Pumpkin Cheesecake Bars are a snap to put together. You do not need any fancy equipment, just a few bowls and an electric whisk. This makes it a fantastic recipe for beginners who want to try their hand at making impressive desserts without the stress. Plus, the ingredients are straightforward and easy to find.
The flavor profile here is just spot on for the season. We are talking rich pumpkin puree blended with warm spices like cinnamon, nutmeg, and allspice. It tastes just like autumn in a bite. And for those with dietary considerations, using gluten free ginger snaps cookies makes these Gluten Free Pumpkin Cheesecake bars an accessible delight.
They are also incredibly versatile. You can dress them up with a dollop of whipped cream and a drizzle of caramel for a fancy touch, or keep them simple for an everyday snack. These bars keep well in the fridge, making them a wonderful make ahead option for parties or just to have on hand for when a craving strikes. They are the definition of convenient, delicious Fall Cheesecake Recipes.
Ingredients
For the Gingernut Base
- 320 Grams Gingernut Cookies or Ginger snap cookies (I used gluten free ginger snaps cookies to make gluten free pumpkin cheesecake)
- 150 Grams Unsalted Butter Melted
For the Pumpkin Cheesecake Filling
- 450 ml Heavy Cream AKA Double cream
- 500 grams Full fat Cream Cheese (Always use full fat cream cheese as the higher fat content is required for a firm setting. I used Philadelphia full-fat cream cheese)
- 250 grams Pumpkin Puree
- 150 grams Powdered sugar AKA Icing sugar
- 1 teaspoon Vanilla extract
- 1 teaspoon Ground Cinnamon
- ¼ teaspoon Nutmeg
- ¼ teaspoon All spice
- ¼ teaspoon Salt
For the Optional Cream Topping
- 300 ml Heavy Cream AKA Double cream
- 50 grams Powdered Sugar AKA Icing sugar
- ½ teaspoon Vanilla extract
Step-By-Step Instructions
Prepare the Pan
First things first, get your 8×8 baking tin ready. Line both the bottom and sides with parchment paper. Make sure to leave a slight overhang, trust me, this little trick makes it so much easier to lift the cheesecake out once it is set.
Crush the Gingernuts
Now, let’s tackle the base. Place your gingernut cookies in a food blender and pulse them until they turn into fine, sand like crumbs. No blender? No problem! Just pop the cookies into a food bag and use a rolling pin or the back of a wooden spoon to crush them. Aim for those fine crumbs we talked about.
Combine with Butter
Once your crumbs are ready, transfer them into a mixing bowl. Melt the unsalted butter and pour it over the crumbs. Mix everything really well until the crumbs are completely coated and combined with the butter. It should look like wet sand.
Press and Chill the Base
Transfer this buttery crumb mixture into your prepared baking tin. Spread it out evenly and then press down very firmly. You want a compact, solid base. Use the bottom of a glass or your knuckles to really pack it in there. Pop the tin into the fridge to set for at least an hour while you get the filling ready.
Whip the Cream
Grab a large bowl and pour in the heavy cream. Using an electric handheld whisk, whip the cream until it forms nice, stiff peaks. You will know it is ready when you can pull the whisk out and the cream holds its shape. Set this bowl aside for a moment.
Beat Cream Cheese Mixture
In a separate bowl, beat the full fat cream cheese until it is soft and smooth. A little tip here: if you are using cream cheese from a tub, gently pat it dry with a paper towel first to remove any excess moisture. Too much water can prevent your cheesecake from setting properly. Then, add the pumpkin puree, powdered sugar, vanilla, cinnamon, allspice, nutmeg, and salt. Beat until the mixture is beautifully smooth and thick. For the pumpkin puree, canned is generally best for no bake recipes. It is also a good idea to strain your pumpkin puree through a cheesecloth to remove any extra liquid, even canned puree can hold a surprising amount.
Gently Fold Together
Now, carefully add the whipped cream to your pumpkin cream cheese mixture. Gently fold it in with a spatula. The key word here is ‘gently.’ You want to combine everything fully without losing all that lovely air you whipped into the cream. Stop folding as soon as no streaks of cream remain.
Chill the Cheesecake
Transfer the smooth, creamy pumpkin cheesecake filling into the tin, spreading it evenly over the chilled gingernut base. Smooth out the top with a spatula. This is the hardest part: place the tin back into the fridge to set for at least 8 hours, though preferably overnight. Patience is a virtue here, as a fully set cheesecake is a happy cheesecake!
Serve and Enjoy
When your Gluten-Free No Bake Pumpkin Cheesecake Bars are perfectly set, remove the tin from the fridge. Use the parchment paper overhang to carefully lift the cheesecake out. Slice it into your desired bar sizes. For an extra special touch, you can add an optional cream topping.
Prepare Optional Topping
If you are going for the optional cream topping, sift the powdered sugar. In a bowl, whisk the heavy cream, vanilla extract, and powdered sugar until the cream is smooth and just starting to thicken. Be careful not to over whisk. Place the cream into a piping bag with your favorite nozzle tip and pipe delightful swirls on top of each bar. A drizzle of caramel sauce can also take these Fall Cheesecake Recipes over the top.


How To Store Leftovers
So, you have got some delicious Gluten-Free No Bake Pumpkin Cheesecake Bars left over? Lucky you! To keep them fresh and tasty, simply place them in a sealed airtight container. Pop that container into the fridge, and your bars will stay wonderful for up to three days. It is a fantastic way to enjoy a little bit of fall flavor whenever you want without any extra effort.
Just a quick reminder: if you added the optional whipped cream topping, it is best enjoyed fresh. If you plan on storing them for a few days, consider adding the topping just before serving each bar. This helps maintain the best texture and appearance of both the cream and the cheesecake itself.
Tips
Making these Gluten-Free No Bake Pumpkin Cheesecake Bars is pretty straightforward, but a few simple tips can truly make all the difference, ensuring your results are absolutely stellar every single time.
When it comes to the cream cheese, opting for a full fat variety is a must. This higher fat content is crucial for achieving that firm, stable set we all want in a No Bake Cheesecake Recipe. If you are in the US, block cream cheese tends to have less moisture than the tub varieties, which is a big plus. Additionally, gently patting your cream cheese dry with a clean kitchen towel or paper towel before you start can remove any excess water. This step might seem small, but it really helps prevent a runny filling.
For the pumpkin puree, using canned is generally recommended for its consistent texture and moisture level. However, even canned puree can hold quite a bit of liquid. That is why I highly suggest straining your pumpkin puree through a cheesecloth. You will be surprised by how much liquid drains out! Reducing this extra moisture is key for a perfectly set, creamy Gluten Free Pumpkin Cheesecake. If you are feeling ambitious and want to use homemade pumpkin puree, just be extra diligent about straining it to achieve a similar dry consistency. Remember, we are trying to reduce any extra liquid that could interfere with the cheesecake setting properly.
Lastly, do not skimp on the chilling time. Eight hours, or even better, overnight, is not just a suggestion; it is a vital step. This extended chill time allows the cheesecake to firm up completely, giving you those beautiful, clean slices you see in the pictures. Rushing it might lead to a softer, less stable bar. Trust the process, and you will be rewarded with delightful Pumpkin Cheesecake Bars.
Conclusion
Well, there you have it! A truly effortless way to bring the warm, inviting flavors of autumn into your home with these incredible Gluten-Free No Bake Pumpkin Cheesecake Bars. We have walked through every step, from creating that sturdy, ginger spiced base to whipping up the wonderfully creamy, perfectly spiced pumpkin filling.
This recipe is a real winner for anyone looking for delicious Fall Cheesecake Recipes that are both easy to make and friendly for those needing Gluten Free Pumpkin Cheesecake options. It is proof that you do not need an oven or a culinary degree to create something truly special and seasonal. So go ahead, give this recipe a try, gather your loved ones, and savor every single bite of these delightful bars. Happy fall cooking, everyone!
FAQ
Can I Make This Dairy Free?
While this specific recipe uses heavy cream and cream cheese, you could experiment with dairy free alternatives. Look for dairy free full fat cream cheese blocks and plant based heavy cream that is designed for whipping. Results may vary in texture and setting.
How Far in Advance Can I Prepare These Bars?
You can prepare these Gluten-Free No Bake Pumpkin Cheesecake Bars up to three days in advance. Just store them in an airtight container in the refrigerator. If you are adding the optional whipped cream topping, it is best to do that right before serving.
What if I Do Not Have Gingernut Cookies?
If gingernut cookies are not available, you can use any other crunchy ginger snap style cookie. Just ensure they are gluten free ginger snaps cookies if you need a Gluten Free Pumpkin Cheesecake option. Plain gluten free digestive biscuits could also work, though the ginger spice would be less prominent.
Can I Freeze These Pumpkin Cheesecake Bars?
Yes, you can freeze these bars! Once fully set, slice them and place them on a baking sheet lined with parchment paper. Freeze until firm, then transfer the frozen bars to an airtight freezer safe container or bag, separating layers with parchment. They will keep for up to one month. Thaw in the refrigerator before serving.
Why Did My Cheesecake Not Set Properly?
The most common reasons for a cheesecake not setting are not using full fat cream cheese, insufficient chilling time, or too much moisture in the cream cheese or pumpkin puree. Make sure to pat your cream cheese dry and strain your pumpkin puree thoroughly. Also, ensure you chill the cheesecake for the recommended 8 hours or overnight for the best firm set.
Gluten-Free No Bake Pumpkin Cheesecake Bars
These creamy, spiced pumpkin cheesecake bars are an easy, no-bake fall treat with a crisp gluten-free ginger snap crust. Perfect for effortless autumn enjoyment.
Ingredients
Instructions
- Line an 8×8 inch baking tin with parchment paper, leaving an overhang on the sides for easy removal.
- Crush gingernut or ginger snap cookies into fine crumbs using a food blender or a rolling pin. Transfer to a mixing bowl.
- Pour the melted unsalted butter over the cookie crumbs. Mix thoroughly until all crumbs are coated.
- Press the buttery crumb mixture firmly and evenly into the prepared baking tin. Chill in the fridge for at least 1 hour while preparing the filling.
- In a large bowl, whip the heavy cream until stiff peaks form. Set aside.
- In a separate bowl, beat the full-fat cream cheese until soft and smooth. Add the strained pumpkin puree, powdered sugar, vanilla, cinnamon, nutmeg, allspice, and salt. Beat until the mixture is smooth and thick.
- Gently fold the whipped cream into the pumpkin cream cheese mixture with a spatula until just combined, being careful not to deflate the cream.
- Spread the pumpkin cheesecake filling evenly over the chilled cookie base. Smooth the top with a spatula. Return the tin to the fridge and chill for at least 8 hours, preferably overnight, until fully set.
- Once set, use the parchment paper overhang to carefully lift the cheesecake out of the tin. Slice into desired bar sizes.
- For the optional topping: whisk the additional heavy cream, sifted powdered sugar, and vanilla extract until smooth and slightly thickened. Pipe swirls onto each bar before serving.
Notes
Using full-fat block cream cheese is important for a firm set. Patting it dry can help reduce excess moisture.
Strain your canned pumpkin puree through a cheesecloth to remove any extra liquid, which can prevent the cheesecake from setting properly.
Allow ample chilling time (8 hours or overnight) for the cheesecake to firm up completely and ensure clean slices.
If adding the optional whipped cream topping, it’s best to add it just before serving each bar to maintain the best texture.
Nutrition
Calories
Sugar
Fat
Carbs