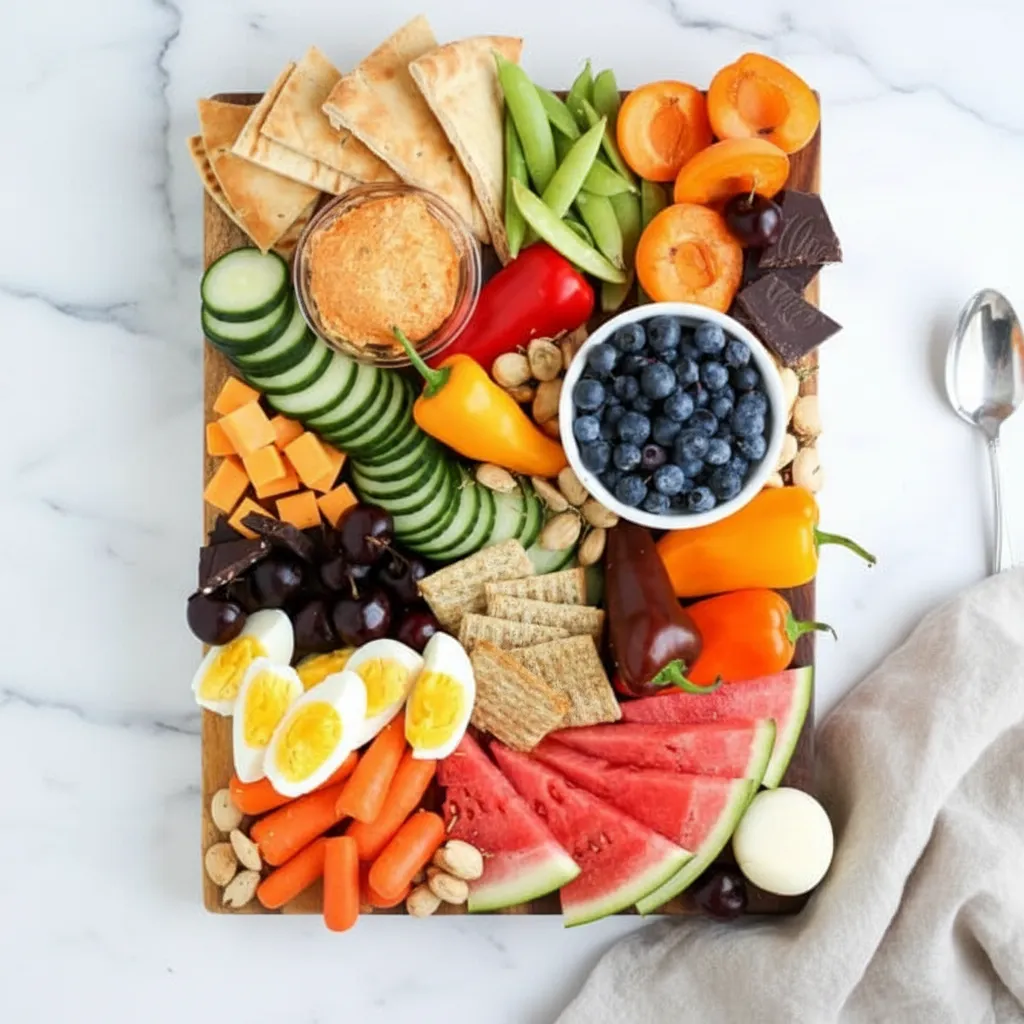
There’s something so satisfying about a platter loaded with colorful, delicious bites. Forget complicated recipes and hours in the kitchen. We’re talking about creating an Easy & Aesthetic Fruit Grazing Board Recipe that looks like it came straight from a magazine but is simple enough for anyone to assemble. This isn’t just a snack; it’s an experience. A beautiful Fruit Charcuterie Board brings people together, offering a little something for everyone, whether you’re hosting a party, planning a picnic, or just want a special treat for a quiet night in.
This guide will walk you through building a stunning grazing board that balances sweet fruits with savory meats, cheeses, crunchy nuts, and delicious dips. The beauty of this recipe is its flexibility. You can customize it with your favorite ingredients or whatever you have on hand, making it a budget-friendly and creative way to entertain. Get ready to impress your guests (and yourself!) with a board that’s as delightful to look at as it is to eat.
Jump To:
Why You’ll Love This Recipe
Honestly, what’s not to love? A grazing board is the definition of low-effort, high-reward. There’s no cooking required, just some simple slicing and artful arranging. It’s a fantastic way to cater to different dietary preferences and tastes all at once. Vegetarians, meat-lovers, and picky eaters can all find something to enjoy. Plus, it’s a feast for the eyes! The vibrant colors and textures make for a truly charcuterie board aesthetic that brightens up any table.
This recipe is also incredibly versatile. You can scale it up for a large gathering or down for a cozy snack for two. It’s perfect for holidays, game nights, or even as a light dinner. The combinations are endless, allowing you to get creative and try new pairings every time you make one. It’s a fun, interactive way to enjoy food that encourages sharing and conversation.
Ingredients
The beauty of a fruit charcuterie board is its flexibility. Think of this list as a collection of ideas, not a strict shopping list. Pick a few items from each category that you love or have on hand. The goal is a variety of colors, textures, and flavors.
- Proteins
- Deli meats (like deli turkey or roast beef)
- Cured meats (beef prosciutto, beef salami)
- Jerky, biltong, or meat sticks
- Hard-boiled eggs
- Smoked salmon
- High-protein dips (like a simple chicken dip)
- Edamame
- Fats
- Soft cheeses (brie, goat cheese)
- Hard cheeses (gouda, parmesan, cheddar)
- A variety of nuts and seeds
- Olives (kalamata, Castelvetrano)
- Vegetables
- Sliced cucumbers
- Bell peppers (mini or sliced)
- Cherry or grape tomatoes
- Sundried tomatoes
- Celery sticks
- Carrot sticks or baby carrots
- Broccoli and cauliflower florets
- Kale chips or crunchy broccoli
- Fruit
- Apple and pear slices
- Apple chips or other dried fruit like apricots
- Fresh cherries and grapes
- Berries (blueberries, strawberries, raspberries, blackberries)
- Pomegranate arils
- Orange wedges or mandarin segments
- Cubed pineapple or tiny watermelon triangles
- Peach slices
- Freeze-dried fruit for a nice crunch
- Whole Grains & Starchy Carbs
- Pita wedges or pita chips
- Assorted crackers
- Sweet potato chips or plantain chips
- Pretzels
- Tortilla chips
- Popcorn or rice cakes
- Crostini or crunchy breadsticks
- Roasted crunchy chickpeas
- Dips & Condiments
- Hummus (any flavor!)
- Protein dips (like Greek yogurt ranch)
- Spinach artichoke dip
- Red pepper feta dip
- Honey Greek yogurt dip
- Nut butter
- Mustards (dijon, whole grain)
- Guacamole, salsa, or pico de gallo
- Something Sweet
- Dark or milk chocolate squares
- Chocolate-covered nuts
- Candied nuts or seeds
- Jam or preserves
- Honey or a piece of honeycomb
- Garnishes (optional)
- Fresh herbs (rosemary or mint look lovely)
- Edible fresh flowers
- Small fruits and nuts for filling gaps
Step-By-Step Instructions
Ready to build your masterpiece? Creating a beautiful grazing board follows a simple, layered approach. Don’t overthink it—just have fun with the process!
Step 1: Anchor with Bowls
First things first, grab your board, platter, or even a large cutting board. Before you place any food on it, position any small bowls you’re using. These are for your dips, condiments, olives, or anything else that might roll around or get messy. Placing these first gives your board structure and creates focal points to work around. I like to spread them out to create balance across the board.
Step 2: Add Large Items First
With your bowls in place, it’s time to add the bigger items. This includes your cheeses, any folded or fanned-out meats, and larger piles of crackers. Arrange them around the bowls. For example, you can place a wedge of brie near one corner and some fanned-out salami next to a bowl of hummus. You can also create beautiful arrangements like fanned-out cucumber slices or those cute tiny watermelon triangles to take up a good amount of space. This step builds the main landscape of your board.
Step 3: Fill in with Smaller Items
Now comes the fun part: filling in the gaps. A great-looking grazing board should feel abundant and full. Start tucking in your medium-to-small items in the remaining spaces. Create little families of foods—a pile of strawberries here, a cluster of grapes there, a handful of baby carrots next to the dip. Don’t be afraid to let things touch and overlap. This is what creates that lush, inviting charcuterie board aesthetic.
Step 4: Finish & Garnish
You’re almost there! Look for any small, empty spots on your board. This is where your smallest items come in handy. Use individual berries, nuts, or pomegranate arils to fill in any last little holes. The goal is to not see the board underneath! Once everything is packed in, you can add your final touches. A few sprigs of fresh rosemary or mint can add a pop of green and a lovely aroma. If you have them, a few edible flowers can also add a really pretty, delicate touch.


How To Store Leftovers
If you happen to have leftovers (which isn’t always a guarantee!), storing them is pretty straightforward. The best way to keep everything fresh is to disassemble the board. Store cheeses and meats by wrapping them separately and putting them in the fridge. Fruits and veggies can go into airtight containers, also in the refrigerator. Crackers, nuts, and other dry goods should be stored in their original packaging or an airtight container at room temperature to prevent them from getting stale or soft.
Dips and condiments should be covered and returned to the fridge. While it’s tempting to just cover the whole board with plastic wrap, separating the components will keep everything tasting its best for the next day. The crackers won’t get soggy from the fruit, and the cheese won’t pick up smells from the salami.
Conclusion
And there you have it—your very own Easy & Aesthetic Fruit Grazing Board Recipe! It’s more of a method than a strict recipe, giving you the freedom to create something new every time. This kind of snack board is perfect for making memories, whether you’re hosting a big party or just treating yourself. It encourages everyone to gather around, chat, and enjoy good food together. So next time you need a simple but impressive dish, grab a board and start creating. You’ve got this!
FAQ
Can I Prepare a Grazing Board in Advance?
You can definitely do some prep work in advance to save time. I recommend washing and chopping your fruits and veggies a day ahead and storing them in airtight containers in the fridge. You can also portion out dips into their serving bowls. However, I’d wait to assemble the full board until just before serving to keep everything, especially crackers and cheeses, as fresh as possible.
What Kind of Board Should I Use?
You don’t need a fancy, expensive board! Any large, flat surface will work. A large wooden cutting board is a classic choice. You can also use a slate board, a large ceramic platter, or even a clean baking sheet. The key is to have enough space to spread everything out without it looking too crowded.
How Do I Make My Board Budget-Friendly?
Making a budget-friendly grazing board is easy! Focus on seasonal fruits and vegetables, as they are often less expensive and taste better. Look for cheeses and meats that are on sale. You can also fill out the board with more affordable items like crackers, pretzels, and homemade dips like hummus. You don’t need a dozen different expensive ingredients to make a beautiful and delicious board.