
Looking for a dessert that’s impressive yet no-stress? This chocolate pavlova recipe Nigella version checks every box. Crispy shell, chewy middle, whipped cream, and fruit piled high—it’s festive, easy, and totally delicious.
Table of Contents

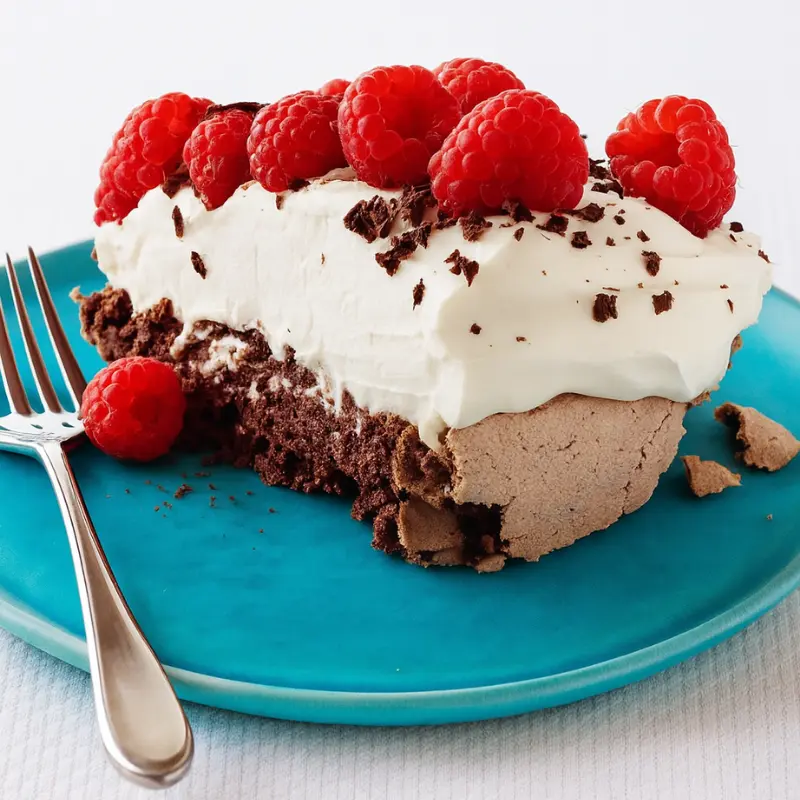
Chocolate Peanut Butter Layered Pavlova
Chocolate pavlova layers filled with rich ganache and a peanut butter mousse, topped with toasted nuts. Inspired by Nigella’s famous pavlova technique.
- Total Time: 2 hours 45 minutes
- Yield: 1 large pavlova 1x
Ingredients
6 large egg whites
1 1/2 cups granulated sugar or turbinado sugar, ground
1 teaspoon vanilla extract
1/2 teaspoon fine sea salt
1 teaspoon vinegar (apple cider, red wine, or plain)
1/2 tablespoon cornstarch
2 tablespoons Dutch process cocoa
200 g dark chocolate (60–70%), chopped
120 g heavy cream (for ganache)
235 g heavy cream (for mousse)
113 g cream cheese, softened
70 g smooth peanut butter or other nut butter
Pinch of sea salt
1 teaspoon vanilla extract
Chopped nuts for topping
Instructions
1. Preheat oven to 250°F. Line two baking sheets with parchment and draw 8-inch circles.
2. Whisk egg whites and sugar over simmering water until sugar dissolves.
3. Beat mixture until stiff, glossy peaks form. Add vanilla, salt, and vinegar near the end.
4. Sift in cocoa and cornstarch and fold gently.
5. Divide meringue between baking sheets, forming 8-inch rounds.
6. Bake for 2 hours. Let cool in the oven 1–2 more hours or overnight.
7. For ganache: heat cream and pour over chocolate. Stir until smooth.
8. For mousse: pulse cream, cream cheese, peanut butter, salt, and vanilla until thick.
9. Layer pavlova: bottom meringue, ganache, mousse, nuts. Repeat with second layer.
10. Serve immediately after assembly.
Notes
This dessert is gluten-free by nature.
You can swap peanut butter for hazelnut, almond, or cashew butter.
Keep leftovers chilled in an airtight container for up to 2 days.
- Prep Time: 45 minutes
- Cook Time: 2 hours
- Category: Chocolate
- Method: Baked
- Cuisine: British
Nutrition
- Serving Size: 1 slice
- Calories: 370
- Sugar: 30g
- Sodium: 85mg
- Fat: 24g
- Saturated Fat: 13g
- Unsaturated Fat: 9g
- Trans Fat: 0g
- Carbohydrates: 32g
- Fiber: 2g
- Protein: 6g
- Cholesterol: 65mg
Chocolate Pavlova Recipe Nigella Style

If you’ve ever seen the chocolate pavlova recipe Nigella makes on her shows, you already know it’s something special. The crackling shell, the soft and chewy center, the rich cocoa flavor—it’s pure dessert magic. What makes this version so unforgettable is how it balances sweetness with bold dark chocolate and that effortless, rustic look Nigella is known for.
This guide walks you through her techniques, tips, and the little touches that bring it all together. Whether you’re making this for a holiday dinner, a birthday, or just because it’s Wednesday, this recipe will leave people talking. The best part? You don’t need fancy tools or years of baking experience.
Let’s break down how to get that perfect pavlova, just like Nigella does it.
Nigella’s classic technique for crisp and chewy meringue

Nigella’s magic starts with her meringue. It has that ideal texture—crisp on the outside and marshmallow-like inside. She uses a few tricks to make this happen:
- Egg whites at room temperature whip up with more volume.
- She adds vinegar and cornstarch to create that soft center.
- A slow bake at a low temp keeps it from cracking too much.
Don’t rush it. Letting the meringue cool in the oven after baking helps it set up without collapsing.
Key ingredients and why Nigella swears by dark chocolate

The heart of this dessert is the chocolate, and Nigella Lawson chocolate pavlova always leans on rich, high-quality dark chocolate. Here’s why:
- Cocoa powder adds a deep flavor without weighing down the meringue.
- A touch of finely chopped dark chocolate folded in gives surprise bites of fudgy goodness.
- Using 70 percent cocoa solids or higher brings that bold contrast to the sweet cream and berries.
Nigella often says to never skimp on chocolate quality. It’s the soul of this dessert.
Tips for the perfect glossy meringue every time
Want that shiny, picture-perfect top? It’s all in the technique:
- Beat egg whites until stiff peaks form but don’t overdo it or the texture turns grainy.
- Add sugar slowly, one spoonful at a time.
- Check by rubbing the mix between your fingers. It should feel smooth, not gritty.
And always bake on parchment paper, not foil. That simple change can mean the difference between a stuck pavlova and a perfect one.
Decorating with berries the Nigella way
When it comes to decorating, chocolate pavlova with berries Nigella style is effortless yet dramatic. She piles fresh fruit right on top of softly whipped cream. Some of her favorite berry choices include:
- Raspberries for tartness
- Blueberries for sweetness
- Blackberries for color
The key is not to overthink it. Let the fruit fall naturally. That messy, over-the-top look is exactly what makes it so inviting.
Nigella Lawson Pavlova With Passion Fruit & Chocolate
This version of the chocolate pavlova recipe Nigella shared combines deep cocoa flavor with the bright zing of passion fruit. It’s rich and refreshing at the same time, which is classic Nigella. The meringue is still the star, but it gets a boost from tropical fruit and a creamy, tangy topping. If you’re looking for a dessert that feels both luxurious and light, this one’s it.
It’s also great for spring and summer, when passion fruit is in season. You get that contrast between sweet, crispy meringue and a pop of juicy brightness that cuts through the richness.
How Nigella balances sweet meringue with tangy passion fruit
Nigella’s genius is knowing when to hold back. The meringue is sweet, but she lets the passion fruit pulp bring in sour and slightly bitter notes. Together, they balance beautifully. She doesn’t sweeten the passion fruit much—just enough to keep it from tasting sharp.
The result? A spoonful that has all the textures and flavors you crave: crisp shell, creamy center, fruity bite.
Chocolate drizzle or ganache? Nigella’s preference
When it comes to topping this pavlova, there’s always the chocolate question. Nigella chocolate meringue dessert fans will notice she leans toward a simple, slightly bitter chocolate drizzle.
Here’s why she skips ganache:
- Drizzle is lighter and doesn’t weigh down the meringue.
- It cools quickly and creates delicate patterns across the cream.
- You can add it last-minute without changing the structure.
Of course, if you want something richer, a thin ganache works too—but Nigella keeps it simple.
Step-by-step: layering flavors like Nigella
The layering is where this dessert becomes stunning. Nigella’s method goes like this:
- Start with your cooled chocolate meringue base.
- Add a thick layer of whipped cream—not too sweet.
- Spoon fresh passion fruit pulp over the cream.
- Finish with a light chocolate drizzle and maybe a few berries for color.
Each layer brings contrast, and each bite hits all the right notes.
Serving it like Nigella: rustic and rich
Nigella never goes for neat. She embraces a rustic presentation that makes the pavlova look full of life. She’ll pile on toppings without worrying about symmetry. It feels homemade and warm—not stiff or overly styled.
Her serving tip? Use a big spoon, not a knife. Let people scoop their slice. It keeps the meringue from cracking too much and adds to that laid-back, indulgent feel.
Nigella’s Christmas Chocolate Pavlova: Festive Edition
There’s something magical about the chocolate pavlova recipe Nigella makes during the holidays. It’s a dessert that feels rich and joyful, with deep chocolate flavor, colorful toppings, and just enough spice to hint at Christmas. If you’re tired of pies and traditional cakes, this pavlova is a fresh twist that still feels festive.
It’s perfect for gatherings because you can prep most of it ahead. When served, this chocolate pavlova recipe Nigella style becomes the centerpiece of the table. The contrast between crunchy meringue, soft cream, and tart fruit keeps every bite exciting. It’s festive without the fuss, and just dramatic enough to feel like a celebration on a plate.
Let’s take a closer look at how this chocolate pavlova recipe Nigella inspired version gets its holiday magic.
Holiday spice tweaks inspired by Nigella
For Christmas, Nigella adds a cozy layer of spice to deepen the chocolate flavor. It’s not overpowering, just enough to hint at something special. Try mixing these into your cocoa:
- Cinnamon or nutmeg for subtle warmth
- A pinch of clove for deeper depth
- Orange zest for brightness that complements chocolate
These small additions give the meringue a unique holiday twist and pair beautifully with rich toppings.
Topping ideas: red currants, pistachios, and edible glitter
The toppings are where this chocolate pavlova recipe Nigella really shines. Bold colors, textures, and a bit of sparkle turn a simple pavlova into a showstopper. Consider:
- Red currants or pomegranate seeds for tartness and color
- Chopped pistachios for crunch and a hint of green
- Edible glitter or gold flakes for a festive touch
Pile everything generously over soft cream for that signature rustic Nigella look.
Make-ahead tips for stress-free holiday dessert
One of Nigella’s best tips is to make the meringue a day early. Once baked, let it cool in the oven and then store in a dry, airtight container. Prepare the whipped cream and toppings ahead too, and assemble right before serving. This way, you can relax and enjoy the moment without rushing.
How to store leftover pavlova without it getting soggy
Leftover pavlova needs gentle handling to stay good. To keep it from turning soggy:
- Gently scrape off any fruit or cream
- Store the meringue base in a dry container at room temperature
- Keep toppings refrigerated in a separate container
This method helps keep the texture crisp so you can enjoy a second round the next day.
Nigella’s Chocolate Pavlova With Berries: Summer Delight
This sunny twist on the chocolate pavlova recipe Nigella loves is packed with fresh berries, making it ideal for warm-weather brunches or garden parties. It’s light, fruity, and has just the right amount of chocolate to feel indulgent without being too rich.
Berries balance the sweetness of the meringue, while soft whipped cream ties it all together. This version of the chocolate pavlova recipe Nigella style is a showstopper for summer gatherings. It looks stunning on a platter and is easy to serve. The kind of dessert that vanishes fast and always earns a round of compliments.
Here’s how to get the summer edition of this chocolate pavlova recipe Nigella just right.
Best berry pairings for chocolate meringue
Berries do more than add color. They bring acidity, juicy bursts, and texture that makes the chocolate shine. The chocolate pavlova recipe Nigella inspired lineup often includes:
- Strawberries for a balanced, classic sweetness
- Raspberries for a tangy bite
- Blueberries and blackberries for deeper flavor
Use a mix to keep things exciting and add beautiful contrast to the chocolate.
Whipped cream tricks from Nigella’s kitchen
Nigella keeps her whipped cream light and just barely sweet. She often folds in vanilla extract or a bit of citrus zest for added flavor.
Pro tip: Chill your mixing bowl and beaters before whipping. Cold equipment gives the cream better structure and helps it stay fluffy longer, especially in warm weather.
Plating for outdoor brunch or garden party
Presentation is part of the fun. Nigella’s style is casual but elegant. Place your pavlova on a large serving dish, then pile the berries on top. Let them spill naturally over the cream for a relaxed, garden-fresh look. A few mint leaves or powdered sugar can give it an extra lift.
Alternatives to berries: figs, cherries, or mango?
No berries on hand? No problem. You can still make your chocolate pavlova recipe Nigella inspired. Try these fruity swaps:
- Figs for soft sweetness and visual flair
- Cherries for bright color and tart juice
- Mango slices for a bold, tropical feel
Whatever fruit you use, freshness is key. That balance of crisp shell, smooth cream, and juicy topping is what makes this pavlova sing.
Watch & Bake: Nigella Chocolate Pavlova Recipe Video Breakdown
There’s nothing like watching the chocolate pavlova recipe Nigella makes come to life on screen. Her relaxed pace, confidence, and simple explanations make even tricky desserts feel doable. Watching her create this chocolate pavlova helps you catch those little tricks that aren’t always obvious in a written recipe.
If you learn best visually, watching a chocolate pavlova recipe Nigella video can really help. Seeing each step unfold on screen shows exactly how the meringue should look, how thick the cream needs to be, and how to layer and top everything like Nigella does—effortless but beautiful.
Where to find Nigella’s video tutorials
You can find chocolate pavlova recipe Nigella videos on her official website, in her holiday or summer specials on streaming platforms, or on the Food Network. Her content is also included in many baking apps and cooking subscriptions.
Episodes that feature her Christmas or warm-weather desserts often walk through the full pavlova process step by step.
What you’ll learn from her on-screen baking style
Watching Nigella bake does more than explain the process. It teaches rhythm and technique. You’ll see:
- How to whip egg whites to just the right stiffness
- When and how to fold in cocoa gently
- How she shapes the meringue into a tall, rustic round
Her approach is calm and instinctive, which makes the whole chocolate pavlova recipe Nigella style feel approachable and fun.
Common viewer questions answered
In her video demos, Nigella often tackles viewer questions such as:
- Should the egg whites form stiff or soft peaks?
- Can vinegar be skipped, or is it essential?
- What type of chocolate gives the best flavor?
She usually points out these details as she bakes, showing common mistakes and how to avoid them.
How long to bake and cool for best results
Nigella recommends baking the meringue low and slow. Go for 90 minutes at 285°F, then turn off the oven and leave the door cracked. Let the pavlova cool inside for another hour. This helps the crust stay firm while the inside remains chewy.
Cooling it gently is just as important as the bake. It locks in that signature texture and keeps your chocolate pavlova recipe Nigella perfect from top to base.
Mini Chocolate Pavlovas Inspired by Nigella
Sometimes, you don’t want to make one big dessert. For birthdays, showers, or casual get-togethers, mini versions of the chocolate pavlova recipe Nigella shared are perfect. They have the same crisp shell and gooey center, but come in single-serve sizes.
These mini desserts are great for portion control and presentation. They look fancy but are easy to plate and serve. Guests love the personal touch of individual pavlovas—it feels a bit more special than slicing a large one.
Here’s how to turn your chocolate pavlova recipe Nigella inspired dish into adorable, individual servings.
How to adapt her recipe into individual portions
Use the base chocolate pavlova recipe Nigella shared and divide it into smaller mounds on your baking sheet. Space them well because they expand during baking.
- Each mini pavlova should be 3 to 4 inches wide
- Spoon or pipe the meringue into rounds
- Create a shallow dip in the center for your cream and toppings
- Bake at a slightly lower temperature for 60 to 70 minutes
- Cool in the oven to help prevent cracks
This makes them just the right size for a single, satisfying dessert.
Best piping techniques for visual impact
For a cleaner, polished look, pipe the meringue using a star or round tip. While chocolate pavlova recipe Nigella versions are often more rustic, piping adds structure and helps toppings stay in place.
Quick tip: Once the meringue hits stiff peaks, avoid overmixing—it can break the texture and affect the final shape.
Party-ready plating ideas Nigella would love
Presentation doesn’t have to be complicated. Arrange your mini pavlovas on a large platter or cake stand. Top each with a dollop of cream, a few berries, or even chocolate curls. Finish with a light dusting of powdered sugar or cocoa powder for a polished touch.
This simple layout delivers big visual appeal with minimal effort.
Chocolate cream or mousse filling options
Looking for an upgrade to plain whipped cream? Try one of these filling swaps:
- Chocolate whipped cream made with cocoa and sugar
- Light chocolate mousse for a richer taste
- Mascarpone cream for a tangy, creamy contrast
Each version pairs well with fruit and offers a new way to enjoy your chocolate pavlova recipe Nigella style, especially during holidays or special occasions.
FAQ
What is the difference between pavlova and meringue?
Is it okay to make pavlova the day before?
What is the Swiss method of pavlova?
Why do you add vinegar to pavlova?
Is baking paper or foil better for cooking pavlova?
How to get a chewy pavlova?
Share Your Experience
Tried this chocolate pavlova recipe Nigella style? We’d love to hear how it turned out! Did you go classic with berries or add a twist like passion fruit or edible glitter?
Drop a comment below with your tips, swaps, or sweet stories. Your feedback helps others bake with confidence, and it’s always fun to see how each pavlova gets its own little personality. Don’t forget to snap a photo and tag us on Instagram @cookfastrecipes so we can admire your delicious masterpiece!


I made this chocolate pavlova for a small family gathering, and it was such a hit! The meringue came out perfectly crisp on the outside with that soft, marshmallowy center.