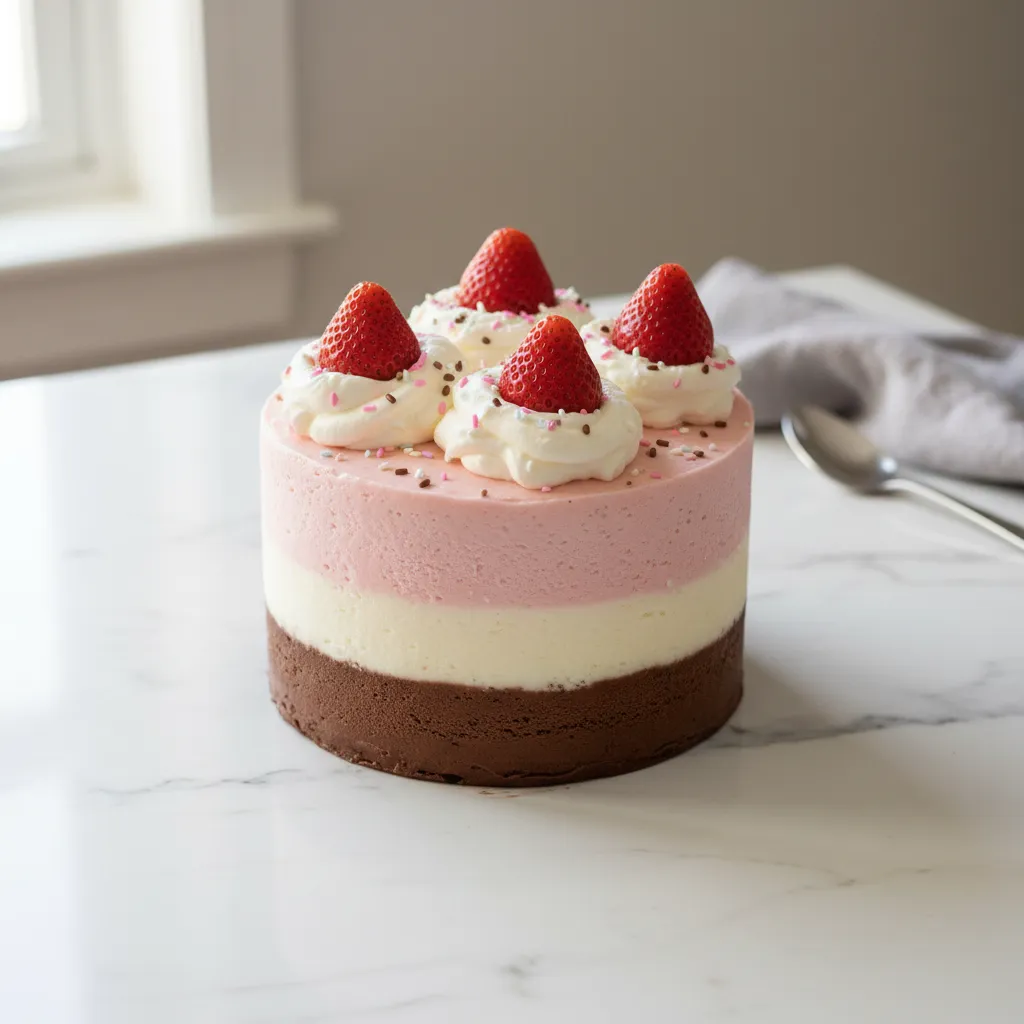
There is something truly nostalgic about the classic combination of chocolate, vanilla, and strawberry. Most of us grew up begging for that rectangular tub of ice cream where the three colors sat side by side in perfect harmony. That iconic neopolitan trio represents a simple joy that never really goes out of style. Whether you are a fan of the rich cocoa, the creamy vanilla, or the fruity sweetness of strawberry, there is always a little something for everyone in every single bite.
Today we are taking those beloved flavors and turning them into something you can hold in your hand. These dessert bars are not just tasty but they are also incredibly visual. If you enjoy Aesthetic Crochet Things or colorful crafts, you will appreciate how the layers of pink, white, and brown come together. They look almost as cute as a Mokke Crochet Pattern sitting on a shelf. Best of all, you do not need to be a professional baker to pull this off. We are using a few clever shortcuts to make sure you spend less time measuring and more time enjoying the results.
Jump To:
Why You’ll Love This Recipe
One of the best things about this recipe is how approachable it is for anyone. If you are just starting out in the kitchen, you might feel intimidated by complex recipes with dozens of steps. This neopolitan treat is different because it uses cake mixes as a base. This keeps the ingredient list short and the process very straightforward. It is the kind of project that gives you a lot of confidence because it turns out looking beautiful every single time without fail.
For those who enjoy making items for local markets or fundraisers, these bars fall right into the category of Easy Stuff To Make To Sell. They are sturdy enough to be packaged individually and their colorful appearance makes them stand out on a crowded table. People are naturally drawn to the pink, white, and brown layers because they look so cheerful and professional. You can easily whip up a large batch in one afternoon and have plenty of treats ready for your next event or bake sale.
Another reason to love this recipe is the versatility it offers. While we are focusing on the classic flavors today, the technique of layering cake mix dough can be applied to all sorts of combinations. It is a bit like following a Crochet Cute Things Free Pattern where you learn the basic stitches and then realize you can change the yarn colors to create something entirely new. Once you master the method of pressing the dough into the pan, you can start experimenting with other flavor profiles to suit your personal taste or the season.
Finally, this recipe is just plain fun. There is a tactile satisfaction in pressing the different colored doughs into the pan. It feels like a creative project rather than a chore. If you have kids or friends who want to help, this is a great way to get them involved in the kitchen. Everyone can take charge of a different layer. It is a wonderful way to bond over something sweet while creating a dessert that looks like it took much more effort than it actually did.
Ingredients
- 1 box chocolate cake mix
- 1 box white or vanilla cake mix
- 1 box strawberry cake mix
- 3 large eggs
- 1 and a half cups unsalted butter, softened and divided
- 1/4 cup heavy cream
- 12 oz white chocolate chips
- Rainbow sprinkles
Step By Step Instructions
Step 1: Prep The Oven And Pan
Start by preheating your oven to 350 degrees F. You want to make sure the oven is fully up to temperature before you put your bars in so they bake evenly. Grab a 13 by 9 inch baking pan and grease it liberally with cooking spray. You can also use a bit of butter if you prefer. Ensuring the pan is well greased is crucial for getting these bars out cleanly later on. If you want to be extra safe, you can line the pan with parchment paper, leaving a little overhang on the sides to use as handles.
Step 2: Create The Chocolate Base
In a large mixing bowl, combine the chocolate cake mix with one egg and half a cup of the softened butter. Use a sturdy spoon or your hands to stir everything together until a soft dough forms. It should feel a bit like cookie dough. Once it is combined, press the chocolate mixture evenly into the bottom of your prepared pan. Take your time to make sure it reaches all the corners. After you are done, make sure to clean the bowl thoroughly so the colors of the neopolitan layers do not bleed into each other.
Step 3: Add The Vanilla Layer
Now it is time for the middle layer. In that same clean bowl, mix the white or vanilla cake mix with another egg and another half cup of softened butter. Just like before, stir until a dough forms. Carefully place clumps of the vanilla dough over the chocolate layer and then gently press it down to create an even second layer. You want to be careful not to disturb the chocolate layer underneath too much. This creates that sharp visual distinction that makes these bars so appealing, much like the clean lines in a Rosalina Crochet project.
Step 4: Finish With Strawberry
Clean your bowl one last time. Mix the strawberry cake mix with the final egg and the remaining half cup of softened butter. This layer will provide that beautiful pink pop of color. Press the strawberry dough evenly over the vanilla layer. By now, your pan should be filled with three distinct colors of dough. It already looks fantastic even before it hits the oven. The pink layer on top is often the favorite for those who love Aesthetic Crochet Things because it adds such a bright and cheerful touch to the dessert.
Step 5: Bake To Perfection
Slide the pan into your preheated oven and bake for 30 to 40 minutes. You will know they are done when the top looks lightly browned and the center appears set. If you jiggle the pan slightly, the middle should not look wet or loose. Every oven is a little bit different, so start checking around the 30 minute mark. Once they are finished, remove the pan from the oven and set it on a wire rack. It is very important to let the bars cool completely in the pan before you even think about adding the topping.
Step 6: Prepare The White Chocolate Ganache
While the bars are cooling, you can prepare the topping. In a microwave safe bowl, combine the white chocolate chips and the heavy cream. Microwave the mixture for about 40 seconds. Take it out and give it a good stir. If the chips are not fully melted, you can put it back in for another 10 or 15 seconds. Stir until the ganache is completely smooth and glossy. This creamy white topping will act as the perfect canvas for your sprinkles and adds a rich sweetness to the neopolitan layers.
Step 7: Glaze And Decorate
Once the bars are totally cool, pour the white chocolate ganache over the top. Use a spatula to spread it evenly all the way to the edges. While the ganache is still wet, immediately shower the top with rainbow sprinkles. The sprinkles add a fun and festive texture that everyone loves. This step is where the dessert really comes to life. It is the finishing touch that makes these bars feel special and ready for a party or a cozy afternoon snack.
Step 8: Set And Serve
Place the pan in the refrigerator for about 30 minutes. This allows the ganache to firm up so you can get clean cuts when you slice the bars. Once the topping is set, use a sharp knife to cut the dessert into squares. You can make them as large or as small as you like. Seeing the three distinct layers of the neopolitan bars once they are sliced is the most rewarding part of the whole process. They are now ready to be served and enjoyed by your friends and family.


How To Store Leftovers
If you find yourself with leftovers, you are in luck because these bars store very well. You can keep them in an airtight container at room temperature for about two to three days. However, because of the white chocolate ganache, they stay a bit fresher if you keep them in the refrigerator. In the fridge, they will remain delicious for up to a week. Just make sure the container is sealed tight so they do not pick up any other flavors from the fridge.
For longer storage, you can actually freeze these bars. Wrap individual squares tightly in plastic wrap and then place them in a freezer safe bag. They will stay good for up to three months. When you are ready to eat one, just let it thaw on the counter for about an hour. This makes them a great make ahead treat for busy weeks. Having a stash of neopolitan bars in the freezer is a great way to ensure you always have a sweet treat on hand when a craving hits.
When you are storing them, you might want to place a piece of parchment paper between the layers if you are stacking them in a container. This prevents the ganache from sticking to the bottom of the bar above it. It keeps everything looking neat and tidy, just like how you would organize your supplies for Acrylic Knitting Patterns. Keeping your treats organized makes it much more pleasant when you go to grab a snack later on.
Tips
To get the best results, make sure your butter is truly softened but not melted. If the butter is too cold, it will be hard to mix into the cake mix. If it is melted, the dough might become too greasy. Leaving the butter out on the counter for an hour or two before you start is usually the perfect amount of time. This small detail makes a big difference in the texture of your neopolitan layers.
If you want to pass the time while your bars are baking and cooling, why not pick up a hobby? You could look for a Crochet Pattern Printable and start a small project. Many people find that Beginner Crochet Projects Amigurumi are the perfect way to stay busy while waiting for the oven timer to go off. You could even try to crochet a little octopus in pink, white, and brown to match your dessert. It is a relaxing way to spend your afternoon while the kitchen fills with the scent of chocolate and strawberry.
When it comes to the white chocolate ganache, quality matters. Using a good brand of white chocolate chips will result in a smoother and tastier topping. Some cheaper brands might not melt as well or can have a slightly waxy texture. Since the ganache is such a prominent part of the neopolitan bars, it is worth spending an extra dollar or two on the good stuff. You will definitely notice the difference in the final taste.
If you are planning to give these away as gifts, consider the packaging. These bars look wonderful in clear cellophane bags tied with a colorful ribbon. You could even include a Crochet Cute Things Free Pattern or a small handmade item if you are gifting to a fellow crafter. It adds a personal touch that shows you put a lot of thought into the gesture. These bars are so pretty that they really deserve to be shown off.
Lastly, do not be afraid to get creative with the sprinkles. While rainbow sprinkles are classic, you could use pink and white ones for a Valentine theme or brown and white for a more muted look. Much like choosing colors for Easy Diy Crochet, the choice of decorations is entirely up to you. Have fun with it and make the recipe your own. There are no rules when it comes to making your treats look as good as they taste.
Conclusion
Making these neopolitan dessert bars is such a rewarding experience from start to finish. You get to play with vibrant colors, enjoy the classic flavors of your childhood, and create something that looks truly impressive with very little effort. It is the perfect recipe for a rainy afternoon or a busy weekend when you want a homemade treat without the stress of complicated techniques. The layered look is always a hit and the taste is simply unbeatable.
Whether you are a seasoned baker or someone who spends more time looking at Acrylic Knitting Patterns and yarn, these bars are accessible and fun. They prove that you do not need fancy equipment or expensive ingredients to make something memorable. Sometimes the simplest ideas are the ones that bring the most joy. We hope you enjoy making and eating these colorful treats as much as we do. Happy baking and happy crafting.
FAQ
Can I Use Different Cake Flavors?
Yes, you absolutely can. While the neopolitan theme requires chocolate, vanilla, and strawberry, you can experiment with any flavors you like. You could try lemon, orange, and vanilla for a citrus twist. Just follow the same method of mixing each box with an egg and butter. It is a very flexible base that works with almost any standard cake mix you find at the store.
How Do I Get Clean Slices?
The secret to clean slices is making sure the bars are completely cold. Chilling them in the refrigerator is key. When you are ready to cut, use a sharp knife and wipe it clean with a warm damp cloth between every single cut. This prevents the layers from smearing and keeps the white chocolate topping looking perfect. It takes a little extra time but the results are worth it for that professional look.
Can I Make This Without A Microwave?
If you do not have a microwave, you can make the ganache using a double boiler. Place the white chocolate and cream in a heat proof bowl over a pot of simmering water. Make sure the bottom of the bowl does not touch the water. Stir constantly until the chocolate is melted and the mixture is smooth. This method is actually a bit more controlled and prevents the chocolate from scorching.
What If I Cannot Find Strawberry Cake Mix?
If strawberry mix is unavailable, you can use another white cake mix and add a few drops of pink food coloring and some strawberry extract. This will give you the same neopolitan look and flavor. You could even fold in some finely chopped freeze dried strawberries for an extra burst of fruitiness. The goal is to keep that beautiful pink layer as the star of the show.
Easy Neapolitan Dessert Bars
These tasty Neapolitan dessert bars are a no-fuss treat for the whole family. Using cake mixes for the classic chocolate, vanilla, and strawberry layers, this recipe is incredibly easy and perfect for bake sales or a quick weeknight dessert.
Requirements


Ingredients
Instructions
- Preheat oven to 350°F. Grease a 13 by 9 inch baking pan, or line with parchment paper.
- In a large bowl, combine the chocolate cake mix, one egg, and 1/2 cup softened butter. Mix until a soft dough forms. Press evenly into the bottom of the prepared pan.
- In a clean bowl, mix the vanilla cake mix, one egg, and 1/2 cup softened butter. Gently press this dough over the chocolate layer.
- In another clean bowl, mix the strawberry cake mix, the final egg, and the remaining 1/2 cup softened butter. Press this dough over the vanilla layer.
- Bake for 30-40 minutes, until the top is lightly browned and the center is set. Let cool completely on a wire rack.
- In a microwave-safe bowl, combine white chocolate chips and heavy cream. Microwave for 40 seconds, then stir until smooth.
- Pour the ganache over the cooled bars and spread evenly with a spatula. Immediately top with rainbow sprinkles.
- Refrigerate for 30 minutes to set the ganache before cutting into squares and serving.
Notes
Ensure your butter is softened but not melted for the best dough texture.
For clean slices, make sure the bars are fully chilled and wipe the knife clean between cuts.
Store leftovers in an airtight container at room temperature for up to 3 days, or in the refrigerator for up to a week.
Nutrition
Calories
Sugar
Fat
Carbs