Hey there, fellow baking enthusiasts! Got a special someone whose birthday falls under the stars of Aquarius? Or maybe you’re just feeling the cosmic vibes and want to whip up something truly out of this world? Well, you’ve landed in the right spot!
Making a beautiful cake doesn’t have to be a huge production. Forget those complicated recipes that require a pastry chef’s degree. We’re talking about a fun, flavorful, and totally achievable aquarius cake that’ll have everyone asking for the recipe.
Jump To:
Why You’ll Love This Recipe
This aquarius cake is designed with you in mind. It’s perfect for beginners and busy bees alike. You get a delicious, sturdy cake that’s a fantastic canvas for your creativity. Plus, cleanup is a breeze!
Imagine impressing your friends and family with a cake that looks like it came straight from a bakery. But guess what? You made it! It’s a fantastic way to celebrate Aquarius Szn Cake time.
Ingredients
For the Sturdy Vanilla Cake
- 2 ½ cups all-purpose flour
- 2 ½ tsp baking powder
- ½ tsp salt
- 1 cup (2 sticks) unsalted butter, softened to room temperature
- 1 ¾ cups granulated sugar
- 3 large eggs, room temperature
- 1 tbsp pure vanilla extract
- 1 cup whole milk, room temperature
For the American Buttercream & Decoration
- 2 cups (4 sticks) unsalted butter, softened
- 7-8 cups powdered sugar, sifted
- ¼ cup heavy cream (plus more if needed)
- 2 tsp vanilla extract
- Pink gel food coloring
- Edible gold luster dust or gold cake paint (for the text)
- White sugar pearl sprinkles (various sizes)
Step-By-Step Instructions
Step 1: Prep the Oven and Pan
First things first, let’s get our oven ready. Preheat it to 350°F (175°C). Grab a star-shaped cake pan and give it a good grease and flour. Don’t have a star pan? No worries!
You can also bake this in a standard 9×13-inch sheet pan. After it cools, you can simply use a paper template to calibrate a perfect star shape. Easy peasy!
Step 2: Mix Dry Ingredients
In a medium bowl, just whisk together your flour, baking powder, and salt. This ensures everything is evenly distributed. Then, set this dry mix aside.
Step 3: Cream Butter and Sugar
Now for the creamy part! In a large bowl or your trusty stand mixer, beat the 1 cup of softened butter and granulated sugar. You’ll want to do this on medium-high speed for about 3 to 5 minutes.
The goal here is to get it super light and fluffy. This step is key for a tender cake crumb in your Aquarius Cake Ideas.
Step 4: Add Eggs and Vanilla
Time to add the eggs! Pop them in one at a time, making sure to beat well after each addition. Don’t forget to scrape down the sides of the bowl so everything gets incorporated.
Then, stir in that lovely pure vanilla extract. It’s going to smell amazing already!
Step 5: Combine Batter
With your mixer on low speed, it’s time to bring it all together. Add the dry ingredients in three parts, alternating with the milk. Start and end with the flour mixture.
Mix only until everything is just combined. Overmixing can lead to a dense cake, and we definitely don’t want that for our Aquarius Heart Cake.
Step 6: Bake the Cake
Pour your beautiful batter into the prepared pan. Pop it into the oven and bake for about 30 to 35 minutes. If you’re using a specialty pan, it might bake a bit faster, so check it a little early.
You’ll know it’s done when a toothpick inserted into the center comes out perfectly clean. Hooray!
Step 7: Cool the Cake
Let the cake cool in the pan for about 10 minutes. Then, carefully invert it onto a wire rack. Make sure it cools completely before you even think about frosting it.
Step 8: Make the Frosting
Let’s whip up that delicious American buttercream! Beat the 2 cups of butter on medium speed until it’s nice and creamy, which should take around 3 minutes.
Gradually add the sifted powdered sugar, about a cup at a time, mixing on low speed. Once that’s in, add the heavy cream and vanilla extract. Then, crank the speed up to high and whip it for another 3 to 5 minutes until it’s wonderfully fluffy.
Step 9: Tint and Fill
Time to get colorful! Scoop about a third of your white frosting into a piping bag. This will be for the center base. If you’re spreading it with a spatula, you can just keep it in a bowl.
Now, take the rest of the frosting and tint it a lovely light pink using your gel food coloring. Transfer this pink frosting into a piping bag fitted with a large star tip, like a Wilton 1M or 4B. This is where the magic really starts for your Aquarius Birthday Cake!
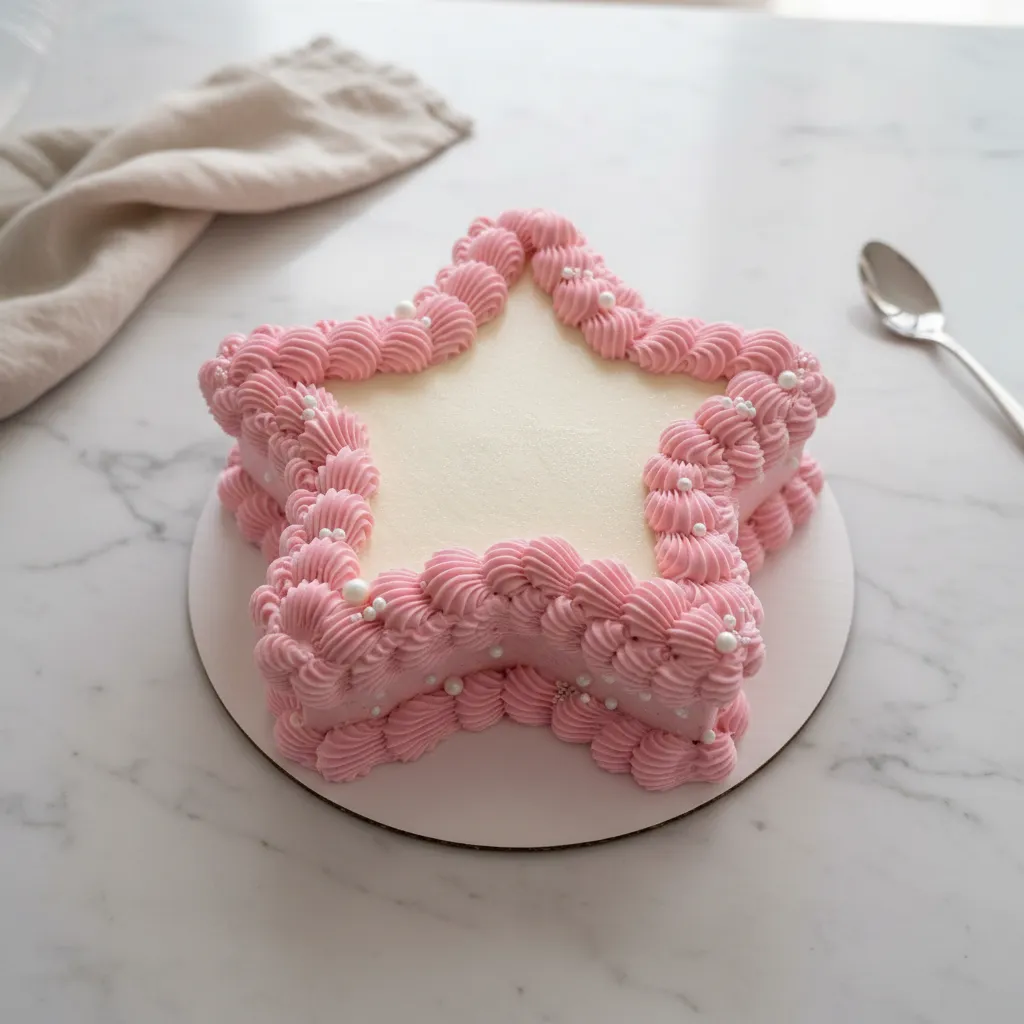
Step 10: Decorate Your Masterpiece
Let’s make this aquarius cake shine! First, spread a smooth, even layer of the white frosting over the flat top surface of your star cake. This creates a nice, clean base.
Next, use your pink frosting to pipe a thick, vintage-style shell or rosette border all along the edges and sides of the cake. Think of it like elegant ruffles!
While the pink frosting is still soft, gently press your white sugar pearl sprinkles into the piping. Varying the sizes adds a lovely touch. This makes it a perfect Star Cake Birthday treat.
For the final flourish, mix your edible gold luster dust with a tiny drop of vodka or lemon extract to make a paint. Alternatively, you can use ready-made gold cake paint. Use a fine, food-safe brush to carefully write “Aquarius Baby” in a pretty script right in the smooth white center.


How To Store Leftovers
Got any leftover aquarius cake? Lucky you! Store it in an airtight container at room temperature for up to 3 days. If it’s particularly warm where you are, the refrigerator is a good option, but let it come to room temperature before serving for the best flavor and texture.
Tips
Want to get that gorgeous vintage look, often called a Lambeth-style border? Here’s a quick tip: squeeze your piping bag to form a bulb, then drag slightly and release pressure to create a little tail. Overlap each shell slightly for that classic ruffly effect.
If you opted to carve your star shape from a sheet cake, try freezing it for about 20 minutes before cutting. This trick helps reduce crumbing and makes for cleaner edges. Seriously, it makes a difference!
Also, for that painted text, make sure the white base frosting has crusted over a bit. It should feel dry to the touch. This prevents the gold paint from smudging and keeps your message looking sharp. This is a great tip for any Star Cake.
Conclusion
And there you have it! A stunning and delicious aquarius cake that’s surprisingly easy to make. Whether you’re baking for an Aquarius Party or just because, this recipe is sure to be a hit. It’s a fantastic way to show someone you care, personalized with a cosmic touch.
Don’t be afraid to get creative with your decorations. Maybe add some blue and silver sprinkles to really lean into the Aquarius theme, or try different piping techniques. This is your chance to make a truly unique Aquarius Birthday Cake. Happy baking!
FAQ
Can I use a different cake pan shape?
Absolutely! While a star shape is perfect for an aquarius cake, you can bake this batter in round pans, square pans, or even cupcakes. Just adjust the baking time accordingly.
How do I make the frosting less sweet?
If you find American buttercream too sweet, you can slightly increase the amount of heavy cream or add a tablespoon of lemon juice for a touch of tang. You can also reduce the powdered sugar by about half a cup, but you might need to adjust the cream to get the right consistency.
Can I make this cake ahead of time?
Yes! The cake layers can be baked a day or two in advance and stored tightly wrapped at room temperature. The frosting can also be made ahead and refrigerated, but you’ll need to re whip it before using to restore its fluffy texture. This makes decorating day much less stressful!
What are some other Aquarius Cake Ideas?
Think celestial! You could add edible glitter for a starry sky effect, use blue and silver colors for a water bearer vibe, or even pipe little water droplets. For a simpler touch, consider Hawaiian Birthday Cakes inspired decorations with tropical flowers if the season is right, or simply focus on the star theme.
Aquarius Cake (Star Cake)
This Aquarius cake is a total showstopper without the stress. It features a tender, sturdy vanilla base and a fluffy American buttercream. Whether you use a star pan or carve a sheet cake, this vintage-style dessert is perfect for celebrating the water bearer in your life.
Requirements


Ingredients
Instructions
- First things first, let’s get our oven ready. Preheat it to 350°F (175°C). Grab a star-shaped cake pan and give it a good grease and flour. You can also bake this in a standard 9×13-inch sheet pan.
- In a medium bowl, just whisk together your flour, baking powder, and salt. This ensures everything is evenly distributed. Then, set this dry mix aside.
- Now for the creamy part! In a large bowl or your trusty stand mixer, beat the 1 cup of softened butter and granulated sugar. You’ll want to do this on medium-high speed for about 3 to 5 minutes.
- Time to add the eggs! Pop them in one at a time, making sure to beat well after each addition. Don’t forget to scrape down the sides of the bowl. Then, stir in that lovely pure vanilla extract.
- With your mixer on low speed, add the dry ingredients in three parts, alternating with the milk. Start and end with the flour mixture. Mix only until everything is just combined.
- Pour your beautiful batter into the prepared pan. Pop it into the oven and bake for about 30 to 35 minutes. You’ll know it’s done when a toothpick inserted into the center comes out perfectly clean.
- Let the cake cool in the pan for about 10 minutes. Then, carefully invert it onto a wire rack. Make sure it cools completely before you even think about frosting it.
- Beat the 2 cups of butter on medium speed until it’s nice and creamy, about 3 minutes. Gradually add the sifted powdered sugar, about a cup at a time, mixing on low speed. Once that’s in, add the heavy cream and vanilla extract. Whip on high for another 3 to 5 minutes.
- Scoop about a third of your white frosting into a piping bag or bowl for the base. Tint the rest with pink gel food coloring. Transfer this pink frosting into a piping bag fitted with a large star tip.
- Spread a smooth layer of white frosting over the flat top surface using an offset spatula. Pipe a thick, vintage-style shell or rosette border along the edges. Press pearl sprinkles into the piping and use gold luster dust to paint “Aquarius Baby” in the center.
Notes
To get that gorgeous vintage Lambeth-style border, squeeze your piping bag to form a bulb, then drag slightly and release pressure to create a little tail, overlapping each shell.
If you carve your star shape from a sheet cake, freeze the cake for about 20 minutes before cutting to reduce crumbing and get cleaner edges.
Ensure the white base frosting has crusted over and feels dry to the touch before painting the text to prevent smudging.
Leftovers can be stored in an airtight container at room temperature for up to 3 days.
Nutrition
Calories
Sugar
Fat
Carbs