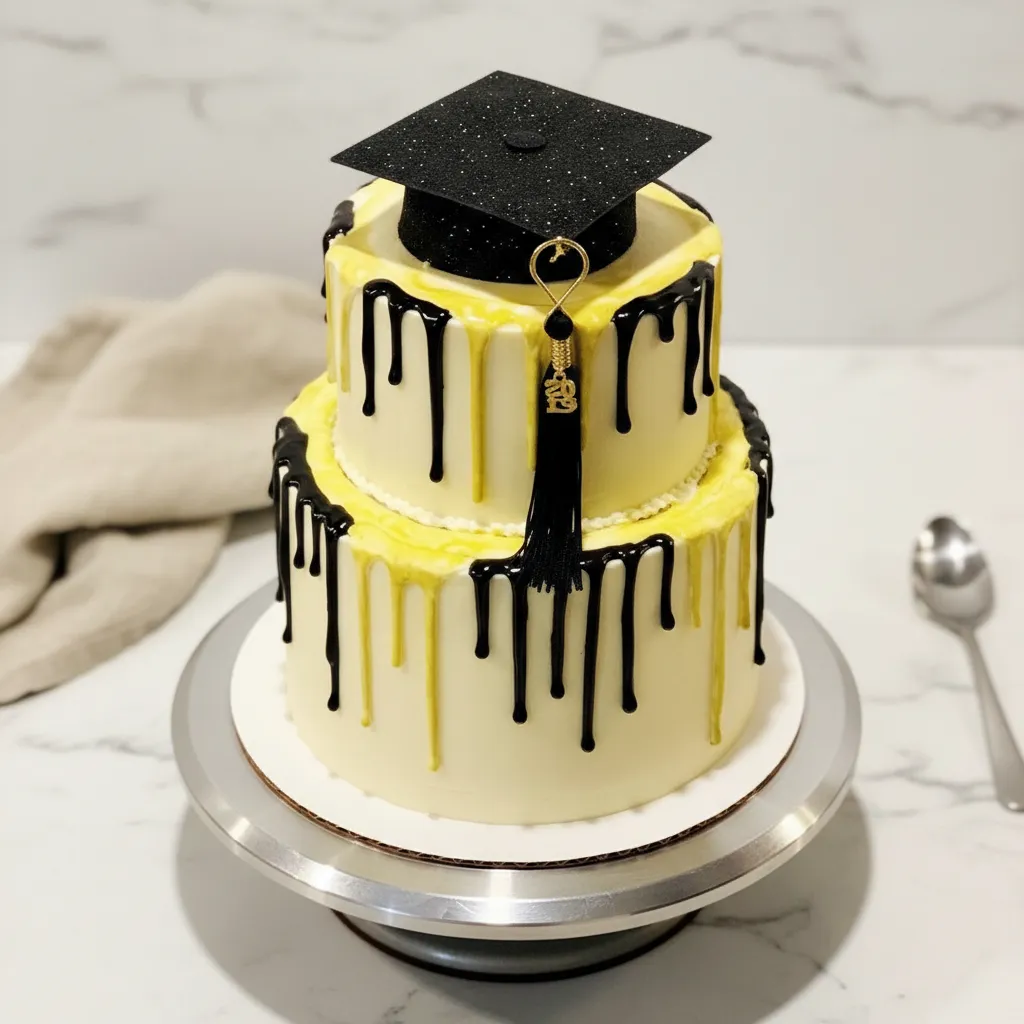
Ever wanted to bake a cake that really makes a statement? Something that sparkles and shines, just like the stars? Well, get ready, because we are diving into how to create the most magical aquarius cake you can imagine. This isn’t just any dessert; it is a showstopper, bursting with vibrant blues and shimmering glitter.
Whether you are celebrating a September Birthday Cake Ideas or just want to add a little sparkle to your week, this recipe is your go to. It is surprisingly simple to make, even if you are new to cake decorating. Plus, it is incredibly fun to customize, letting your creativity really shine through.
Jump To:
Why You’ll Love This Recipe
Honestly, what’s not to love about a cake that looks like it came straight from a fairy tale? This aquarius cake recipe is a total winner for so many reasons. First off, it is designed for home bakers, meaning you don’t need any fancy equipment or advanced skills to pull it off.
It is also incredibly versatile. While we are going for a gorgeous blue theme perfect for an aquarius cake, you can totally switch up the colors to fit any occasion or preference. Think pink for a different birthday vibe, or even a rainbow for extra cheer.
This cake is a fantastic choice for a Birthday Glitter Cake or even a Blue 13th Birthday Cake. The combination of easy to follow steps and stunning visual results makes it a truly rewarding baking project. Your friends and family will be absolutely wowed, trust me.
Plus, it is just plain fun! From mixing the batter to piping the beautiful blue frosting and sprinkling on the edible glitter, every step is a joy. It is a great way to spend an afternoon and end up with a delicious masterpiece.
Ingredients
For the Cake
- 2 1/4 cups all purpose flour
- 1 1/2 cups granulated sugar
- 3/4 cup unsalted butter, softened
- 3/4 cup milk
- 3 large eggs
- 2 1/4 teaspoons baking powder
- 1 teaspoon vanilla extract
- 1/2 teaspoon salt
For the Buttercream Frosting and Decoration
- 4 cups powdered sugar
- 1 cup unsalted butter, softened
- 3 4 tablespoons heavy cream
- 2 teaspoons vanilla extract
- Blue gel food coloring
- Edible glitter
- Silver dragées (silver pearl sprinkles)
Step By Step Instructions
Step 1: Get Ready to Bake
First things first, preheat your oven to 350°F (175°C). Then, grab your heart shaped cake pan and give it a good grease and flour. This helps ensure your beautiful cake comes out perfectly.
Step 2: Cream It Up
In a big bowl, take 3/4 cup of softened butter and the granulated sugar. Cream them together until the mixture is super light and fluffy. This step is key for a tender cake texture.
Step 3: Add Eggs and Vanilla
Now, beat in those eggs, one at a time. After each egg, make sure it is fully incorporated before adding the next. Once all eggs are in, stir in 1 teaspoon of vanilla extract. It adds such a lovely flavor!
Step 4: Dry Mix
In a separate bowl, whisk together your all purpose flour, baking powder, and salt. Give it a good mix so everything is evenly distributed. This is your dry team ready for action.
Step 5: Combine Wet and Dry
Gradually add the dry ingredients to your creamed butter mixture. Alternate with the milk, starting and ending with the dry ingredients. Mix until everything is just combined. Don’t overmix, or your cake might get tough.
Step 6: Bake Away
Pour your beautiful batter into the prepared heart shaped pan and spread it out evenly. Pop it into the preheated oven and bake for about 30 35 minutes, or until a toothpick poked into the center comes out clean. That’s your signal it is done!
Step 7: Cool Down
Let the cake cool in the pan for about 10 minutes. Then, carefully invert it onto a wire rack to cool completely. Patience is a virtue here; a fully cooled cake is essential before frosting.
Step 8: Make the Buttercream Magic
While your cake cools, let’s get that amazing buttercream ready. In a large bowl, beat 1 cup of softened butter until it is wonderfully creamy and smooth. This is the base for your stunning blue layer cake.
Step 9: Sweeten It Up
Gradually add the powdered sugar, one cup at a time, alternating with the heavy cream. Beat in 2 teaspoons of vanilla extract. Keep beating on medium high speed until your frosting is light, fluffy, and absolutely dreamy. This is going to be the perfect frosting for your aquarius cake.
Step 10: Color Your World Blue
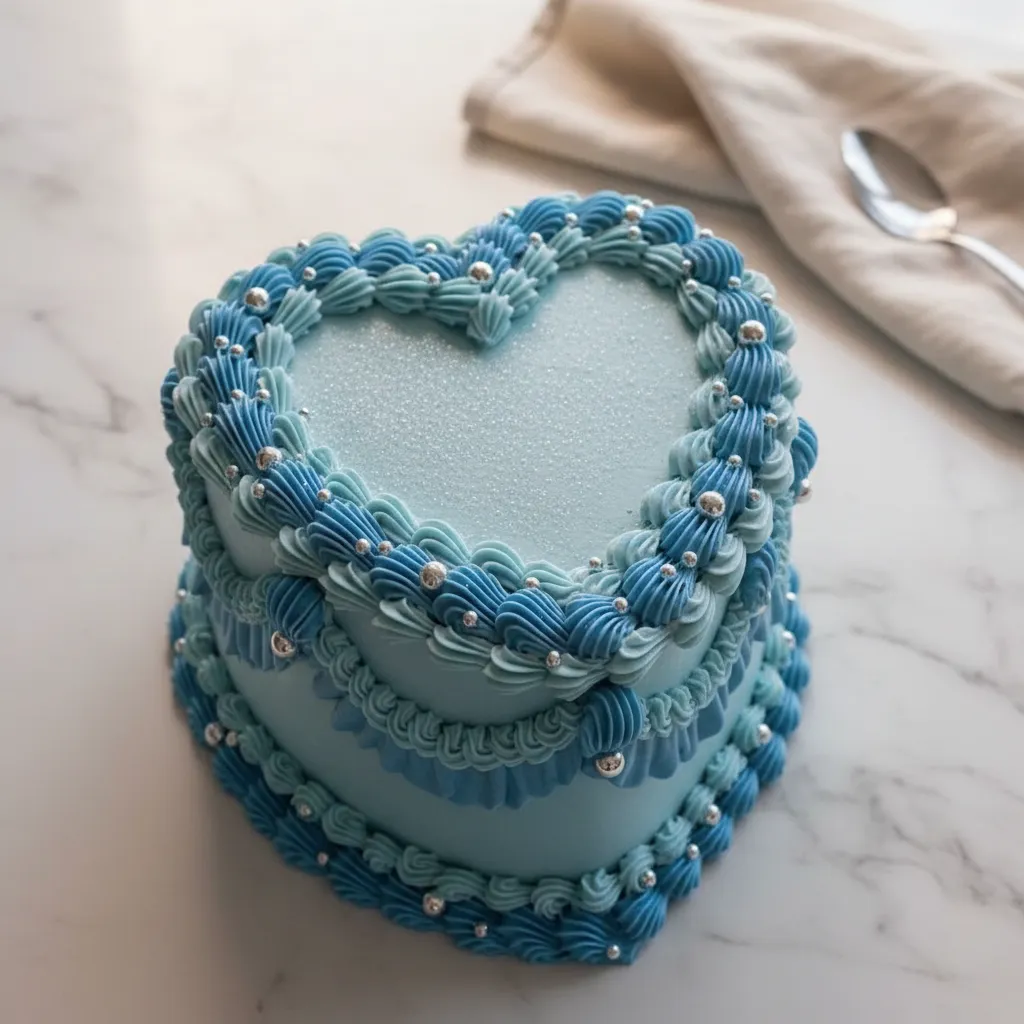
Divide the buttercream into three bowls. Leave one bowl white. In the second bowl, add a tiny bit of blue gel food coloring for a light blue shade. For the third bowl, add more food coloring to get a deeper, darker blue. This creates a lovely gradient for your Cakes Blue And White design.
Step 11: Crumb Coat Time
Once your cake is completely cool, apply a thin layer of the light blue frosting all over the cake. This is called a crumb coat, and it locks in any loose crumbs, giving you a super smooth finish later. You want to make sure your aquarius cake looks flawless.
Step 12: Pipe Your Masterpiece
Now for the fun part! Using piping bags fitted with various star and ruffle tips, pipe borders and ruffles around the top and bottom edges of the cake. Alternate between the light blue and dark blue frosting to create a beautiful, layered, vintage effect. This technique really makes your Blue Birthday Cakes For Girls stand out.
Step 13: Glitter and Glam
Generously sprinkle edible glitter over the top center of the cake. This is where the magic really happens, giving your aquarius cake that cosmic, shimmering look. It is truly a Blue Glitter Cake dream come true.
Step 14: Final Touches
To complete your stunning creation, decorate the piped borders with silver dragées. These little silver pearl sprinkles add an elegant touch and make your Cake Ideas Blue come to life. Step back and admire your handiwork!


How To Store Leftovers
If you happen to have any of this delicious aquarius cake left over (which is a big if, let’s be real!), you will want to store it properly to keep it fresh. The best way is to place the cake in an airtight container.
You can keep it at room temperature for up to two days, especially if your kitchen isn’t too warm. However, if you want it to last longer, pop it in the refrigerator. It will stay good for about 5 7 days when chilled.
Just remember to let it come to room temperature for about 30 minutes before serving again. This helps the buttercream soften slightly and makes every bite as delightful as the first. It is all about enjoying every last crumb of your beautiful blue cakes for girls birthday.
Tips
Baking is an art, but a few simple tricks can make all the difference, especially when creating something as special as an aquarius cake. Here are some pointers to help you along the way.
For truly awesome piping results, your buttercream needs to be just right. If it feels a little too soft or runny, don’t fret! Just gradually add a tablespoon more of powdered sugar at a time until it reaches a nice, stiff consistency. This makes piping those intricate ruffles and borders a breeze.
Another pro tip: after you apply the crumb coat to your cake, pop it in the fridge for about 15 20 minutes. Chilling the cake helps that thin layer of frosting set up firmly. This makes applying your final, decorative layers of frosting and piping much, much easier and cleaner.
No heart shaped pan? No problem! You can totally create a heart shaped cake without one. Just bake one square cake and one round cake of the same size. Once they are cool, cut the round cake in half. Place these two halves on two adjacent sides of the square cake, and voilà, you have a heart!
When it comes to edible glitter, don’t be shy! A generous sprinkle really makes the aquarius cake sparkle and gives it that ethereal, watery effect. Look for fine, food grade glitter for the best shimmer. This is a crucial step for a true Birthday Glitter Cake.
And here’s a little secret: always use room temperature ingredients for your cake batter. This means your butter, eggs, and milk. They will combine much more smoothly, giving you a more consistent and better textured cake. It is a small detail that makes a big difference.
Conclusion
So there you have it, folks! A complete guide to creating an absolutely stunning and delicious aquarius cake. This recipe is more than just a set of instructions; it is an invitation to get creative in the kitchen and bring a little bit of magic to your celebrations.
Whether you are whipping up a Blue Birthday Cakes For Girls, a special treat, or just exploring fun Cake Ideas Blue, this cake is sure to impress. The shimmering blues, the edible glitter, the elegant piping, it all comes together to create something truly memorable.
Don’t be afraid to make it your own. Experiment with different shades of blue or even other colors. Add extra sprinkles or different toppers. The joy of baking is in the personal touch. So go ahead, bake this fantastic aquarius cake, and share your starry creation with the world. Happy baking!
FAQ
Can I Make This Aquarius Cake Ahead of Time?
Absolutely! You can bake the cake layers a day or two in advance. Once cooled, wrap them tightly in plastic wrap and store them at room temperature. You can also make the buttercream a day ahead and keep it in the fridge. Just let it come to room temperature and re whip it before frosting.
What if I Don’t Have Blue Gel Food Coloring?
While gel food coloring gives the best vibrant blue for an aquarius cake, you can use liquid food coloring. You might need to use a bit more to achieve the desired intensity of color. Keep in mind that liquid coloring can slightly thin your frosting, so you might need to add a touch more powdered sugar.
Can I Use a Different Shaped Pan for My Birthday Glitter Cake?
Of course! While a heart shape is lovely for an aquarius cake, you can use any round or square cake pan. Just adjust the baking time slightly if your pan size is very different. A standard 9 inch round pan would work great, simply adjust the baking time as needed.
Where Can I Find Edible Glitter and Silver Dragées?
You can usually find edible glitter and silver dragées at most craft stores in the baking aisle, or specialty baking supply shops. Online retailers are also a fantastic resource for a wide variety of colors and styles, perfect for any Birthday Glitter Cake.
How Can I Get a Smooth Crumb Coat for My Blue Layer Cake?
For a super smooth crumb coat, use an offset spatula or a flat knife. Apply a very thin layer of frosting, ensuring it covers all the cake. Then, use the spatula to smooth it out as much as possible. Don’t worry if crumbs get into this layer; that is its job! Chill the cake, then apply your final frosting layers for a perfect finish on your blue layer cake.
Magical Aquarius Birthday Cake
Create a stunning, family-friendly showstopper with this vibrant Aquarius cake! Featuring shimmering blue frosting and cosmic glitter, this tasty dessert is surprisingly simple to make for any weeknight celebration or special birthday.
Requirements


Ingredients
Instructions
- Preheat your oven to 350°F (175°C). Grease and flour a heart-shaped cake pan to ensure your beautiful cake comes out perfectly.
- In a large mixing bowl, cream together 3/4 cup softened butter and granulated sugar until light and fluffy.
- Using a hand mixer, beat in the eggs one at a time, then stir in 1 teaspoon of vanilla extract.
- In a separate bowl, whisk together the flour, baking powder, and salt until evenly distributed.
- Gradually add the dry ingredients to the butter mixture, alternating with the milk. Mix until just combined to keep the cake tender.
- Pour the batter into the prepared pan and bake for 30-35 minutes, or until a toothpick comes out clean.
- Cool in the pan for 10 minutes, then move to a wire rack to cool completely before frosting.
- Beat 1 cup of softened butter until creamy. Gradually add powdered sugar, heavy cream, and 2 teaspoons of vanilla; beat until fluffy.
- Divide the buttercream into three bowls: leave one white, tint one light blue, and tint the third a dark blue.
- Apply a thin crumb coat of light blue frosting and chill the cake for 15-20 minutes to set.
- Pipe borders and ruffles using various tips, alternating shades for a lovely layered effect.
- Generously sprinkle edible glitter over the center for a cosmic, shimmering look.
- Decorate the piped borders with silver dragées for an elegant final touch. Enjoy your masterpiece!
Notes
If your buttercream is too soft for piping, gradually add a tablespoon of powdered sugar at a time until it reaches a stiff consistency.
For a flawless finish, always use an offset spatula to smooth your crumb coat before adding the final decorative layers.
No heart pan? Bake one square cake and one round cake. Cut the round cake in half and place the halves on two sides of the square to form a heart.
Always use room temperature butter, eggs, and milk for the smoothest batter and best cake texture.
Nutrition
Calories
Sugar
Fat
Carbs