Have you ever looked up at the stars on a clear winter night and felt a sense of wonder? There is something truly magical about the deep blue sky and those tiny twinkling lights.
If you are celebrating a birthday between late January and mid February you probably know an Aquarius. They are known for being unique and creative souls who love things that are a bit different.
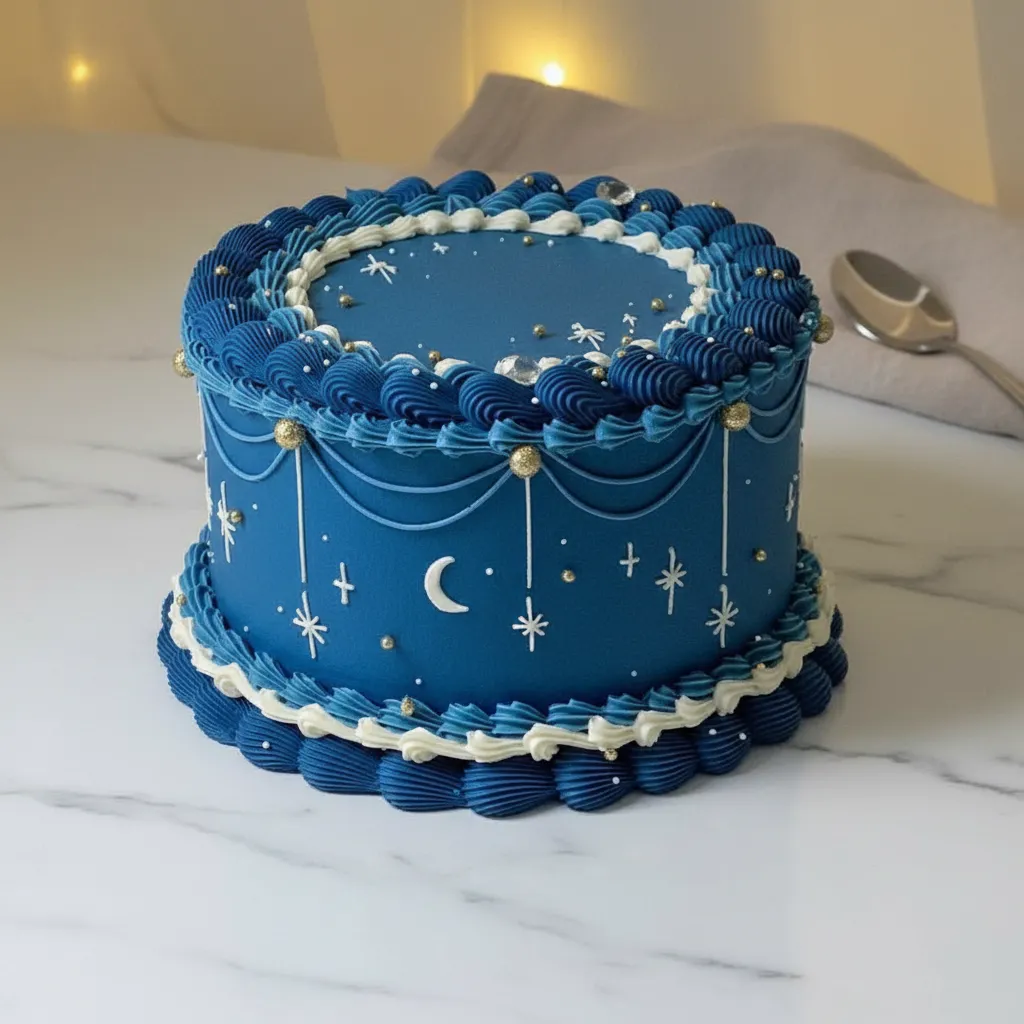
That is why making an aquarius cake is such a wonderful idea for a celebration. It allows you to bring the beauty of the cosmos right onto your dessert table without needing a degree in art.
Honestly you do not need to be a professional baker to pull off this look. With a little patience and some blue food coloring you can create a Blue Starry Cake that everyone will love.
Jump To:
Why You’ll Love This Recipe
You know what makes this recipe so special? It looks incredibly fancy but the techniques are actually very simple once you break them down. It is all about the layers and the colors.
This aquarius cake uses a style called Lambeth piping which is basically just repeating pretty patterns with frosting. It gives the cake a vintage feel that is very trendy right now.
Another reason you will love this is because it is highly customizable. While we are focusing on a Blue Celestial Cake theme you can easily tweak the shades to fit your personal style.
It is also a great budget friendly option for a big party. Instead of spending hundreds of dollars at a bakery you can make this Celestial Birthday Cake in your own kitchen with basic tools.
The flavor is another huge plus because you can use any sponge you like. Whether you love rich chocolate or light vanilla this Blue Cake With Stars will taste just as good as it looks.
Let me explain why the colors are so important here. The deep midnight blue represents the vastness of space which perfectly matches the adventurous spirit of an Aquarius person.
Plus using gold and silver accents makes the whole thing feel more royal. You are essentially creating an Elegant Starry Cake Design that looks like it belongs in a high end magazine.
Even if you are a beginner you will find that the repetitive piping is actually quite relaxing. It is almost like a form of meditation once you get into the rhythm of it.
Finally this cake is a total showstopper. When you bring out a Blue Starry Birthday Cake with glowing gold stars people will definitely ask where you bought it. You can proudly say you made it.
Ingredients
Before we get started you will need to gather your supplies. Most of these items can be found at your local grocery store or a craft shop that has a baking aisle.
- 3 layers of 8 inch chocolate or vanilla sponge cake
- 4 cups Swiss meringue buttercream
- Navy blue royal blue and black gel food coloring
- 1/2 cup white buttercream reserved for details
- Gold and silver edible dragees or sprinkles
- White piping icing or royal icing for fine details
- Edible gold luster dust and lemon extract for painting
- Small amount of white fondant or gum paste for moon and star shapes
Step By Step Instructions
Step 1 Bake And Cool The Cake Layers
The first step to a perfect aquarius cake is having a solid foundation. Bake your three layers of cake and let them cool completely on a wire rack before you do anything else.
If the cake is even slightly warm it will melt your buttercream and you will end up with a mess. Once they are cool level the tops with a serrated knife for stability.
Step 2 Stack And Crumb Coat
Now you want to stack your layers with a thin spread of buttercream between each one. This acts like glue and keeps your Blue Star Cake from sliding around while you work.
Apply a very thin layer of frosting over the entire outside of the cake. This is called a crumb coat. It locks in all those little cake crumbs so they do not ruin your finish.
Pop the cake into the fridge for about 30 minutes. You want that crumb coat to feel firm to the touch before you move on to the beautiful blue layers.
Step 3 Mix The Celestial Blue Buttercream
Here is the thing about getting a deep color. You need to use gel food coloring because liquid coloring will change the texture of your frosting and make it too runny.
Mix navy blue and royal blue into your remaining buttercream. To get that true Blue Celestial Cake look add a tiny drop of black gel to deepen the shade to a midnight hue.
Step 4 Apply The Final Frosting Layer
Frost the cake with a smooth final layer of that deep blue buttercream you just mixed. Use a bench scraper to get those sides perfectly flat and the edges sharp.
A clean finish is essential for a Blue Cake With Starry Design because it makes the stars stand out more. Chill the cake again for 20 minutes to set the surface.
Step 5 Pipe The Thick Shell Borders
Grab a large open star tip like a 4B. Pipe a thick shell border around the very bottom and the top edges of your aquarius cake to create a framed look.
This adds a lot of texture and volume. It is the hallmark of the Lambeth style and it instantly makes the cake look more professional and intentionally designed.
Step 6 Add Delicate White Inner Borders
Now take your reserved white buttercream and a smaller star tip like tip 18. Pipe a delicate inner shell border just inside the blue ones you just finished.
This contrast is what makes a Blue Starry Cake look so striking. The white looks like a soft glow against the dark night sky background of the frosting.
Step 7 Create The Side Swags
Using a small round tip like a 3 or 4 pipe three concentric draped lines between points on the side of the cake. These are called swags and they look like fabric.
Take your time with this part. If you mess up a line you can carefully scrape it off while the cake is cold and try again until it looks perfect.
Step 8 Pipe The Stars And Constellations
This is where your aquarius cake really comes to life. Use a very small round tip with white icing to pipe a crescent moon and tiny dots for stars.
You can even connect the dots with thin lines to create the Aquarius constellation. This makes it a true Blue Cake With Stars that feels personal to the birthday person.
Step 9 Decorate With Gold Dragees
Attach your gold dragees at the intersections of the swags and at the ends of your piped lines. These represent the brightest stars in the Elegant Starry Cake Design.
The gold adds a touch of class and makes the blue look even richer. It is a simple addition that makes a huge impact on the overall aesthetic.
Step 10 Add Fondant Moon And Stars
If you want extra dimension cut out a small crescent moon from fondant. Let it dry and then paint it with gold luster dust mixed with lemon extract.
Place these gold shapes on top of the cake. Now you have a finished Celestial Birthday Cake that is ready to be the center of attention at any party.


How To Store Leftovers
If you happen to have any cake left over you want to make sure it stays fresh. Buttercream acts as a seal for the cake but cut edges will dry out.
Store your aquarius cake in an airtight container. If it is a whole cake a cake carrier is best. If it is slices you can use smaller plastic containers.
You can keep it at room temperature for about two days if your kitchen is cool. However because of the intricate piping it is usually safer to keep it in the fridge.
When you are ready to eat it again let the cake sit out for about an hour. Swiss meringue buttercream tastes best when it has softened back to room temperature.
Do not freeze the cake with the gold dragees on it if you can help it. Sometimes the moisture from the freezer can make the gold color bleed into the frosting.
Tips
Always use gel food coloring for your Blue Starry Birthday Cake. Liquid colors will make the frosting too soft to hold those beautiful piped shell shapes we worked so hard on.
Make sure your cake is well chilled before you start the decorative piping. A cold surface helps the new frosting stick and prevents the base layer from getting squished.
If you do not have a small star tip for the white borders do not worry. You can use a small round tip to make a beaded look instead which is just as pretty.
When painting with luster dust use lemon extract or vodka. These evaporate quickly which means your fondant moon will not get soggy and lose its shape while drying.
Keep a damp cloth nearby while you pipe. If your hands get too warm the buttercream in the bag might start to melt. Take breaks to let everything cool down.
Conclusion
Creating an aquarius cake is a rewarding project that combines art and baking. It is the perfect way to show someone you care by putting effort into a theme.
This Blue Starry Cake is not just a dessert but a conversation piece. Your guests will be amazed by the deep colors and the intricate Blue Star Cake details.
Remember that baking is supposed to be fun. Do not stress if your swags are not perfectly symmetrical. The beauty of a handmade cake is in its unique character.
I hope this guide inspires you to try your hand at a Blue Celestial Cake. Whether it is for a birthday or just for fun it is a lovely way to celebrate.
So go ahead and grab your piping bags. You are ready to create a Celestial Birthday Cake that will shine as bright as the stars in the night sky.
FAQ
Can I Use American Buttercream Instead
Yes you can use American buttercream for your aquarius cake if you prefer the taste. It is actually a bit stiffer which can make the piping even easier for beginners.
How Do I Get The Deep Blue Off My Hands
Working with dark gel colors can stain. If your hands turn blue try using a bit of vegetable oil or a sugar scrub to lift the pigment from your skin.
Can I Make This A Pastel Starry Cake Design
Absolutely if you want a softer look you can use light blues and purples. A Pastel Starry Cake Design is perfect for a baby shower or a younger childs birthday.
What If My Frosting Is Too Soft To Pipe
If your buttercream is melting just put the whole piping bag in the fridge for five or ten minutes. This will firm it up so your stars hold their shape.
Celestial Birthday Cake
This stunning Celestial Birthday Cake looks incredibly fancy but is surprisingly simple to make, perfect for an Aquarius celebration. With beautiful blue hues, delicate piping, and edible gold stars, this cake is a showstopper that will impress all your guests.
Requirements


Ingredients
Instructions
- Bake and cool your three layers of cake completely on a wire rack. Level the tops with a serrated knife for stability.
- Stack layers with a thin spread of buttercream between each one. Apply a very thin layer of frosting over the entire outside of the cake (crumb coat). Chill the cake in the fridge for about 30 minutes until firm to the touch.
- Mix navy blue, royal blue, and a tiny drop of black gel food coloring into the remaining buttercream to achieve a deep midnight hue.
- Frost the cake with a smooth final layer of that deep blue buttercream. Use a bench scraper to get those sides perfectly flat and the edges sharp. Chill the cake again for 20 minutes to set the surface.
- Grab a large open star tip (like a 4B) and pipe a thick shell border around the very bottom and the top edges of your cake.
- Now take your reserved white buttercream and a smaller star tip (like tip 18). Pipe a delicate inner shell border just inside the blue ones you just finished.
- Using a small round tip (like a 3 or 4), pipe three concentric draped lines (swags) between points on the side of the cake.
- Use a very small round tip with white icing to pipe a crescent moon and tiny dots for stars. You can even connect the dots with thin lines to create the Aquarius constellation.
- Attach your gold dragees at the intersections of the swags and at the ends of your piped lines.
- If you want extra dimension, cut out a small crescent moon from fondant. Let it dry and then paint it with gold luster dust mixed with lemon extract. Place these gold shapes on top of the cake.
Notes
Always use gel food coloring; liquid colors make frosting too soft to hold those beautiful piped shell shapes.
Ensure your cake is well chilled before you start the decorative piping. A cold surface helps the new frosting stick and prevents the base layer from getting squished.
If you do not have a small star tip for the white borders, you can use a small round tip to make a beaded look instead which is just as pretty.
When painting with luster dust, use lemon extract or vodka. These evaporate quickly which means your fondant moon will not get soggy and lose its shape while drying.
Keep a damp cloth nearby while you pipe. If your hands get too warm, the buttercream in the bag might start to melt. Take breaks to let everything cool down.
Store leftover cake in an airtight container. If it is a whole cake, a cake carrier is best. If it is slices, you can use smaller plastic containers. It can be kept at room temperature for about two days if your kitchen is cool, but for intricate piping, it’s safer in the fridge.
When ready to eat, let the cake sit out for about an hour; Swiss meringue buttercream tastes best when softened to room temperature.
Do not freeze the cake with the gold dragees on it if you can help it; moisture from the freezer can make the gold color bleed into the frosting.
Nutrition
Calories
Sugar
Fat
Carbs