Birthdays are a time for big dreams and even bigger celebrations. If you are lucky enough to have an Aquarius in your life, you know they appreciate things that are a bit different. They love to stand out from the crowd. That is exactly why an aquarius cake should be just as unique as they are. Honestly, finding the perfect Birthday Cake Aquarius lovers will actually like can be a bit of a challenge because their tastes are so specific.
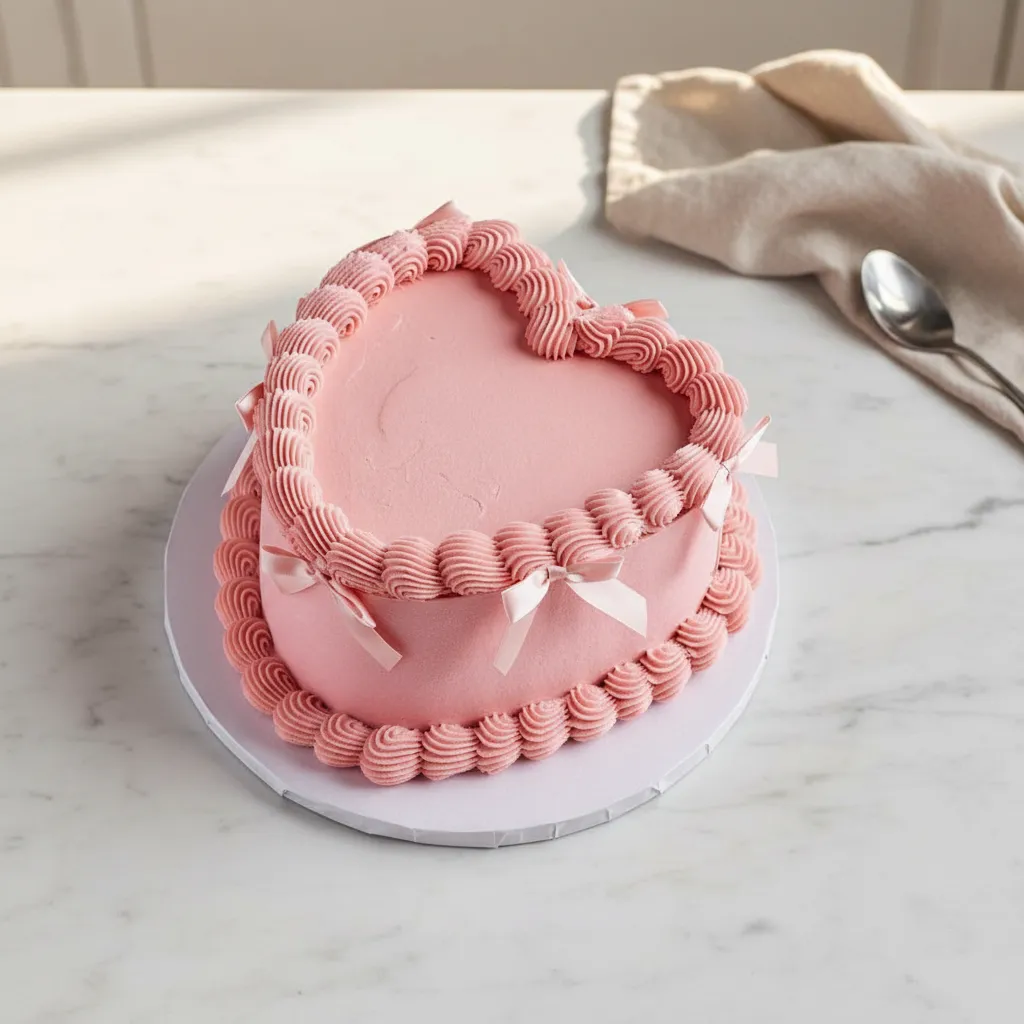
This year, the trend is all about the vintage heart shape and soft pink colors. It is the ultimate Birthday Cake Trendy choice for anyone entering their Sweet 16 Era. You do not need to be a professional baker to create something that looks like an Extravagant Birthday Cake. With a little patience and some pink glitter spray, you can make a Cake Cool enough to win over any zodiac sign. Let us dive into how you can make this beautiful dessert at home without any stress.
Jump To:
Why You’ll Love This Recipe
You know what? This recipe is a total game changer for home bakers. One of the best things about this aquarius cake is how customizable it is. While we are using a soft pink theme, you could easily swap the colors to fit any vibe. It is a great way to explore Aquarius Cake Ideas without needing a ton of expensive equipment. The heart shape is naturally charming and feels very personal for a birthday celebration.
Another reason you will love this is the texture. By using cake flour and egg whites, we get a crumb that is light and fluffy. It feels fancy but the steps are very simple. Most of these ingredients are already in your pantry. It is a budget conscious way to get that high end look. Plus, the addition of white vinegar and buttermilk creates a moist cake that stays fresh for days. It is the perfect Cake Cool project for a rainy afternoon.
Lastly, the decoration is where the real fun happens. Adding satin ribbons and glitter spray makes it look like it came from a high end boutique. It is one of those Aquarius Cake Ideas that looks much harder than it actually is. You will feel so proud when you see the final result. It is a wonderful way to show someone you care by putting in that extra effort to make their day special.
Ingredients
For The Pink Heart Cake
- 3/4 cup unsalted butter, softened
- 1/2 cup vegetable oil
- 1 1/2 cups granulated sugar
- 6 large egg whites, room temperature
- 1 tablespoon pure vanilla extract
- 1 tablespoon white vinegar
- 1/4 teaspoon pink gel food coloring
- 3 cups cake flour
- 2 teaspoons baking powder
- 1/2 teaspoon baking soda
- 1 1/4 cups buttermilk, room temperature
For The Fluffy Buttercream Frosting
- 3 cups unsalted butter, softened
- 8 cups powdered sugar
- 1 tablespoon vanilla extract
- 2 tablespoons heavy cream
- White fondant or stiff white frosting for lettering
- Edible pink glitter spray
- Small light pink satin ribbons or bows
Step By Step Instructions
Step 1: Prep The Oven And Pans
First things first, you need to get your workspace ready. Preheat your oven to 350 degrees F. This ensures the aquarius cake bakes evenly from the moment it goes in. Take two 8 inch heart shaped cake pans and grease them well. You can use butter or a baking spray. I like to add a little flour too just to be safe. This prevents any sticking which is the last thing you want when making a Birthday Cake Trendy and beautiful.
Step 2: Whisk The Dry Ingredients
In a medium sized bowl, grab your whisk. Combine the cake flour, baking powder, and baking soda. Whisking them together helps remove any lumps. It also aerates the flour which makes the aquarius cake extra light. Using cake flour instead of all purpose flour is a little secret for that bakery style texture. It makes the final result feel like an Extravagant Birthday Cake from a professional shop.
Step 3: Cream The Butter And Sugar
Now, head over to your stand mixer. Put in the 3/4 cup of softened butter and the granulated sugar. Beat them together for about 3 to 5 minutes. You want the mixture to look light and fluffy. This step is crucial because it builds the structure of your aquarius cake. If you rush this, the cake might be too dense. Take your time and let the mixer do the heavy lifting here.
Step 4: Add Oil And Egg Whites
Gradually beat in the vegetable oil. The oil adds moisture that butter alone cannot provide. Next, add the egg whites one at a time. Make sure each one is well mixed before adding the next. Using only whites keeps the aquarius cake pale so the pink color really pops. It is a small detail that makes a big difference in how the colors look in the end.
Step 5: Flavor And Color The Batter
Stir in the vanilla extract and the white vinegar. The vinegar reacts with the baking soda to give the cake a great lift. Now, add the pink gel food coloring. Start with a tiny amount. You can always add more to reach that perfect soft pink shade. This is what makes it a Birthday Cake Aquarius fans will love. It is all about that aesthetic appeal and the soft, dreamy vibes.
Step 6: Alternate Dry And Wet Ingredients
Turn your mixer to low speed. Add about a third of the dry ingredients, then half of the buttermilk. Repeat this, ending with the dry ingredients. Mixing this way prevents the batter from curdling. It ensures everything is smooth and perfectly combined. Your aquarius cake batter should look creamy and smell amazing at this point. Do not overmix or the cake will be tough.
Step 7: Bake The Cake Layers
Divide the batter evenly between your two heart shaped pans. Smooth the tops with a spatula. Pop them into the oven for 30 to 35 minutes. You will know they are done when a toothpick comes out clean from the center. Your kitchen will smell like a dream. This is the heart of the aquarius cake process. Let them bake until they are just firm to the touch.
Step 8: Cool Completely
This might be the hardest part because you will want to start decorating right away. However, you must let the layers cool completely on a wire rack. If the cake is even a little bit warm, the frosting will melt and slide right off. For a Cake Cool result, patience is your best friend. I often bake the layers the day before and wrap them in plastic wrap once they are cool.
Step 9: Whip Up The Frosting
While the cake cools, let us make the buttercream. Beat the 3 cups of softened butter until it is very smooth. Gradually add the powdered sugar, one cup at a time. Add the vanilla and heavy cream. Keep beating until the mixture is light, airy, and easy to spread. This frosting is what turns a simple dessert into an Extravagant Birthday Cake. It should be stiff enough to hold its shape but soft enough to pipe.
Step 10: Tint The Frosting Pink
Take a small amount of that pink gel food coloring and add it to your frosting. You want to match the soft pink shade of the cake layers. Mix it well so there are no streaks. This cohesive look is a hallmark of a Birthday Cake Trendy design. It looks professional and very intentional. Make sure you save some white frosting if you plan to pipe the letters later.
Step 11: Stack And Crumb Coat
Place one cake layer on your stand. Spread a generous layer of frosting on top, then place the second layer on. Apply a very thin layer of frosting over the entire cake. This is called a crumb coat. It traps all the loose crumbs so they do not ruin your final look. Refrigerate the aquarius cake for 30 minutes to let this layer set. This is a pro tip for any Cake Cool project.
Step 12: Apply The Final Layer
Now that the crumb coat is firm, apply a smooth final layer of pink frosting. Use a metal cake scraper if you have one to get the sides perfectly flat. This smooth finish is what makes it look like an Extravagant Birthday Cake. Take your time with the heart shape. The curves can be a bit tricky, but just follow the shape of the cake. It does not have to be perfect to be beautiful.
Step 13: Pipe The Borders
Fill a piping bag with a star tip, like a 4B. Pipe continuous shell borders along the top edge and the bottom base of the cake. This vintage style piping is very popular right now. It adds texture and a bit of drama to your aquarius cake. It is one of those Aquarius Cake Ideas that really brings the whole look together. Just squeeze, pull, and repeat all the way around.
Step 14: Add The Lettering
You can use white fondant to cut out letters or pipe them with white frosting. Spell out something fun like IN MY SWEET 16 ERA on the top. This personal touch is what makes it a true Birthday Cake Aquarius celebration piece. It connects the cake to the person and the moment. If you are nervous about piping, you can practice on a piece of parchment paper first.
Step 15: Attach The Ribbons
Gently press small pink satin ribbons or bows into the frosting around the sides. Space them out at equal intervals. This adds a soft, feminine touch that is very Birthday Cake Trendy. It makes the cake look like a gift. Just remember to tell your guests to remove the ribbons before they start eating! It is a simple addition that adds so much charm to the aquarius cake.
Step 16: Finish With Glitter
The final step is the most magical. Give the entire cake a light mist of edible pink glitter spray. This gives it a subtle shimmer that catches the light. It is the perfect finishing touch for an Extravagant Birthday Cake. Now your aquarius cake is ready for its close up. It looks amazing, smells great, and is sure to be the star of the party.


How To Store Leftovers
If you actually have any cake left over, you want to keep it fresh. Put the aquarius cake in an airtight container. If it is too big, you can carefully slice it and store the pieces individually. Keep it in the refrigerator for up to five days. The buttercream acts as a seal to keep the moisture in. When you want a slice, let it sit at room temperature for about 20 minutes so the butter softens up again.
You can also freeze the slices if you want to save them for later. Wrap them tightly in plastic wrap and then foil. They will stay good for about a month. This is a great way to enjoy your Birthday Cake Aquarius treat long after the party is over. Just thaw a slice in the fridge overnight when the craving hits. It still tastes just as tasty as the day you made it.
Tips
For the cleanest look, I highly recommend using a revolving cake stand. It makes smoothing the frosting so much easier. You can just hold your scraper still and spin the cake. Also, if you do not have heart shaped pans, do not worry. You can bake one square cake and one round cake. Cut the round one in half and stick the pieces to the sides of the square to make a heart. It is a classic hack for Aquarius Cake Ideas.
Another tip is to make sure your butter is truly softened but not melted. If it is too cold, your frosting will be lumpy. If it is too hot, it will be soup. Finding that middle ground is key for a Cake Cool finish. Also, when using the glitter spray, hold it about 6 inches away from the cake. This prevents any big splotches of glitter and gives you that even, pretty glow you see in professional photos.
Conclusion
Making an aquarius cake at home is such a rewarding experience. It combines creativity with a bit of baking science. You end up with a Birthday Cake Trendy enough for any celebration. Whether it is for a Sweet 16 or just a fun birthday, this pink heart cake is sure to impress. It proves that you do not need a professional kitchen to make an Extravagant Birthday Cake. All you need is a little time and a lot of love.
I hope you feel inspired to try this recipe. It is a wonderful way to celebrate the unique spirit of an Aquarius. Remember to take plenty of photos before you cut into it! This Cake Cool design deserves to be seen. Happy baking, and I hope your celebration is as wonderful as this cake is. Enjoy every single bite of your homemade masterpiece.
FAQ
Can I Make This For A Different Zodiac Sign?
Absolutely! While this is designed as an aquarius cake, you can change the colors and message for any sign. For example, if you need Sagittarius Cake Ideas, you might choose purple or orange tones. The heart shape is universal and works for anyone who loves a bit of vintage flair.
How Do I Make A Star Theme Cake?
If you want a Star Theme Cake, you can add edible gold stars to the frosting. You could also pipe little stars using your star tip instead of the shell border. This fits the celestial vibe of the zodiac perfectly and adds another layer of detail to your aquarius cake.
What About Crystal Cakes?
To get the look of Crystal Cakes, you can use rock candy or crushed clear hard candies. Press them into the bottom border of the cake. It gives the appearance of raw geodes or crystals, which many Aquarius people find very appealing. It adds a sophisticated touch to your Cake Cool project.
Can I Add A Planet Like A Saturn Cake?
Since Saturn is the ruling planet for Aquarius, a Saturn Cake theme is a great idea. You can use a small round chocolate or a cake pop to represent the planet. Add a ring made of fondant or a thin wafer. Place it on top of your aquarius cake for a cool astronomical look.
Pink Heart Aquarius Cake
This trendy pink heart cake is perfect for celebrating an Aquarius or anyone entering their Sweet 16 Era. It looks extravagant but is surprisingly simple to make, using common pantry ingredients and a touch of glitter for that special, custom look. You’ll love its light, fluffy crumb and the joy of creating a unique, personalized dessert at home.
Requirements


Ingredients
Instructions
- Preheat oven to 350°F. Grease and flour two 8-inch heart shaped cake pans.
- In a medium bowl, grab your whisk. Whisk together cake flour, baking powder, and baking soda to remove lumps and aerate.
- In a stand mixer, beat 3/4 cup softened butter and granulated sugar for 3-5 minutes until light and fluffy.
- Gradually beat in the vegetable oil. Add egg whites one at a time, mixing well after each addition.
- Stir in pure vanilla extract, white vinegar, and a small amount of pink gel food coloring until desired soft pink shade is reached.
- On low speed, alternate adding dry ingredients (cake flour mixture) and buttermilk, starting and ending with dry ingredients. Mix until just combined; do not overmix.
- Divide batter evenly between prepared heart shaped pans. Smooth the tops with a spatula. Bake for 30-35 minutes, or until a toothpick inserted into the center comes out clean.
- Let cake layers cool completely on a wire rack. For best results, bake the day before and wrap cooled layers in plastic wrap.
- While cake cools, beat 3 cups softened butter until smooth. Gradually add powdered sugar, then vanilla extract and heavy cream. Beat until light, airy, and spreadable.
- Add pink gel food coloring to match the cake layers. Mix well. Save some white frosting if piping letters.
- Place one cake layer on a stand. Spread a generous layer of frosting, then add the second layer. Apply a thin crumb coat over the entire cake. Refrigerate for 30 minutes to set.
- Once crumb coat is firm, apply a smooth, final layer of pink frosting. Use a metal cake scraper for flat sides, following the heart shape.
- Fill a piping bag with a star tip (e.g., 4B). Pipe continuous shell borders along the top and bottom edges of the cake.
- Use white fondant or white frosting to pipe a message like “IN MY SWEET 16 ERA” on top.
- Gently press small light pink satin ribbons or bows around the sides of the cake at equal intervals. (Remind guests to remove before eating).
- Lightly mist the entire cake with edible pink glitter spray for a subtle shimmer. Serve and enjoy!
Notes
For the cleanest look, use a revolving cake stand to make smoothing frosting easier.
Ensure your butter is truly softened but not melted for best frosting texture.
Hold the glitter spray about 6 inches away from the cake for an even, pretty glow.
Nutrition
Calories
Sugar
Fat
Carbs