Ever dreamt of baking that perfect, crusty loaf of bread right in your own kitchen? You know, the kind with that amazing tangy flavor and airy crumb? Well, the journey to becoming a home baker extraordinaire starts with one crucial ingredient: a vibrant, active sourdough starter. And guess what? It’s not nearly as complicated as it sounds!
Forget those intimidating stories you might have heard. We’re here to show you a super straightforward, sourdough starter easy recipe that will have you creating your own bubbly, happy starter in about a week. This guide is all about simplifying the process, making it accessible for anyone who wants to try their hand at this rewarding craft. Let’s get that kitchen smelling incredible!
Jump To:
Why You’ll Love This Recipe
Honestly, who doesn’t love a good challenge that actually feels achievable? This sourdough starter easy recipe is a game changer for several reasons. First off, it’s incredibly satisfying. Watching flour and water transform into a living, breathing entity that can bake bread? That’s pure magic, my friend.
It’s also surprisingly budget conscious. All you need are two simple ingredients: flour and water. No fancy equipment is required, just a jar, a spoon, and a little patience. This truly is the best sourdough starter for anyone looking to save a few bucks on artisanal bread.
Plus, once you master starting a sourdough starter, you open up a whole new world of baking possibilities. From rustic loaves to pancakes and even pizza dough, your starter will become your go to kitchen companion. It’s a skill that keeps on giving!
This recipe focuses on consistency and simplicity, ensuring your new kitchen pet thrives without constant fuss. You’ll find that establishing this routine is much easier than you might think, making it a truly easy sour dough starter recipe.
Ingredients
Gathering your supplies for this sourdough starter easy recipe couldn’t be simpler. You really don’t need much to get going, which is part of its charm. Just a couple of basics, and you’re well on your way to creating your own active starter.
For the Sourdough Starter
- Flour (any kind works: all purpose, whole wheat, bread flour)
- Water (filtered or boiled and cooled is best)
That’s it! Just two ingredients. For equipment, grab a medium sized glass jar (clear helps you see the action), a spoon, and a clean cloth or a loose fitting lid to cover your jar. A kitchen scale is optional but helpful for precise measurements.
Example Basic Bread Recipe (Using Your Mature Starter)
Once your starter is ready, you’ll be eager to bake! Here’s a quick look at what you’ll need for a simple loaf, showing you how to make bread from sourdough starter.
- Sourdough Starter: 80–120g (your active, bubbly friend!)
- Flour: 500g
- Water: 350g
- Salt: 10g
Step By Step Instructions
Alright, let’s get down to business! This day by day guide will walk you through exactly how do you make a sourdough starter that’s healthy and ready for baking. Remember, consistency is key, but don’t stress too much. It’s a living thing, and it’s pretty forgiving.
Day 1: Mix the First Batch
Grab your clean jar. Add 50g of your chosen flour. Then, add 50g of water. Stir it all together really well until you have a smooth, thick paste. Don’t worry if it looks a bit gluey; that’s totally normal. Cover your jar loosely with a cloth or its lid, allowing some air to get in. Place it in a warm spot, ideally around 72–79°F (22–26°C).
Day 2: Small Signs of Life
Today, you might start seeing a few tiny bubbles. Maybe a slight sour smell? Or a tiny rise and fall? These are all good signs! It’s waking up. Now, remove about half of your mixture, leaving only 50g in the jar. Add 50g fresh flour and 50g fresh water. Mix it thoroughly, cover loosely, and return it to its warm spot. This is your first “feeding” for your sourdough starter easy recipe.
Day 3: More Activity
Expect more action today! You should see more bubbles, a bigger rise after feeding, and a stronger, tangier smell. Keep that routine going: remove all but 50g of starter, then add 50g fresh flour and 50g fresh water. Mix, cover, and wait. You’re well on your way to the best sour dough starter recipe.
Day 4: Starter Starts to Double
By now, your starter should be quite active. It might even double in size within a few hours of feeding! The smell should be pleasantly tangy, and the texture airy and bubbly. Keep up the same feeding method. You’re doing great with your sourdough recipe easy.
Day 5: Almost Ready
Today, your starter should reliably double in size within 4–6 hours after feeding. If it’s doing this consistently, you’re super close! Continue feeding it once daily. Look for a mild sour, slightly sweet smell, a frothy and airy texture, and that reliable doubling. This means your sourdough starter easy recipe is really taking hold.
Day 6–7: Fully Mature
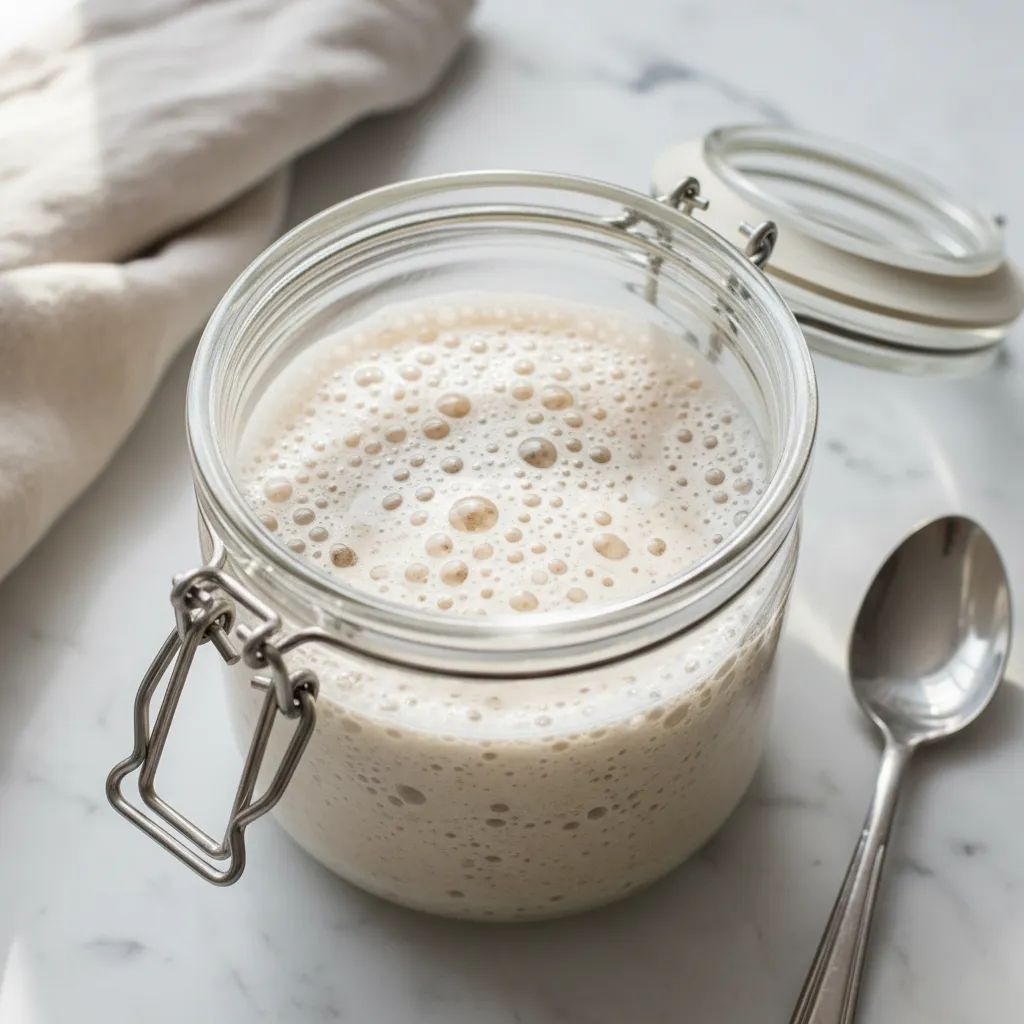
Congratulations! Your starter should now be doubling or even tripling after each feeding, showing tons of bubbles. You can do the “float test”: drop a spoonful into water. If it floats, it’s ready! Your recipe for sourdough starter success is complete. Time to bake something amazing.
How to Use Your Mature Starter in Bread
Once your starter is mature, you can use it in your favorite bread recipes. For a basic loaf, you’d typically combine your active starter with flour, water, and salt. The starter is what gives your bread its lift and signature tangy flavor. This is truly the heart of how to make bread from sourdough starter.
Just remember to reserve some starter before you use it all, so you can feed it again and keep your culture going for future bakes. It’s a continuous cycle of deliciousness!


How To Store Leftovers
Okay, so we’re not talking about leftover dinner here, but rather how to care for your “leftover” starter once it’s mature and you’re not actively baking. This is crucial for maintaining your best sourdough starter for years to come.
First, keep your jar clean. Regularly rinse the sides to prevent dried crust from building up. This helps keep your starter healthy and happy. Consistency in feeding is also super important; it keeps the yeast and bacteria strong.
For storage, it really depends on how often you bake. If you’re a daily baker, keep your starter on the counter and feed it twice a day. If you bake a couple of times a week, a single daily feeding on the counter should suffice. But what if you bake less frequently? This is where a refrigerator sourdough starter comes in handy.
If you only bake once a week or less, you can store your starter in the fridge. Just make sure to feed it once a week, even when it’s chilling out. This slows down its activity, so it won’t need feeding as often. Just remember to pull it out and feed it a few times at room temperature before you plan to bake again to get it super active and bubbly.
Tips
Making a sourdough starter easy recipe is certainly achievable, but a few insider tips can make the process even smoother and more enjoyable. Think of these as little nudges from a seasoned baker to help you along the way.
Firstly, don’t fret over exact temperatures. While 72–79°F is ideal, if your kitchen is a little cooler, it just means your starter might take an extra day or two to become active. Patience is a virtue when you’re starting a sourdough starter!
Secondly, use a clear glass jar. It’s not just for aesthetics; being able to see those bubbles form and watch your starter rise and fall is incredibly motivating and helps you gauge its activity. Plus, it just looks cool!
Consider using a kitchen scale. While not strictly necessary, it provides precision in your feedings, which can lead to a more consistent and robust starter. It’s a small investment that pays off big time in the long run for your best sourdough starter.
Don’t be afraid to experiment with different flours once your starter is established. While all purpose is a great starting point, whole wheat or rye flour can give your starter a boost of nutrients, sometimes making it even more vigorous. This is part of the fun of a sourdough recipe easy.
Lastly, trust your nose. A healthy starter should smell pleasantly tangy, like yogurt or ripe fruit. If it smells like nail polish remover, it might be hungry. Just feed it, and it should bounce back. This truly is an easy sour dough starter recipe that’s hard to mess up.
Conclusion
There you have it! A complete guide to creating your very own vibrant, active sourdough starter easy recipe. It’s a journey that’s incredibly rewarding, transforming simple ingredients into the foundation for delicious, homemade bread. You’ve just unlocked a new level in your home baking adventure.
Remember, your starter is a living thing, and it gets better with age and consistent care. Don’t be discouraged by minor setbacks; every baker has them. Just keep feeding, keep observing, and keep baking. Soon enough, you’ll be enjoying those warm, crusty loaves you’ve always dreamed of, all thanks to your amazing sourdough starter easy recipe.
FAQ
What if my starter isn’t bubbling?
Don’t worry! This is common, especially in the first few days. Ensure your kitchen is warm enough. Give it a bit more time and keep up the consistent feeding schedule. Sometimes it just needs an extra day or two to get going.
Can I use tap water?
It’s best to use filtered or boiled and cooled tap water. Chlorine in regular tap water can inhibit the yeast and bacteria development in your starter. If you must use tap, let it sit out overnight to allow the chlorine to dissipate.
How often should I feed my refrigerator sourdough starter?
If stored in the fridge, your refrigerator sourdough starter only needs to be fed once a week. Take it out, feed it, let it sit at room temperature for a couple of hours, then pop it back in the fridge.
My starter smells like nail polish remover. Is it ruined?
Not at all! This usually means your starter is very hungry. It’s producing alcohol as a byproduct. Just discard most of it and feed it as usual. It should bounce back to a pleasant, tangy aroma quickly.
How do I know my sourdough starter is ready for baking?
Your starter is ready when it consistently doubles or triples in size within 4–6 hours after feeding. It should be full of bubbles, smell pleasantly tangy, and pass the float test (a spoonful floats in water).
“`htmlEasy Sourdough Starter Recipe
Creating your own active sourdough starter is simpler than you think! This easy recipe guides you day-by-day to a bubbly, happy starter, perfect for baking delicious, crusty bread right at home. Get ready for that amazing tangy flavor and airy crumb!
Requirements


Ingredients
Example Basic Bread Recipe (Using Your Mature Starter)
Step By Step Instructions
- Day 1: Mix the First Batch
In a clean jar, combine 50g flour and 50g water. Stir into a thick paste. Cover loosely and place in a warm spot (72–79°F). - Day 2: Small Signs of Life
Remove half the mixture (leaving 50g). Add 50g fresh flour and 50g fresh water. Mix, cover, and return to warm spot. - Day 3: More Activity
Expect more bubbles and tangier smell. Repeat the feeding process: discard all but 50g, add 50g flour and 50g water. - Day 4: Starter Starts to Double
Your starter should be active, possibly doubling in size within hours. Continue daily feedings with the same ratio. - Day 5: Almost Ready
The starter should reliably double in 4–6 hours after feeding. Look for a frothy, airy texture and mild sour smell. - Day 6–7: Fully Mature
Your starter should double or triple after feeding. Pass the float test: a spoonful should float in water. It’s ready to bake! - How to Use Your Mature Starter in Bread
Combine your active starter with flour, water, and salt for a basic loaf. Remember to reserve some starter before using it for future bakes.
How To Store Leftovers
Keep your starter jar clean. For frequent bakers, keep it on the counter and feed twice daily. For weekly bakers, a single daily feeding suffices.
For less frequent baking (once a week or less), store your starter in the fridge. Feed it once a week. Before baking, take it out and feed it a few times at room temperature to reactivate it.
Tips
Don’t worry too much about exact temperatures; a cooler kitchen might just mean a slightly longer activation time. Patience is key!
Use a clear glass jar to easily monitor your starter’s activity – seeing those bubbles is motivating!
A kitchen scale offers precision in feedings, leading to a more consistent starter.
Experiment with different flours like whole wheat or rye for added nutrients and potential vigor.
A healthy starter smells pleasantly tangy, like yogurt or ripe fruit. A nail polish remover smell means it’s hungry; just feed it.
FAQ
What if my starter isn’t bubbling? Don’t worry! Ensure your kitchen is warm enough and maintain the feeding schedule. It might just need a little more time.
Can I use tap water? It’s best to use filtered or boiled and cooled water, as chlorine can inhibit yeast growth. If using tap water, let it sit out overnight.
How often should I feed my refrigerator sourdough starter? Feed it once a week. Take it out, feed it, let it sit at room temperature for a few hours, then return it to the fridge.
My starter smells like nail polish remover. Is it ruined? No! This indicates it’s very hungry. Discard most of it and feed as usual; it should recover quickly.
How do I know my sourdough starter is ready for baking? It consistently doubles or triples in size within 4–6 hours after feeding, is bubbly, smells tangy, and passes the float test.
Nutrition (Estimated per 1/4 cup serving of starter)
Calories
Sugar
Fat
Carbs
Protein