Graduation is a super special time, isn’t it? It marks the end of one chapter and the exciting start of another. You want to celebrate your grad’s hard work and all those late nights, but let’s be real, planning a party can feel like a lot.
What if I told you that you could whip up truly amazing simple graduation cakes right in your own kitchen, without breaking the bank or your sanity? Forget fancy bakeries and steep prices. We’re talking about making a memorable treat that’s full of love and flavor.
This recipe is your secret weapon for creating beautiful, delicious cakes graduation style that everyone will adore. It is perfect for any kind of celebration, whether you are looking for graduation party cake ideas high school or just a lovely treat for a family gathering.
Jump To:
Why You’ll Love This Recipe
Honestly, who does not love a good cake? This recipe for simple graduation cakes is a real winner for so many reasons, especially if you are a home baker looking for something fun and approachable. It is designed with you in mind, making baking feel less like a chore and more like a joy.
First off, it is incredibly easy. You do not need any special equipment or advanced baking skills to make these simple graduation cakes. We are talking basic ingredients and straightforward steps that even a beginner can follow with confidence.
Then there is the flavor. This vanilla cake is moist, tender, and just sweet enough, making it a crowd pleaser every single time. It is the kind of cake that brings back childhood memories and creates new ones, too.
Plus, it is super customizable! This is where the fun really begins. You can easily tailor this cake to match your grad’s school colors, add their name, or even create a fun cap and diploma design. This recipe gives you a fantastic base for all your creative graduation cake ideas.
Whether you are looking for cute graduation cake ideas or something more sophisticated, this recipe has got your back. It is budget friendly, too. Making your own cake at home is almost always cheaper than buying one, letting you save those extra dollars for other party essentials.
Imagine the look on your grad’s face when they see a beautiful cake made just for them, by you! It is a personal touch that truly stands out and makes the celebration even more special. This recipe provides great ideas for a graduation cake that is both delicious and heartfelt.
Ingredients
For the Vanilla Cake
- 2 ½ cups all purpose flour
- 2 ½ teaspoons baking powder
- ½ teaspoon baking soda
- ½ teaspoon salt
- 1 cup unsalted butter, softened
- 2 cups granulated sugar
- 4 large eggs
- 1 tablespoon pure vanilla extract
- 1 cup buttermilk
- ½ cup sour cream
For the Buttercream Frosting
- 1 cup unsalted butter, softened
- 4 cups powdered sugar, sifted
- 2 teaspoons pure vanilla extract
- 3 tablespoons heavy cream or milk
- Pinch of salt
Step By Step Instructions
Step 1: Get Ready to Bake
First things first, preheat your oven to 350°F (175°C). Then, get your pans ready. Grease two 9 inch round cake pans, or if you prefer a sheet cake, a 9 by 13 inch sheet pan. A little nonstick spray and a dusting of flour work wonders here.
Step 2: Whisk the Dry Ingredients
In a medium sized bowl, whisk together your dry ingredients: the all purpose flour, baking powder, baking soda, and salt. Give them a good stir to make sure everything is evenly distributed. This helps the cake rise beautifully.
Step 3: Cream Butter and Sugar
Now for the wet ingredients. In a large bowl, cream the softened unsalted butter and granulated sugar together. Beat them until they are light and fluffy. This step is key for a tender crumb, so take your time and let your mixer do the work.
Step 4: Add Eggs and Vanilla
Beat in the eggs one at a time, making sure each egg is fully incorporated before adding the next. This creates a stable emulsion. Then, stir in the pure vanilla extract. It is going to smell amazing already!
Step 5: Combine Buttermilk and Sour Cream
In a separate, small bowl, combine the buttermilk and sour cream. This mixture adds incredible moisture and a slight tang to the cake, making it extra special. Set it aside for a moment.
Step 6: Mix Wet and Dry Ingredients
This part is important: gradually add the dry ingredients to the wet ingredients, alternating with the buttermilk mixture. Start and end with the dry ingredients. Mix until just combined. Remember, do not overmix the cake batter! Overmixing can lead to a dry cake, and nobody wants that.
Step 7: Fill the Pans
Divide the batter evenly between your prepared cake pans. You can eyeball it, or for precision, use a kitchen scale. This ensures your cake layers bake evenly.
Step 8: Bake to Perfection
Pop your cakes into the preheated oven and bake for 30 to 35 minutes. You will know they are done when a toothpick inserted into the center comes out clean. Keep an eye on them, as oven times can vary a bit.
Step 9: Cool Down
Let the cakes cool in their pans for about 10 to 15 minutes. This helps them firm up a bit before you try to move them. Then, carefully invert them onto a wire rack to cool completely. Patience is a virtue here; do not try to frost a warm cake!
Step 10: Make the Buttercream
While your cakes are cooling, get started on that luscious buttercream. In a large bowl, beat the softened butter until it is nice and creamy. This is your base for a fantastic frosting.
Step 11: Add Powdered Sugar
Gradually add the sifted powdered sugar to the butter, beating until it is smooth. Sifting is important here to avoid any lumps. Start on a low speed to avoid a sugar cloud!
Step 12: Finish the Frosting
Stir in the pure vanilla extract, heavy cream or milk, and a pinch of salt. Beat until the frosting is light and fluffy. If it is too thick, add a tiny bit more cream; if it is too thin, add a little more powdered sugar.
Step 13: Frost Your Masterpiece
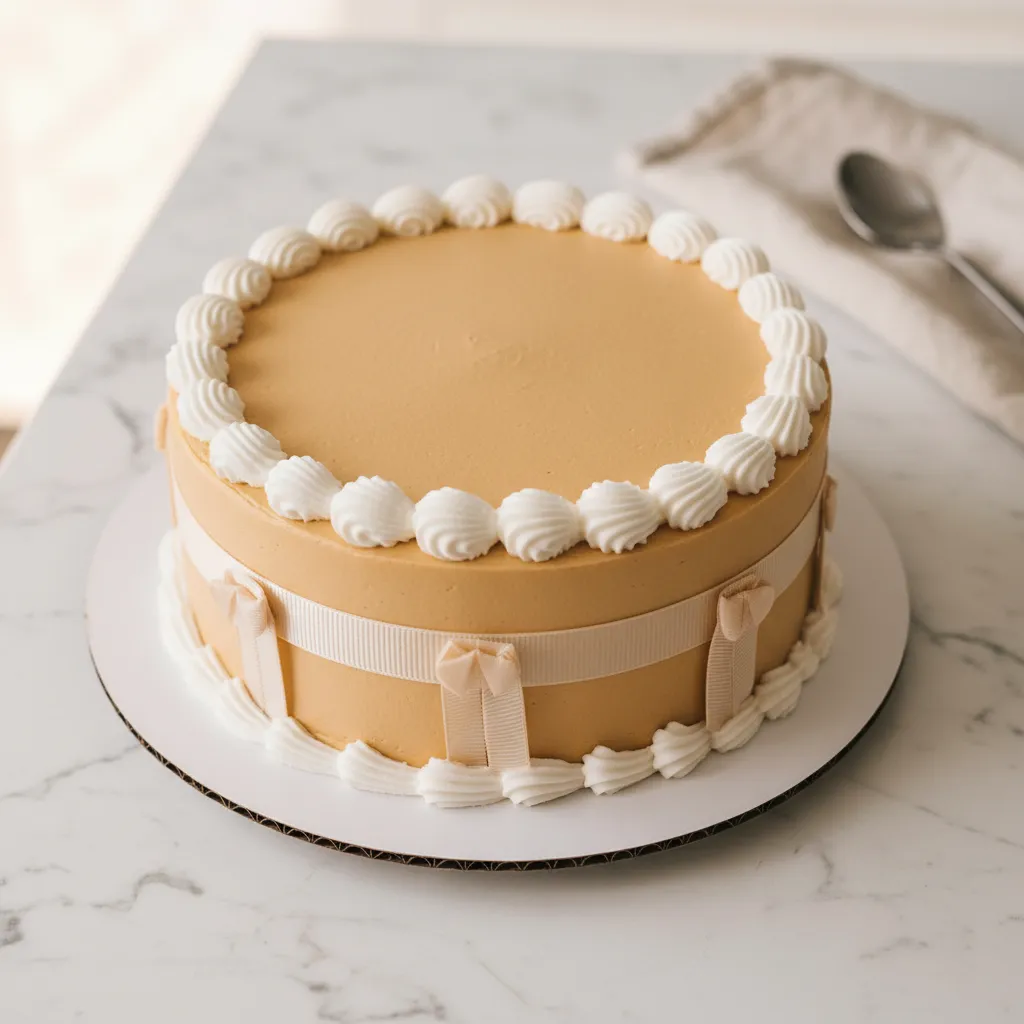
Once your cakes are completely cool, it is time for the fun part: frosting! Frost as desired. You can go for a simple spread, or get fancy with piping bags and tips to create those memorable simple graduation cakes you have been dreaming of. This is where your grad party cake ideas come to life!


How To Store Leftovers
So, you have got some delicious cake left over? Lucky you! To keep your simple graduation cakes fresh, the best way to store them is in an airtight container at room temperature for up to 2 to 3 days. If it is a particularly hot day, or if your frosting contains fresh cream cheese or fruit, it is safer to pop it in the fridge.
If refrigerating, just make sure to bring it back to room temperature before serving for the best flavor and texture. Nobody wants a cold, firm slice of cake, right? You can also freeze individual slices for longer storage, up to a month. Wrap them tightly in plastic wrap and then foil.
Tips
Making simple graduation cakes can be a breeze with a few handy tips. These little tricks can make all the difference, especially if you are new to baking or just want to ensure your cake turns out perfectly every time.
First, always ensure all your cold ingredients, like butter, eggs, buttermilk, and sour cream, are at room temperature. This is not just a suggestion; it really helps everything combine smoothly, resulting in a perfectly emulsified batter and a lighter, more consistent cake texture. It is a game changer, truly.
Do not overmix the cake batter. We touched on this earlier, but it bears repeating. Once you add the dry ingredients, mix only until just combined. Overmixing develops the gluten too much, which can lead to a tough, dry cake. A little human like imperfection in mixing is okay!
For a whiter frosting, which is great if you are aiming for specific school colors or a clean look for your graduation party cake ideas high school, use clear vanilla extract instead of the regular brown kind. It makes a surprising difference in the final color.
When it comes to decorating your senior graduation cake, get creative! Think about incorporating school colors with food coloring in your frosting. You can use simple piping techniques for borders or add edible glitter for a festive touch. Even a simple inscription like “Congrats, Grad!” can make a huge impact.
If you are looking for guy graduation cake ideas, consider decorating with simple, bold stripes in school colors, or even a fun edible image if your grad has a particular hobby. Sometimes less is more for a clean, masculine look.
Consider making the cake layers a day ahead. This can really cut down on party day stress. Just wrap the cooled layers tightly in plastic wrap and store them at room temperature. You can then frost them closer to the event, leaving you more time for other preparations.
Always use fresh ingredients. Baking powder and baking soda lose their potency over time, so check their expiration dates. Fresh ingredients mean your cake will rise properly and taste its very best, making for truly irresistible simple graduation cakes.
Conclusion
There you have it! Baking beautiful and delicious simple graduation cakes does not have to be a daunting task. With this easy to follow recipe, you are all set to create a showstopping dessert that celebrates your grad’s incredible achievement in the sweetest way possible.
Remember, the best part about homemade cakes graduation is the love and effort you put into it. That personal touch truly makes it one of a kind. So, roll up your sleeves, gather your ingredients, and get ready to bake some wonderful memories.
Whether it is for high school, college, or any other milestone, these grad party cake ideas are sure to be a hit. Happy baking, and congratulations to all the amazing graduates out there!
FAQ
Can I Make This Gluten Free?
Yes, you can! Simply swap the all purpose flour for a good quality 1:1 gluten free baking flour blend. Make sure your blend contains xanthan gum for the best texture. The rest of the ingredients and instructions should remain the same for your simple graduation cakes.
How Can I Customize the Flavor?
To customize the flavor of your simple graduation cakes, you can add citrus zest to the batter, or swap out some of the vanilla extract for almond extract. You could also fold in fresh berries or chocolate chips for a different twist. The buttercream can be flavored with different extracts or even fruit purees.
Can I Make This Cake Ahead of Time?
Absolutely! You can bake the cake layers up to 2 days in advance. Once completely cool, wrap them tightly in plastic wrap and store at room temperature. The buttercream can also be made a day or two ahead and stored in the fridge. Just bring it to room temperature and re whip it before frosting the cake. This is a great tip for any senior graduation cake preparation.
What If I Do Not Have Buttermilk?
No buttermilk? No problem! You can easily make a substitute. For 1 cup of buttermilk, simply pour 1 tablespoon of white vinegar or lemon juice into a liquid measuring cup, then fill the rest with regular milk until it reaches the 1 cup line. Let it sit for 5 to 10 minutes until it curdles slightly. This works perfectly for these simple graduation cakes.
Simple Graduation Cakes
Celebrate your grad’s big day with this moist, delicious vanilla cake. It’s easy to make, budget-friendly, and perfect for any party.
Requirements


Ingredients
Instructions
- Preheat your oven to 350°F (175°C). Grease two 9 inch round cake pans or a 9 by 13 inch sheet pan with nonstick spray and a dusting of flour.
- In a medium sized bowl, whisk together the all purpose flour, baking powder, baking soda, and salt.
- In a large bowl, cream the softened unsalted butter and granulated sugar until light and fluffy.
- Beat in the eggs one at a time, then stir in the pure vanilla extract.
- In a separate small bowl, combine the buttermilk and sour cream.
- Gradually add the dry ingredients to the wet ingredients, alternating with the buttermilk mixture. Mix until just combined; do not overmix.
- Divide the batter evenly between your prepared cake pans.
- Bake for 30 to 35 minutes until a toothpick inserted into the center comes out clean.
- Let the cakes cool in their pans for 10 to 15 minutes, then invert onto a wire rack to cool completely.
- For the frosting, beat the softened butter in a large bowl until creamy.
- Gradually add the sifted powdered sugar, beating until smooth.
- Stir in the pure vanilla extract, heavy cream or milk, and a pinch of salt. Beat until light and fluffy.
- Frost the cooled cake as desired and enjoy!
Notes
Ensure all cold ingredients, like butter, eggs, and sour cream, are at room temperature for a smooth batter.
Do not overmix the batter once the dry ingredients are added; mix only until just combined to keep the cake tender.
For a pure white frosting, use clear vanilla extract instead of the regular brown kind.
You can bake the cake layers a day ahead and store them wrapped at room temperature to save time on party day.
Nutrition
Calories
Sugar
Fat
Carbs