Graduation day is a huge milestone, isn’t it? Whether it is for a kindergarten little one, a middle schooler moving on to high school, or a college student finally getting that hard earned diploma, it is a big deal. And what is a big deal celebration without a showstopper cake? You might think making a grand cake is too much work, especially with all the other Graduation Party Ideas University or Graduation Ideas College you are juggling.
But guess what? You absolutely can create a stunning yet simple graduation cake right in your own kitchen! No need for fancy equipment or a pastry chef degree. We are talking about a totally doable recipe that tastes amazing and looks like you spent hours on it. This recipe is designed to be approachable, even if you are a beginner baker, and it avoids any alcohol, making it perfect for all ages at any celebration.
Jump To:
Why You’ll Love This Recipe
Let us be real, planning a graduation party can be a whirlwind. From sending out invites to picking decorations, there is a lot on your plate. That is where this recipe for simple graduation cakes comes into play. It is your secret weapon for a stress free celebration, no matter if you are planning for Year 6 Graduation Ideas or a university bash.
First off, it is incredibly flavorful. We are talking about moist cake layers with a rich, creamy frosting that everyone will rave about. Plus, it is customizable! You can easily adapt the colors and toppers to fit your specific graduate’s school colors or personal style. Think about how awesome a customized College Cake or Senior Year Cake would look!
This recipe also hits the mark for budget conscious consumers. Making a cake at home is almost always cheaper than buying one from a bakery, especially for a tiered design. You get a beautiful, impressive dessert without breaking the bank, which is a total win in our book. It is perfect for those looking for creative, easy to follow recipes.
And here is the best part: it is genuinely fun to make. There is something so satisfying about seeing your creation come to life, especially when it is for someone you care about. Imagine the look on their face when they see their personalized Senior Cakes or Graduation Cake Designs College. It is a labor of love, but a really enjoyable one.
Ingredients
For the Cake Layers
- 4 ⅞ cups all purpose flour
- 4 ½ cups granulated sugar
- 3 ¾ teaspoons baking powder
- 1 ½ teaspoons salt
- 1 ½ cup unsalted butter, or 3 sticks, at room temperature
- 9 eggs
- 1 ¾ cups buttermilk, at room temperature
- ½ cup espresso (instant espresso works great)
- 3 Tablespoons vanilla extract
For the Cream Cheese Frosting
- 12 ounces cream cheese, one and a half packages, softened
- 1 1/2 cups butter, three sticks, softened
- 9 cups powdered sugar
- 3 Tablespoons vanilla extract or milk
- 1/4 t. salt (if using unsalted butter)
For the Cake Filling and Soaking Syrup
- ¾ cup Cocoa powder (for cake filling)
- 1 2 Tablespoons chocolate syrup (for cake filling)
- 2 Tablespoons vanilla extract (for soaking syrup)
- 2 Tablespoons simple syrup (for soaking syrup)
- ¼ cup espresso (for soaking syrup)
- ½ cup chocolate syrup (for soaking syrup)
- ½ cup chocolate chips (optional, for filling)
For the Decorations
- 4 ounces white candy melts (Wilton brand is a good choice)
- 2 ½ Tablespoons heavy whipping cream
- 4 5 drops Black gel food coloring
- 1 2 teaspoons Gold lustre dust or edible paint
- Graduation cake topper
Step By Step Instructions
Step 1: Get Ready to Bake
First things first, preheat your oven to 350°F. Then, prepare three 8 inch cake pans and two 6 inch cake pans. You can use baker’s floured cooking spray or simply grease and line them with parchment rounds. This step is super important for easy cake release.
Step 2: Mix Dry and Wet Ingredients
In a stand mixer with a paddle attachment, combine all your dry ingredients: flour, sugar, baking powder, and salt. Mix them until they are fully combined. Next, slowly add chunks of room temperature butter into the dry mix on a low speed. Keep mixing until no large butter chunks are left and the mixture looks crumbly, like wet sand.
Pour in the eggs and mix on low speed until they are just incorporated. Then, mix in the buttermilk and espresso in two installments, still on a low speed. Add the vanilla extract and mix until everything is fully incorporated. Do not forget to scrape down the sides of the bowl with a spatula, then beat on medium speed for about 30 seconds to get that perfect batter.
Step 3: Bake Those Layers
Divide your batter evenly among the prepared cake pans. A kitchen scale is a real lifesaver here if you want perfectly even layers. For example, you might aim for about 690g in your larger pans and 450g in your smaller ones. Even layers mean a beautiful, stable cake.
Bake for 34 to 37 minutes, or until a skewer inserted into the center comes out clean. Let the cake layers cool for 10 to 15 minutes on a wire cooling rack before removing them from the pans. Running an offset spatula or knife around the perimeter helps. Cool completely before frosting. Pop them in the fridge or freezer to speed things up a bit.
Step 4: Make the Frosting
While your cakes cool, it is frosting time! Beat together the softened cream cheese and butter until smooth. Slowly add in the powdered sugar, alternating with vanilla extract or milk, until your frosting reaches a lovely, spreadable consistency. Add salt if needed and beat until well combined. This is going to be the base for your amazing simple graduation cakes.
Step 5: Prepare the Filling
Reserve about 1 cup of your cream cheese frosting. Mix in the cocoa powder and chocolate syrup until you get a spreadable, chocolatey consistency. This will be your delicious cake filling. It adds a wonderful depth of flavor to your simple graduation cakes.
Step 6: Assemble the Base Tier
Place a small smear of frosting on your large cake circle to keep the cake from sliding. Center your first large cake layer on it. For extra flavor, you can infuse each layer with a mix of vanilla, simple syrup, espresso, and chocolate syrup using a squeeze bottle. This step is optional but highly recommended!
Pipe a small border of frosting around the outer edge of the layer, then spread a generous layer of your chocolate filling in the middle. Sprinkle some chocolate chips if you like for added texture. Place your next cake layer on top and repeat the process with your remaining large cake layers.
Step 7: Assemble the Top Tier
Repeat the same layering process with your smaller cardboard circle and cake layers. If your circles do not have a pre centered hole, use a dowel or straw to make one in the exact center. This hole will be crucial for centering the top tier on the base tier later on. This attention to detail makes for sturdy and beautiful simple graduation cakes.
Step 8: Crumb Coat and Final Frosting
Now it is time to crumb coat! This just means spreading a thin layer of frosting over the entire outside of both cakes. It traps any loose crumbs, making sure your final frosting layer is perfectly smooth and clean. Let the crumb coat set in the fridge for about 5 to 10 minutes.
Once the crumb coat is set, add your final, thicker layer of frosting. Use an offset spatula and a bench scraper to smooth it out. For the smaller tier, you might find it helpful to trim the cake layers slightly smaller than the cardboard circle and use the cardboard as a guide for perfectly smooth sides. Place both tiers in the fridge for about 20 minutes to set the frosting.
Step 9: Stack the Tiers
To stack your tiered cake safely, you will need to insert dowels or straws into the base tier. This prevents the top tier from crushing the lower one and keeps it centered. Use a ruler to push dowels into the base tier, about an inch from the cake edge, placing them evenly at quarter intervals. Place your tallest dowel into the exact center, making sure it is straight.
Carefully center the hole in the bottom of your top tier cake circle over the tallest dowel. Gently lower the top tier onto the base tier. The dowel will poke into the center of the top tier, holding it firmly in place. Pat yourself on the back, you have just stacked a beautiful cake! If your cardboard circle shows a bit, just pipe some extra frosting at the base of the top tier to hide it. This is how you make truly impressive simple graduation cakes.
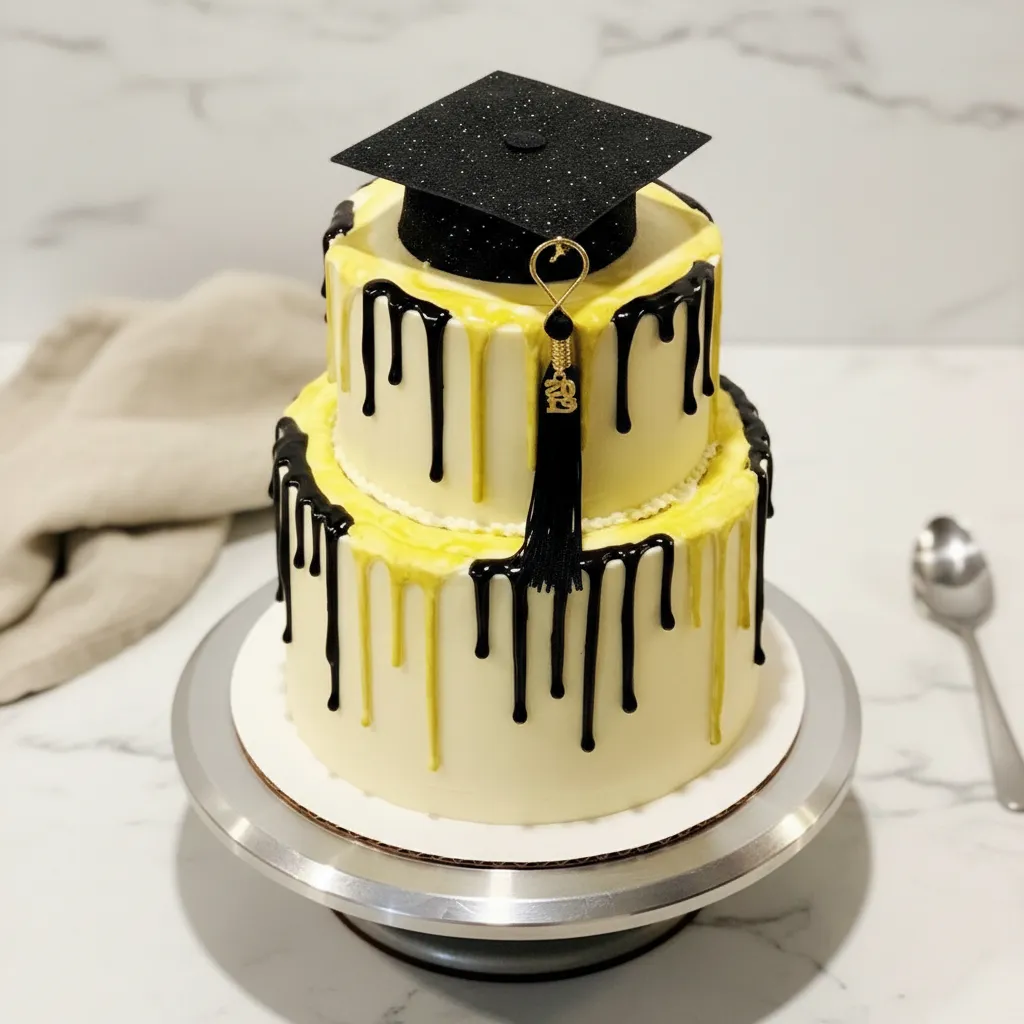
Step 10: Drip Decoration Fun
In a microwave safe bowl, combine heavy cream and white candy melts. Microwave on 50% power in 30 second intervals, stirring between each, until smooth. Divide the mixture into two bowls. Add black gel food coloring to one bowl to get a rich black ganache. Let both mixtures cool to a moderate, slightly warm, liquid temperature.
Transfer the candy melt mixtures to squeeze bottles or small piping bags. Slowly drizzle the mixture around the upper edge of your cake. Pause every inch or so to let more fall in a drip down the side. Alternate black and white drips for a striking contrast. Return the cake to the fridge or freezer to set the drips.
Step 11: Add Gold Glamour and Topper
Once the drips are set, mix some gold lustre dust with a little water or use edible gold paint in a small glass. Use a paintbrush to carefully cover the white drips with gold. This creates a really elegant and celebratory look, perfect for any Graduation Cake Designs College or College Cake Ideas. Finally, place your chosen graduation cake topper on top. Step back and admire your amazing creation! Enjoy your delicious and beautiful simple graduation cakes.


How To Store Leftovers
Got some cake left over? That is a rare occurrence with a cake this good, but it happens! To keep your simple graduation cakes fresh and tasty, you will want to store them properly. If your cake is uncut, you can cover it loosely with plastic wrap or place it in an airtight cake carrier at room temperature for up to two days.
Once cut, it is best to place any remaining slices in an airtight container. Because of the cream cheese frosting, it is safest to store the cake in the refrigerator. It will stay fresh for about 3 to 5 days. Just bring slices to room temperature for about 15 to 20 minutes before serving for the best flavor and texture. You can even freeze individual slices for longer storage, up to a month!
Tips
Want to make your simple graduation cakes even better or easier? Here are a few handy tips. First, make sure all your cold ingredients, especially the butter, eggs, and buttermilk, are at room temperature. This helps everything mix together smoothly and creates a lighter, fluffier cake texture. It really does make a difference, trust me.
When it comes to the frosting, do not overmix it. Once everything is combined and smooth, stop. Overmixing can incorporate too much air, which can make your frosting less stable. For a perfectly smooth finish, use a bench scraper. It is a game changer for getting those professional looking sides on your simple graduation cakes.
Feeling creative with your Message Cake Design? You can use edible markers or even pipe a special message onto the cake board or a small fondant plaque. For an extra touch, consider adding edible glitter or sprinkles in school colors. These small details can really elevate your simple graduation cake and make it truly unique.
If you are short on time, you can bake the cake layers a day or two in advance. Wrap them tightly in plastic wrap once they are completely cooled and store them at room temperature or even freeze them. This breaks up the work and makes assembly day much less hectic. A little planning goes a long way when making impressive simple graduation cakes.
Conclusion
So there you have it, a comprehensive guide to baking a truly spectacular yet simple graduation cake. This recipe proves that you do not need to be a professional baker to create something beautiful and delicious for your graduate. With a little patience and these step by step instructions, you can whip up a dessert that will be the talk of the party.
Imagine the pride you will feel as you present this homemade masterpiece, knowing you poured your love and effort into celebrating their big achievement. Whether it is for a high school sendoff, a Graduation Party Ideas University gathering, or a joyful Year 6 Graduation Ideas celebration, this cake is sure to bring smiles. Happy baking, and congratulations to all the graduates out there!
FAQ
Can I Make This Gluten Free?
Yes, you can! Substitute the all purpose flour with a good quality gluten free all purpose flour blend that contains xanthan gum. Make sure to follow the package instructions for any recommended adjustments, as some blends might absorb liquids differently. The rest of the ingredients should be naturally gluten free.
How Far in Advance Can I Bake the Cake?
You can bake the cake layers up to 2 to 3 days in advance. Once completely cooled, wrap them tightly in plastic wrap and store them at room temperature. For longer storage, you can freeze the wrapped layers for up to a month. Thaw them in the refrigerator overnight before frosting and assembling your simple graduation cake.
What If I Do Not Have a Stand Mixer?
No worries! A good quality hand mixer will work just fine for this recipe. Just be prepared to put in a little more arm work, especially when mixing the butter into the dry ingredients and beating the frosting. Ensure you scrape down the bowl frequently to ensure everything is well combined.
Can I Change the Drip Colors?
Absolutely! The beauty of these simple graduation cakes is their customizability. You can use any color of gel food coloring for your candy melts to match school colors or party themes. For example, use red and white for a spirited look, or blue and gold. Just make sure to use gel food coloring, as liquid coloring can alter the consistency of the candy melts.
Simple Tiered Graduation Cake
Planning a celebration? This simple graduation cake is your secret weapon for a stress-free milestone. It’s a tasty, budget-friendly showstopper that looks professional but is totally doable for any busy parent or beginner baker.
Requirements


Ingredients
Instructions
- Preheat oven to 350°F. Grease and line three 8-inch and two 6-inch cake pans with parchment paper.
- Using a KitchenAid Stand Mixer, combine dry ingredients, then mix in butter, eggs, buttermilk, espresso, and vanilla until smooth.
- Divide batter into pans and bake for 34-37 minutes. Cool on a wire rack, using a Stainless Steel Offset Spatula for easy release.
- Beat cream cheese and butter, then slowly mix in powdered sugar and vanilla for a spreadable frosting.
- Reserve 1 cup of frosting and mix with cocoa powder and chocolate syrup to create the cake filling.
- Assemble the base tier on a large cake circle, adding soaking syrup, frosting borders, and chocolate filling between layers.
- Assemble the top tier following the same process on a smaller cardboard circle.
- Apply a thin crumb coat to both cakes, chill for 10 minutes, then apply the final smooth layer of frosting.
- Stack the tiers by inserting dowels into the base tier and centering the top tier over a central dowel.
- Microwave white candy melts with Heavy Whipping Cream. Color half black and drizzle both colors down the sides for a drip effect.
- Paint set drips with gold lustre dust and place your graduation topper. Admire your work and enjoy!
Notes
Ensure all cold ingredients like butter and eggs are at room temperature for a fluffier, more consistent cake texture.
Use a bench scraper for the final frosting layer to get those professional, smooth sides on your tiered cake.
Bake the cake layers a day in advance and wrap them in plastic once cooled to make assembly day much more manageable.
Customize the drip colors with gel food coloring to match your graduate’s specific school colors for a personal touch.
Nutrition
Calories
Sugar
Fat
Carbs