Let’s talk about the perfect birthday cake. We all have that memory, right? The one with the candles, the singing, and that first amazing bite of rich, chocolatey goodness. What if I told you that you could make that exact cake at home? And what if I told you it was actually easy?
This recipe is my secret weapon for every celebration. It’s a no fuss, super moist, and deeply chocolatey cake that tastes like it came from a fancy bakery. But you and I will know it was made right in your kitchen. Get ready to become the official cake baker for every party.
Jump To:
Why You’ll Love This Recipe
Honestly, what’s not to love? This isn’t just any chocolate birthday cake. It’s the one that gets rave reviews every single time. It’s the cake people ask for again and again.
First off, the texture is incredible. It is so moist and tender, thanks to a little help from sour cream and oil. No dry, crumbly cake here, I promise. Each bite just melts in your mouth.
The flavor is another big win. We use both cocoa powder and a touch of espresso powder. The coffee doesn’t make it taste like coffee, it just makes the chocolate taste more, well, chocolatey. It’s a classic baker’s trick that makes all the difference.
And the best part? It’s surprisingly simple to make. The instructions are straightforward, perfect for beginners. You don’t need any special equipment to get a stunning result. This recipe is a fantastic base for all sorts of Cake Designs Birthday Simple. You can create an Aesthetic Cake For Birthday celebrations without the stress.
It’s the kind of recipe you’ll find yourself saving on your Cake Pinterest board. It is just that good. It is both comforting and wonderfully Cake Elegant at the same time.
Ingredients
The magic starts with good ingredients. Most of these are probably already in your pantry. Make sure your wet ingredients are at room temperature. It really helps everything mix together smoothly.
For The Cake
- 2 cups all purpose flour, spooned and leveled
- 1 3/4 cups granulated sugar
- 3/4 cup unsweetened, Dutch processed cocoa powder
- 2 tbsp instant espresso powder or instant coffee
- 1 tsp baking soda
- 1/2 tsp baking powder
- 1 tsp coarse Kosher salt (use half if using table salt)
- 4 large eggs, room temperature
- 1 cup whole milk, room temperature
- 1 cup sour cream, room temperature
- 1 cup vegetable oil
- 1 tbsp vanilla extract
For The Buttercream
- 2 cups unsalted butter, softened to room temperature
- 3 cups powdered sugar
- 1 cup unsweetened, Dutch processed cocoa powder, sifted
- 1 tbsp meringue powder (optional, for stability)
- 1/4 tsp coarse Kosher salt (use half if using table salt)
- 2 tsp vanilla extract
- 2 to 4 tbsp milk, if needed
Step By Step Instructions
Step 1: Get The Oven And Pans Ready
First things first, preheat your oven to 350 degrees F. This is important. A properly heated oven ensures your cake bakes evenly. Go ahead and spray the bottoms of three 8 inch round cake pans with non stick spray. You can also line them with parchment paper for extra insurance.
Step 2: Mix The Dry Ingredients
In a large bowl, sift together your flour, sugar, cocoa powder, espresso powder, baking soda, baking powder, and salt. Sifting might seem like an annoying extra step, but it gets rid of lumps and makes your cake lighter. Just do it.
Step 3: Whisk The Wet Ingredients
In a separate bowl, whisk together the eggs, milk, sour cream, oil, and vanilla extract. Make sure they are well combined. Having these at room temperature helps them blend into a smooth emulsion, which is key for a great cake texture.
Step 4: Combine Wet And Dry
Now pour the wet ingredients into the bowl with the dry ingredients. Whisk everything together until it’s just combined. We’re talking about 15 seconds here. Do not overmix! Overmixing develops gluten and can make your cake tough. A few little lumps are totally fine.
Step 5: Bake The Cakes
Evenly divide the batter among your three prepared pans. Pop them onto the center rack of your preheated oven. Bake for about 22 to 28 minutes. You’ll know they’re done when the tops spring back when you gently touch them, or a toothpick inserted into the center comes out clean.
Step 6: Cool Completely
Once baked, place the pans on a wire cooling rack. Loosely cover them with a clean kitchen towel. You must let the cakes cool completely in the pans before you even think about frosting. Warm cake and frosting are a recipe for a melty disaster.
Step 7: Make The Buttercream
In a stand mixer with the whisk attachment, beat the softened butter on medium speed for about a minute until it’s smooth and creamy. A Kitchen Aid mixer works great for this.
Turn the mixer to low and gradually add the powdered sugar, sifted cocoa powder, optional meringue powder, and salt. Mix until it’s all incorporated. Then add the vanilla. Crank the speed up to medium and whip it for a good 4 to 5 minutes. Scrape down the bowl a few times. This makes the buttercream light and fluffy. Only add a splash of milk if it seems too stiff.
Here’s a pro tip for super smooth frosting. Turn the mixer down to the lowest speed, or “stir”, for two minutes. This pushes out the big air bubbles for a silky finish. This is how you get that perfect look for your Cake Pics.
Step 8: Assemble Your Birthday Cake
It’s time for the fun part! Once the cakes are completely cool, remove them from the pans. Place one layer on your cake stand or board. Spread a generous layer of buttercream on top.
Add the second cake layer and repeat with more frosting. Top with the third layer. Now, apply a very thin layer of frosting all over the outside of the cake. This is called a crumb coat, and it traps all the loose crumbs. Chill the cake in the fridge for 30 minutes to set this coat. This step is crucial for a clean final look.
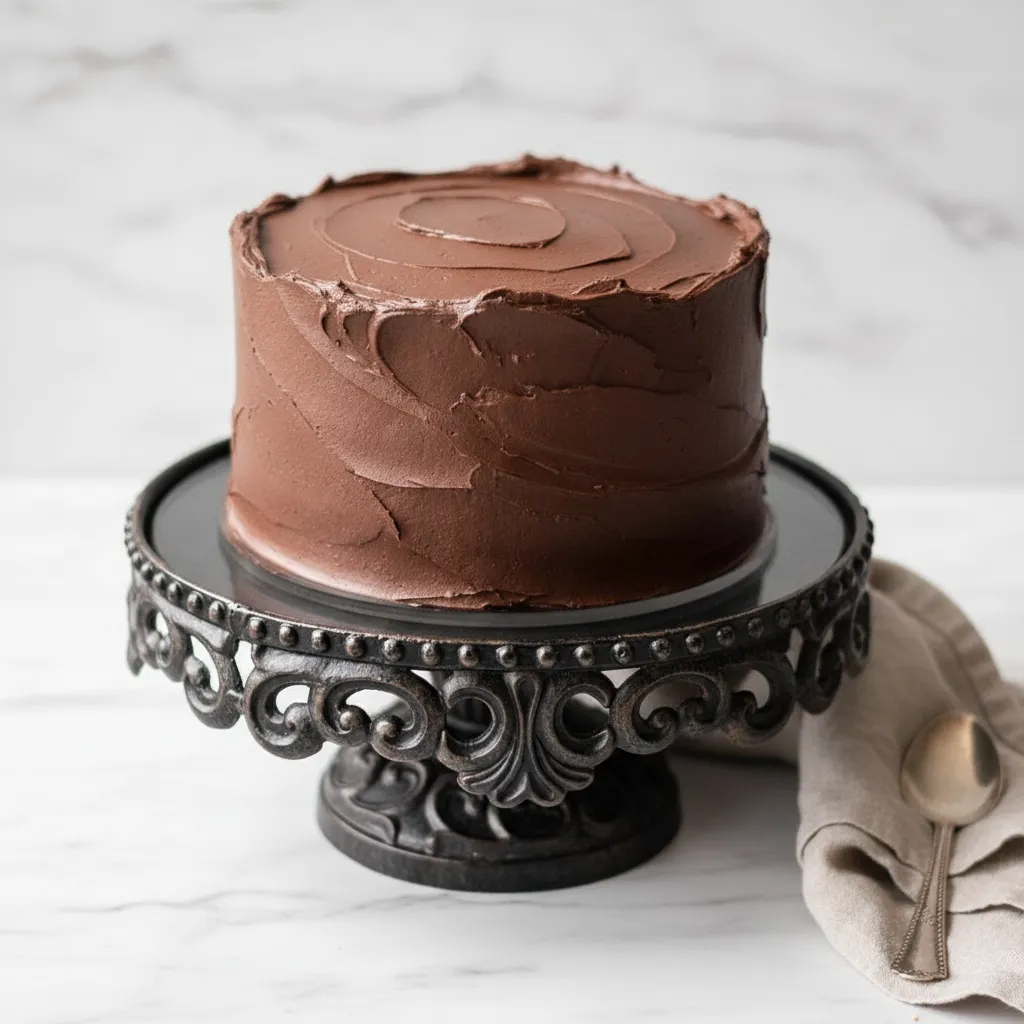
After chilling, cover the cake with the remaining buttercream. You can go for a smooth finish or make pretty, rustic swirls with the back of a spoon. If you have extra frosting, pipe a few swirls on top. Add some chocolate squares for a simple, elegant touch. You’ve just made an amazing birthday cake!


How To Store Leftovers
If you somehow have leftovers, storing this cake is easy. You can keep it in an airtight container at room temperature for up to 2 days. The frosting helps keep the cake moist.
If you need to store it longer, you can keep it in the fridge for up to 5 days. Just be sure to let it sit at room temperature for about 30 minutes before serving. Cold cake can taste a bit dry, and we want that rich flavor to shine through.
Tips
Want to make this the best birthday cake ever? Here are a few extra tips. First, really do use room temperature ingredients. Cold eggs and milk don’t mix as well, which can affect the final texture of your cake.
Don’t skip sifting the dry ingredients, especially the cocoa powder. Cocoa powder is notorious for clumps, and sifting ensures a smooth batter and a lump free cake. It’s a small step that makes a big difference.
When it comes to Birthday Cake Decor, less is often more. Simple swirls of frosting, a sprinkle of chocolate shavings, or fresh berries can make your cake look stunning. You don’t need to be a professional decorator to create a beautiful Cake Elegant design.
Thinking of Birthday Cake Ideas Pink? You could add a little pink food coloring to a small batch of vanilla buttercream to pipe some accents. Or top the cake with fresh raspberries for a natural touch of pink.
This cake is perfect for any milestone, whether it’s a 26 Cake Birthday or a 60th. It’s a classic that everyone loves. The rich chocolate flavor is always a crowd pleaser.
Conclusion
And there you have it. A foolproof recipe for a rich, moist, and absolutely delicious chocolate birthday cake. Baking a cake from scratch can feel intimidating, but this recipe proves it doesn’t have to be. It’s all about simple steps and good ingredients.
The next time a celebration rolls around, I hope you’ll give this recipe a try. There’s nothing quite like the pride of presenting a beautiful, homemade birthday cake. Happy baking!
FAQ
Can I Make This Cake Ahead Of Time?
Absolutely! You can bake the cake layers a day or two in advance. Let them cool completely, then wrap them tightly in plastic wrap and store them at room temperature. You can also make the buttercream ahead and store it in an airtight container in the fridge for up to a week. Just let it come to room temperature and re whip it before using.
What If I Don’t Have A Stand Mixer?
No problem at all. You can easily make the cake batter with a simple bowl and a whisk. For the buttercream, a hand mixer will work perfectly well. It might take a minute or two longer to get it light and fluffy, but the results will be just as delicious.
Can I Use Different Sized Pans?
Yes, you can. If you want to make a two layer 9 inch cake, the baking time will be slightly longer, so start checking it around the 30 minute mark. You can also bake this recipe in a 9×13 inch pan for a simple sheet cake, which would be great for easy Cake Birthday Ideas. The baking time will be about 35 to 40 minutes.
What Is Dutch Processed Cocoa Powder?
Dutch processed cocoa powder has been treated to neutralize its acidity. It results in a darker color and a smoother, less bitter chocolate flavor. It’s my preference for this birthday cake, but in a pinch, you can use regular unsweetened cocoa powder.
“`htmlRich Chocolate Birthday Cake
This is the no-fuss, super moist, and deeply chocolatey cake you’ve been dreaming of! Perfect for any celebration, it tastes like it came from a fancy bakery but is surprisingly simple to make right in your own kitchen.
Requirements


Ingredients
For The Buttercream
Instructions
- Preheat oven to 350°F (175°C). Grease and flour three 8-inch round cake pans, or line with parchment paper.
- In a large bowl, whisk together the flour, sugar, cocoa powder, espresso powder, baking soda, baking powder, and salt.
- In a separate bowl, whisk together the eggs, milk, sour cream, oil, and vanilla extract until well combined.
- Pour the wet ingredients into the dry ingredients and whisk until just combined. Do not overmix; a few lumps are okay.
- Divide the batter evenly among the prepared pans. Bake for 22-28 minutes, or until a toothpick inserted into the center comes out clean.
- Let the cakes cool in the pans on a wire rack for 10-15 minutes before inverting them onto the rack to cool completely.
- For the buttercream: In a stand mixer with the whisk attachment, beat softened butter until smooth. Gradually add powdered sugar, cocoa powder, meringue powder (if using), and salt. Mix until incorporated, then add vanilla. Whip on medium speed for 4-5 minutes until light and fluffy. Add milk if needed for consistency.
- To assemble: Place one cake layer on a serving plate. Spread a generous amount of buttercream on top. Repeat with the second layer. Top with the third layer.
- Apply a thin crumb coat of frosting all over the cake. Chill for 30 minutes.
- Cover the cake with the remaining buttercream. Decorate as desired.
Notes
Make sure all wet ingredients for the cake are at room temperature for the best texture.
Don’t overmix the cake batter; it can lead to a tough cake.
The crumb coat is crucial for a clean, professional-looking final frosting layer.
For a smoother buttercream, whip it on the lowest speed for 2 minutes at the end to remove large air bubbles.
Nutrition (Estimated Per Serving)
Calories
Sugar
Fat
Carbs