Planning a birthday party can be a whirlwind, right? You want everything to be just perfect, especially the cake. But what if I told you that creating a gorgeous, custom birthday cake is totally within your reach, even if you’re just starting out in the kitchen?
Forget those intimidating bakery displays. Today, we’re diving into a recipe that’s designed to be fun, flavorful, and surprisingly easy. We’re talking about a beautiful floral-inspired cake that looks like it came from a fancy shop but is made right in your own home. Let’s get baking!
Jump To:
Why You’ll Love This Recipe
This isn’t just any birthday cake recipe. It’s a gateway to creating something truly special without the stress. You’ll end up with a moist chocolate cake, a vibrant berry buttercream, and a tempting chocolate ganache drip. Plus, the floral decorations add such a lovely, festive touch.
It’s perfect for anyone looking to impress without needing professional tools or years of baking experience. Get ready to have your friends and family asking for your secret!
Ingredients
For the Chocolate Cake
- 2 cups all-purpose flour (you can sub gluten-free flour 1:1 baking blend)
- 1 1/2 cups granulated sugar
- 1 cup cocoa powder
- 2 teaspoons baking powder
- 1 1/2 teaspoon baking soda
- 1 1/2 teaspoon fine sea salt
- 2 cups dairy-free milk, hot
- 1 cup all-vegetable oil
- 1 teaspoon pure vanilla extract
For the Berry Buttercream
- 3/4 cup raspberries, fresh or frozen
- 3/4 cup strawberries, fresh or frozen
- 1/8 cup granulated sugar
- 1 tablespoon cornstarch
- 2 tablespoons lemon juice
- 1 1/2 cups dairy-free butter, room temperature
- 4 1/2 cups icing sugar
- 1 teaspoon fine sea salt
For the Dark Chocolate Ganache Drip
- 1/2 cup dairy-free dark chocolate
- 2 tablespoons dairy-free milk
For Decoration
- Dark Chocolate Oreos
- Red Carnations
- Fresh raspberries
Step-By-Step Instructions
Chocolate Cake
Step 1: Prepare and Mix Dry Ingredients
First things first, let’s get that oven preheated to 350 degrees Fahrenheit. Grab four 6-inch round cake pans and give them a good spray with non-stick baking spray. Now, in your stand mixer bowl, combine all the dry ingredients: flour, sugar, cocoa powder, baking powder, baking soda, and salt.
Use the whisk attachment to mix them all up until they’re nicely combined. This ensures there are no dry pockets later on.
Step 2: Add Wet Ingredients
Next, it’s time for the wet ingredients. Pour in the hot dairy-free milk, vegetable oil, and vanilla extract. Mix everything together with the paddle attachment until it’s just incorporated. Don’t overmix; we want a tender cake!
Step 3: Bake the Cakes
Divide the batter evenly between your four prepared cake pans. Pop them into the preheated oven and bake for about 20 to 23 minutes. You’ll know they’re ready when a toothpick inserted into the center comes out with a few moist crumbs attached.
Let the cakes cool in their pans for about 10 minutes before carefully inverting them onto a wire rack to cool completely. Patience here is key for a sturdy cake base.
Berry Buttercream
Step 4: Make the Berry Puree
In a medium saucepan, combine the raspberries, strawberries, granulated sugar, cornstarch, and lemon juice. Stir it all together over medium heat until it’s well combined.
Bring the mixture to a boil and let it bubble away for about 5 minutes, stirring occasionally, until it thickens nicely. Once it’s thickened, take it off the heat.
Pour this lovely berry mixture into a shallow container. Gently press some plastic wrap directly onto the surface to prevent a skin from forming. Let it cool completely.
Step 5: Prepare the Buttercream Base
Now, grab your stand mixer again, this time with the paddle attachment. Cream the room temperature dairy-free butter on high speed for a good 5 minutes. You’re looking for it to get really light and fluffy. This step makes a big difference in the texture of your frosting.
Step 6: Combine Buttercream Ingredients
Add the icing sugar and salt to the creamed butter. Start mixing on low speed until everything is just combined. This prevents a sugar cloud from exploding in your kitchen!
Then, add in your completely cooled berry mixture. Mix it in until it’s incorporated.
Turn the mixer up to high speed and let it whip for another 5 minutes. Scrape down the sides of the bowl as needed. You want a smooth, creamy, and beautifully colored frosting.
Dark Chocolate Ganache Drip
Step 7: Melt the Ganache
For the ganache drip, place the dairy-free dark chocolate chips and milk in a microwave-safe bowl. Heat in 30-second intervals, stirring well after each one, until the chocolate is completely melted and smooth.
Consistency is key here. Depending on your specific milk or chocolate, you might need to add a tiny bit more milk to thin it out or a few more chocolate chips to thicken it. A good tip is to test the drip consistency by letting a little run over the edge of your sink before applying it to the cake.


Cake Assembly
Step 8: Layer the Cake
Start by placing one leveled cake layer onto your serving plate, cake board, or turntable. Add a small dollop of buttercream to secure it in place.
Spread about 1 cup of the berry buttercream evenly over the first layer. Then, carefully place another cake layer on top and repeat the process with the buttercream and subsequent cake layers until all layers are stacked.
Step 9: Crumb Coat and Chill
Once all layers are stacked, apply a thin, even layer of buttercream all over the cake. This is your crumb coat, and it traps any loose crumbs. Pop the cake into the refrigerator for about 20 minutes to let this layer firm up.
Step 10: Final Frosting and Drip
After the crumb coat has chilled, apply a second, more generous coat of buttercream to the entire cake. Smooth the sides using an offset spatula or bench scraper. Cleanly scrape off any excess buttercream from the top edge for a neat finish.
Chill the cake again for another 10 minutes while you prepare the ganache if you haven’t already. Once the ganache is ready and the cake is chilled, carefully use a piping bag or a spoon to drizzle the chocolate ganache over the edges of the cake, letting it drip down the sides.
Let the ganache set by chilling the cake for another 10 minutes.
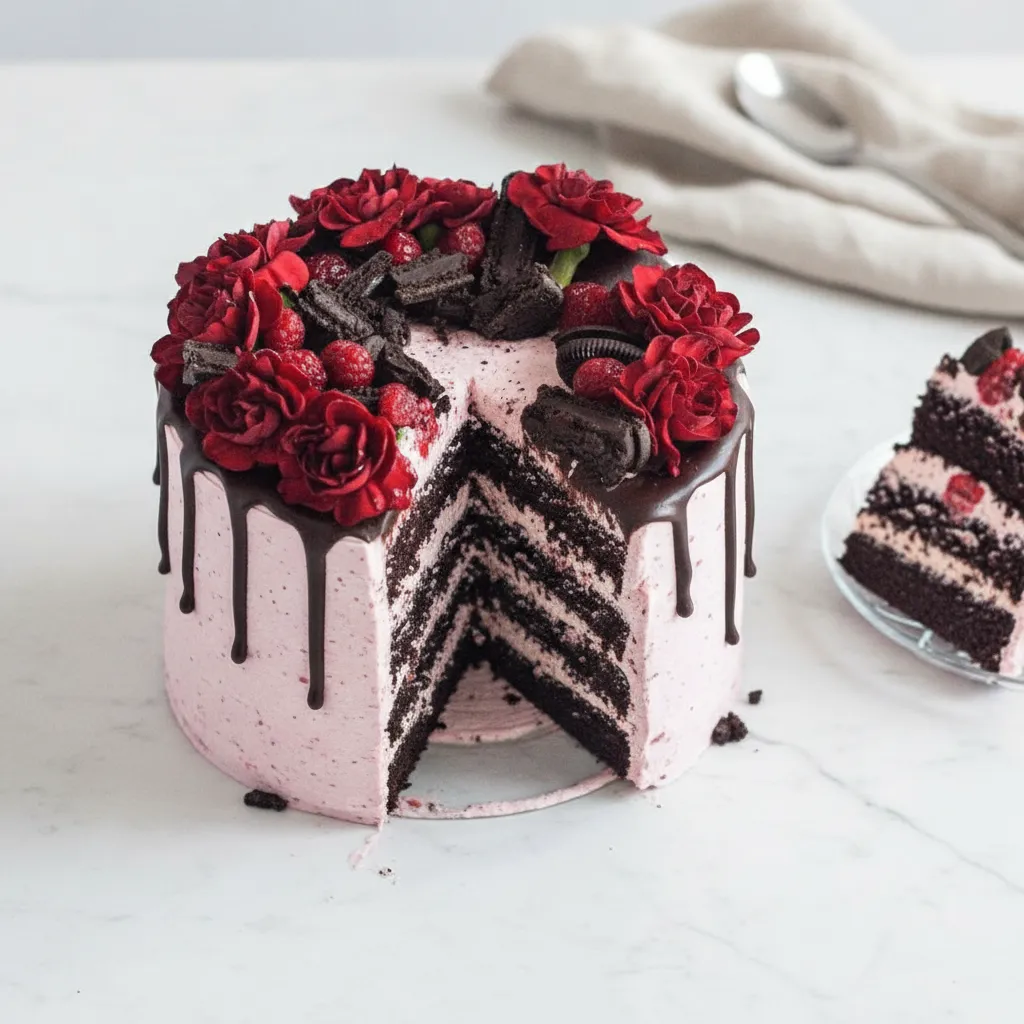
Step 11: Decorate Your Masterpiece
Now for the fun part! Decorate your birthday cake as you desire. For that beautiful floral look, I finished the cake off with a top border crown. I used dark chocolate Oreos, fresh raspberries, and lovely red carnations. It’s a wonderful way to create aesthetic cakes for birthdays, especially if you’re looking for cake ideas floral inspired.
This cake is a fantastic example of cake design for birthday celebrations, proving that beautiful and impressive cakes are achievable. It’s a truly memorable birthday cake for my love.
How To Store Leftovers
Got leftover birthday cake? Lucky you! Store any remaining slices in an airtight container in the refrigerator. It should stay delicious for about 3 to 4 days.
When you’re ready to enjoy a slice, let it sit at room temperature for about 20 to 30 minutes. This helps the buttercream and cake return to their perfect, soft texture.
Tips
- Room Temperature Ingredients: Ensure your dairy-free butter for the buttercream is at room temperature. This is crucial for achieving a smooth, creamy texture.
- Hot Milk for Cake: Using hot milk in the chocolate cake batter blooms the cocoa powder, intensifying the chocolate flavor and creating a super moist cake.
- Don’t Overmix: Overmixing cake batter can lead to a tough cake. Mix just until the ingredients are combined.
- Cooling is Key: Make sure your cake layers are completely cool before frosting. Warm cake will melt the buttercream, making assembly a messy ordeal.
- Ganache Consistency: Test your ganache drip over a cup or bowl before applying it to the cake. You can adjust it with a tiny bit more milk or chocolate chips as needed.
- Decoration Inspiration: For more birthday ideas for spring, consider adding edible flowers or pastel colors. Think about cake ideas flowers that are in season for a fresh look.
Conclusion
There you have it! A stunning, homemade birthday cake that’s as delightful to make as it is to eat. This recipe proves that beautiful, custom cakes are accessible to everyone.
You’ve got a moist chocolate cake, a bright berry buttercream, and a luscious chocolate ganache drip. It’s a perfect example of cake design for birthday celebrations and offers wonderful cake decoration ideas simple enough for beginners. This floral cake design birthday is sure to be a hit!
FAQ
Can I make this cake gluten-free?
Yes, you can! The recipe notes suggest using a 1:1 gluten-free baking blend in place of all-purpose flour for the chocolate cake. Just ensure your blend is designed for baking.
Can I use different fruits for the buttercream?
Absolutely! Feel free to experiment with other berries like blueberries or blackberries. You can even use other fruits like mango or passionfruit for a tropical twist. Adjust sugar if needed based on the fruit’s sweetness.
How far in advance can I bake the cake layers?
You can bake the cake layers a day or two in advance. Once completely cooled, wrap them tightly in plastic wrap and store them at room temperature. This keeps them moist and ready for assembly.
What if I don’t have four 6-inch pans?
No problem! You can bake the cake in fewer pans, but you’ll need to adjust the baking time. If you use two 6-inch pans, the cakes might take a few minutes longer. If you use a single 9-inch pan, the baking time will be significantly longer, so keep an eye on it.
Can I make the buttercream ahead of time?
Yes, the berry buttercream can be made a day in advance. Store it in an airtight container in the refrigerator. Before using, let it soften at room temperature and then whip it again for a few minutes to restore its creamy texture.
Floral-Inspired Chocolate Birthday Cake
Create a gorgeous, bakery-style birthday cake at home! This moist chocolate cake features a vibrant berry buttercream and a rich ganache drip. It’s surprisingly easy to make and perfect for celebrations.
Requirements


Ingredients
For the Chocolate Cake
For the Berry Buttercream
For the Ganache & Decoration
Instructions
- Preheat oven to 350°F. Spray four 6-inch round cake pans with non-stick baking spray.
- In a stand mixer bowl, whisk together the flour, sugar, cocoa powder, baking powder, baking soda, and salt.
- Pour in the hot dairy-free milk, vegetable oil, and vanilla extract. Mix with the paddle attachment until just incorporated. Don’t overmix.
- Divide batter evenly between the pans. Bake for 20 to 23 minutes until a toothpick inserted into the center comes out with moist crumbs. Cool in pans for 10 minutes, then invert onto a wire rack to cool completely.
- Make the Puree: In a saucepan, combine raspberries, strawberries, sugar, cornstarch, and lemon juice. Simmer for 5 minutes until thickened. Cool completely.
- Make the Buttercream: Cream the room temperature dairy-free butter on high speed for 5 minutes until fluffy. Add icing sugar and salt; mix on low. Add the cooled berry puree and whip on high for another 5 minutes.
- Make the Ganache: Microwave the dark chocolate and milk in 30-second intervals, stirring until melted and smooth. Test consistency before using.
- Assembly: Layer the cakes with the berry buttercream. Apply a thin crumb coat over the whole cake and chill for 20 minutes.
- Apply a final coat of buttercream and smooth the sides. Chill for 10 minutes. Drizzle the ganache over the edges and chill again to set.
- Decorate with Oreos, fresh carnations, and raspberries.
Notes
Room Temperature Ingredients: Ensure your dairy-free butter for the buttercream is at room temperature. This is crucial for achieving a smooth, creamy texture.
Hot Milk for Cake: Using hot milk in the chocolate cake batter blooms the cocoa powder, intensifying the chocolate flavor and creating a super moist cake.
Don’t Overmix: Overmixing cake batter can lead to a tough cake. Mix just until the ingredients are combined.
Cooling is Key: Make sure your cake layers are completely cool before frosting. Warm cake will melt the buttercream, making assembly a messy ordeal.
Ganache Consistency: Test your ganache drip over a cup or bowl before applying it to the cake. You can adjust it with a tiny bit more milk or chocolate chips as needed.
Nutrition
Calories
Sugar
Fat
Carbs