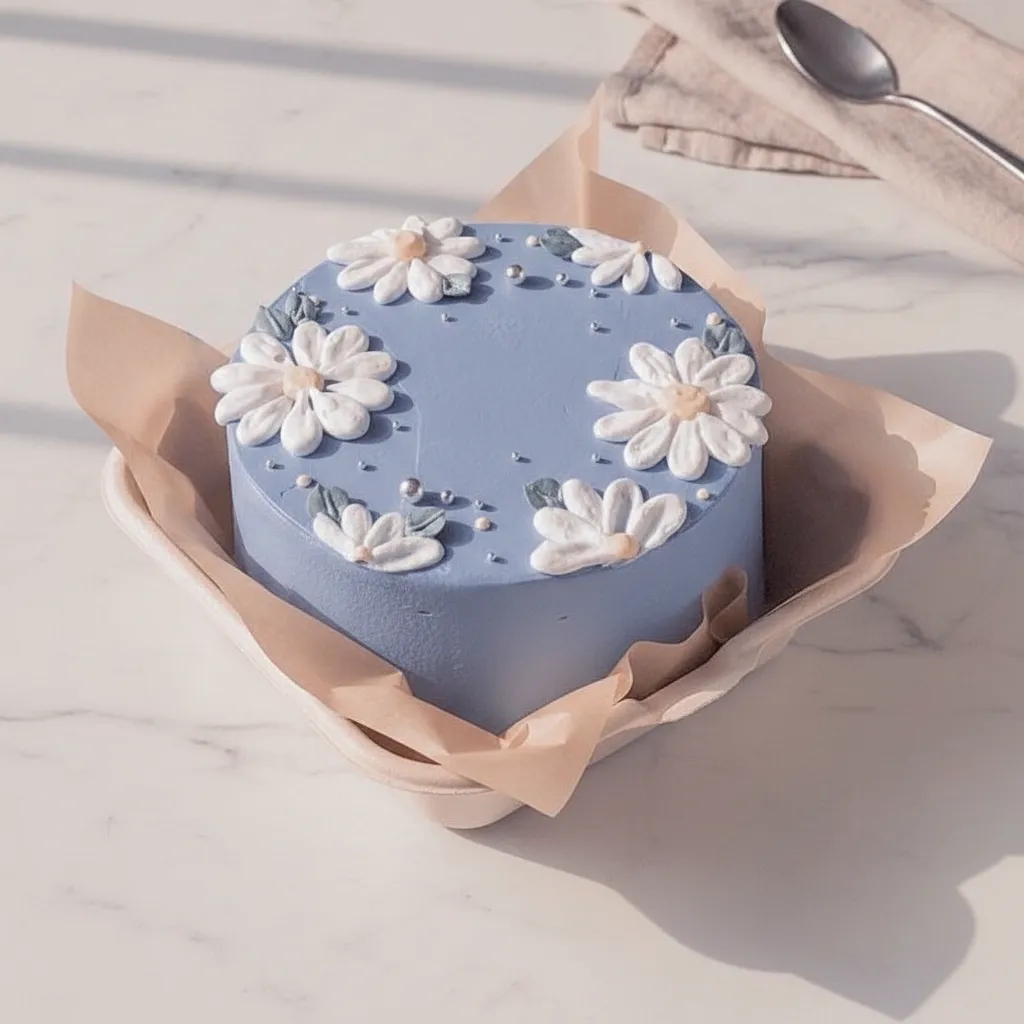
Have you ever seen a cake so pretty you almost didn’t want to eat it? Almost. That’s exactly the feeling you’ll get with this gorgeous blue daisy cake. It looks like it came straight from a fancy bakery, but here’s a little secret. You can make it right in your own kitchen.
This recipe is all about creating a beautiful, light, and airy sponge cake that serves as the perfect canvas for your creativity. We are talking about one of the most charming Bday Cakes Aesthetic Blue you can imagine. It’s perfect for birthdays, baby showers, or just because you feel like making something special. Let’s bake something amazing together.
Jump To:
Why You’ll Love This Recipe
Honestly, what’s not to love? This cake is a total showstopper. But its beauty is more than just frosting deep. The sponge itself is incredibly soft and delicate. It has a melt in your mouth texture that is just divine.
The secret is separating the eggs and whipping the whites into a glorious meringue. This step makes the cake so light, it’s like eating a sweet, fluffy cloud. It’s a classic technique that is so worth the tiny bit of extra effort.
We are also using a stabilized whipped cream frosting. If you have ever had whipped cream melt on a warm day, you know the struggle. The agar agar in this recipe keeps the cream firm and pipeable for hours. It makes decorating so much easier, especially for beginners.
And let’s talk about the look. This is one of those Cute Birthday Cakes Aesthetic Blue that gets all the likes on social media. The soft blue hue is so dreamy. It provides a perfect backdrop for simple decorations, like fresh daisies or elegant frosting strokes. It’s one of my favorite Cake Ideas Aesthetic Blue.
Plus, it’s totally customizable. You can fill it with any fruit you love. Strawberries are amazing, but raspberries or even a thin layer of lemon curd would be fantastic too. This isn’t just a recipe, it’s a foundation for your own Aesthetic Blue Birthday Cake creation.
Ingredients
Here is everything you’ll need to make this beautiful blue daisy birthday cake. The ingredients are simple and easy to find at any grocery store.
- 4 large eggs
- 1/2 cup granulated sugar
- 1/2 cup cake flour, sifted
- 3 tablespoons whole milk
- 2 tablespoons vegetable oil
- 1 teaspoon vanilla extract
- 2 cups heavy whipping cream
- 1/4 cup powdered sugar
- 1 teaspoon agar agar powder
- 1 cup fresh strawberries, sliced
- A few drops of blue food coloring (for the frosting)
Step-By-Step Instructions
Ready to get started? Follow these steps carefully, and you’ll have a perfect sponge cake ready for decorating. Just take your time and enjoy the process.
Step 1: Get Your Oven And Pan Ready
First things first, preheat your oven to 325 degrees Fahrenheit. Getting the temperature right is key for a nice, even bake. While it heats up, prepare a round cake pan by lining it with parchment paper. This little step guarantees your cake will come out cleanly.
Step 2: Mix The Yolk Batter
Now for the fun part. Separate your egg yolks and whites into two different large bowls. With the yolks, add half of the granulated sugar. Whisk them together until the mixture turns a pale yellow color and gets creamy. This adds richness to your sponge.
Next, gently stir in the milk, vegetable oil, and vanilla extract. Keep mixing until everything is just combined. You want a smooth, liquid base for your batter.
After that, it’s time for the cake flour. Fold it in gradually. Folding means using a spatula to gently scoop and lift the batter, rather than stirring vigorously. This keeps the mixture light. Keep going until you don’t see any more flour streaks.
Step 3: Whip The Egg Whites
Grab the bowl with your egg whites. Using an electric mixer, start beating them on a medium speed. As they get foamy, slowly sprinkle in the rest of the granulated sugar. Continue beating until you have stiff, glossy peaks.
What does that mean? When you lift the beaters out of the bowl, the peak of egg white that forms should stand straight up without flopping over. This airy meringue is the secret to a super fluffy cake.
Step 4: Combine And Bake
Now, we combine the two mixtures. Gently fold the whipped egg whites into the yolk batter. Do this in three separate additions. This method helps maintain all that air you just whipped into the whites. Be patient here. A light hand is crucial.
Once the batter is uniform, pour it into your prepared pan. Bake for about 30 minutes. You’ll know it’s done when the sponge is golden brown and springs back when you gently touch the top. Let it cool completely on a wire rack before you even think about frosting.
Step 5: Make The Stabilized Frosting
While the cake cools, let’s make the frosting. This is where we create our beautiful Blue Cake With Daisies look. Dissolve the agar agar powder in a tablespoon of warm water and set it aside for a moment.
In a large bowl, whip the heavy cream and powdered sugar until soft peaks form. This is when the cream holds its shape but the tip flops over. Now, add your blue food coloring, one drop at a time, until you reach your desired pastel shade.
Slowly beat in the dissolved agar agar mixture. Keep whipping until the cream becomes firm and holds its shape perfectly. This stabilized cream is a game changer for creating those lovely Blue Aesthetic Cake Designs.
Step 6: Assemble Your Beautiful Cake
Time to assemble your masterpiece. Once the cake is totally cool, carefully slice it in half horizontally to create two even layers. A serrated knife works best for this.
Place the bottom layer on your serving plate. Spread a generous layer of your blue whipped cream on top. Then, arrange the sliced strawberries over the cream. This adds a fresh, fruity surprise inside.
Gently place the second layer of sponge on top. Use the rest of the whipped cream to frost the top and sides of the entire cake. You can make it smooth with a spatula or create pretty swirls. This is your canvas for fantastic Birthday Cake Ideas Aesthetic Blue.


How To Store Leftovers
If you happen to have any leftover cake, which is a big if, storing it properly is important. Because of the fresh cream frosting, you’ll need to keep it in the refrigerator. Place it in an airtight container or a cake carrier to protect it from drying out and absorbing other fridge smells.
Your beautiful cake will stay fresh and delicious for up to three days in the fridge. The sponge might get a little denser as it sits, but it will still be incredibly tasty. I find it’s just as good the next day with a cup of coffee.
Tips
Here are a few extra tips to make sure your cake baking experience is a total success. These little things can make a big difference.
First, always use room temperature ingredients, especially the eggs and milk. They will combine more easily and create a smoother batter. This helps the cake rise better and have a more tender crumb.
Don’t skip sifting the cake flour. I know it feels like an extra step, but it’s so important. Sifting aerates the flour and removes any lumps, which is essential for a light and delicate sponge cake.
Be very careful not to overmix the batter once you add the flour. Overmixing develops gluten, which can make your sponge tough instead of tender. Mix just until everything is combined and then stop.
When it comes to decorating, have fun with it. For a true blue daisy cake look, you can use real, edible daisies or pipe simple white ones using a bit of reserved white frosting. You can also create beautiful, abstract brushstrokes with your spatula for a modern feel.
Conclusion
And there you have it. A stunning, delicious, and surprisingly simple Aesthetic Blue Birthday Cake that is sure to wow everyone. Baking this cake is such a rewarding experience, from whipping the airy meringue to spreading that lovely blue frosting.
This recipe proves that you don’t need to be a professional baker to create something truly special. So next time you need a celebratory dessert, I hope you give this beautiful cake a try. Happy baking.
FAQ
Can I Make This Cake Ahead Of Time?
Absolutely. You can bake the sponge layers a day in advance. Once they are completely cool, wrap them tightly in plastic wrap and store them at room temperature. It’s best to frost the cake on the day you plan to serve it for the freshest taste.
Why Did My Sponge Cake Deflate?
This is a common issue. It usually happens if the egg whites were not whipped to stiff peaks, or if the batter was overmixed when combining the whites and yolks. Gentle folding is so important to keep all that air in the batter, which is what helps the cake rise.
How Do I Get The Perfect Blue Color?
For that dreamy pastel look, use a gel food coloring. It’s more concentrated than liquid, so you only need a tiny amount. Add it one drop at a time to the whipped cream and mix until you reach the shade you want. It’s always easier to add more color than to take it away.
Can I Use A Different Fruit?
Of course. This cake is delicious with all sorts of fruits. Fresh raspberries, sliced peaches, or even a mix of berries would be wonderful. Just be sure to pat the fruit dry before adding it to prevent the cream from getting watery.
Blue Daisy Cake
Create a beautiful, light, and airy blue daisy cake that looks like it came from a fancy bakery but is surprisingly easy to make at home. Perfect for birthdays or any celebration!
Requirements


Ingredients
Instructions
- First things first, preheat your oven to 325 degrees Fahrenheit. Getting the temperature right is key for a nice, even bake. While it heats up, prepare a round cake pan by lining it with parchment paper. This little step guarantees your cake will come out cleanly.
- Now for the fun part. Separate your egg yolks and whites into two different large bowls. With the yolks, add half of the granulated sugar. Whisk them together until the mixture turns a pale yellow color and gets creamy. This adds richness to your sponge. Next, gently stir in the milk, vegetable oil, and vanilla extract. Keep mixing until everything is just combined. You want a smooth, liquid base for your batter. After that, it’s time for the cake flour. Fold it in gradually. Folding means using a spatula to gently scoop and lift the batter, rather than stirring vigorously. This keeps the mixture light. Keep going until you don’t see any more flour streaks.
- Grab the bowl with your egg whites. Using an electric mixer, start beating them on a medium speed. As they get foamy, slowly sprinkle in the rest of the granulated sugar. Continue beating until you have stiff, glossy peaks. What does that mean? When you lift the beaters out of the bowl, the peak of egg white that forms should stand straight up without flopping over. This airy meringue is the secret to a super fluffy cake.
- Now, we combine the two mixtures. Gently fold the whipped egg whites into the yolk batter. Do this in three separate additions. This method helps maintain all that air you just whipped into the whites. Be patient here. A light hand is crucial. Once the batter is uniform, pour it into your prepared pan. Bake for about 30 minutes. You’ll know it’s done when the sponge is golden brown and springs back when you gently touch the top. Let it cool completely on a wire rack before you even think about frosting.
- Time to make the frosting. This is where we create our beautiful Blue Cake With Daisies look. Dissolve the agar agar powder in a tablespoon of warm water and set it aside for a moment. In a large bowl, whip the heavy cream and powdered sugar until soft peaks form. This is when the cream holds its shape but the tip flops over. Now, add your blue food coloring, one drop at a time, until you reach your desired pastel shade. Slowly beat in the dissolved agar agar mixture. Keep whipping until the cream becomes firm and holds its shape perfectly. This stabilized cream is a game changer for creating those lovely Blue Aesthetic Cake Designs.
- Time to assemble your masterpiece. Once the cake is totally cool, carefully slice it in half horizontally to create two even layers. A serrated knife works best for this. Place the bottom layer on your serving plate. Spread a generous layer of your blue whipped cream on top. Then, arrange the sliced strawberries over the cream. This adds a fresh, fruity surprise inside. Gently place the second layer of sponge on top. Use the rest of the whipped cream to frost the top and sides of the entire cake. You can make it smooth with a spatula or create pretty swirls. This is your canvas for fantastic Birthday Cake Ideas Aesthetic Blue.
Notes
Always use room temperature ingredients for better batter consistency.
Do not skip sifting the cake flour; it ensures a light and tender crumb.
Be careful not to overmix the batter after adding flour to avoid a tough cake.
Have fun decorating! Use real edible daisies or pipe simple frosting ones.
Nutrition
Calories
Sugar
Fat
Carbs