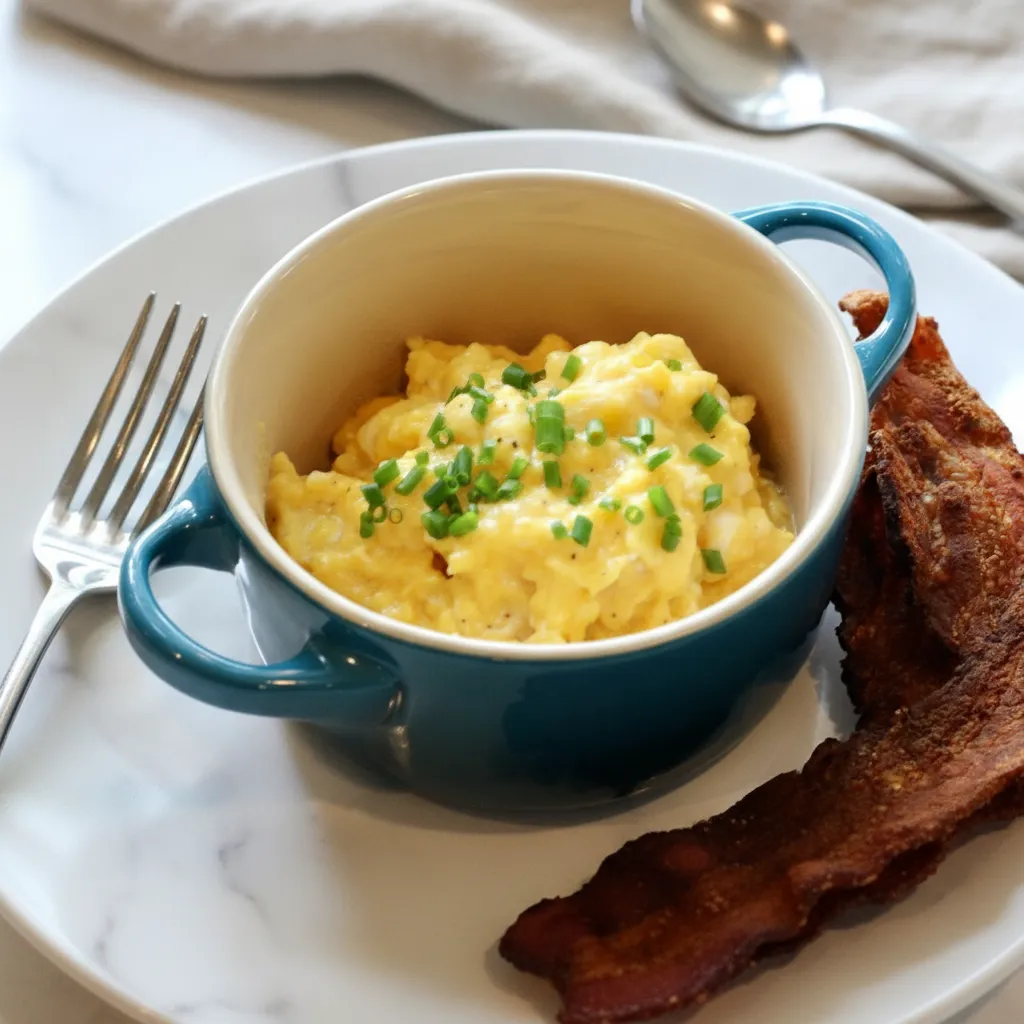
There is something truly special about a plate of warm, fluffy eggs in the morning. It is the kind of meal that feels like a hug. We all grew up eating them, but making perfect Scrambled Eggs is actually a skill that takes a little practice.
Many people rush the process. They turn the heat up too high or stir too fast. The result is often dry or rubbery eggs. But do not worry. We are going to change that today.
You want creamy, tender curds that melt in your mouth. This dish is the foundation of so many Healthy Breakfast Recipes Easy enough for a busy Monday but special enough for a lazy Sunday.
Once you nail this technique, you will never go back to the old way. It is all about patience and using the right tools. You do not need fancy equipment. Just a good pan and fresh ingredients.
Jump To:
Why You’ll Love This Recipe
First of all, this recipe is incredibly fast. When you need Quick Cooking Recipes that actually taste good, this is the gold standard. You can go from fridge to plate in under ten minutes.
It is also budget friendly. Eggs are an affordable source of protein. You do not need expensive cuts of meat to have a satisfying meal. This makes it a staple for anyone watching their grocery bill.
Another reason is versatility. You can keep it simple with salt and pepper. Or you can dress it up with herbs, cheese, or salsa. It serves as a blank canvas for your culinary creativity.
If you are looking for Cooking Recipes Healthy enough for daily eating, this is it. Eggs are packed with nutrients. They keep you full until lunch, which helps prevent snacking on junk food later in the day.
Finally, it is foolproof once you know the secret. No more guessing. This method guarantees success every single time. It truly belongs in the hall of fame of Easy Cooking Recipes.
Ingredients
The beauty of this dish lies in its simplicity. You do not need a long shopping list. In fact, you probably have everything you need in your kitchen right now. Quality matters here since there are so few ingredients.
Here is what you will need to get started:
- 2 to 3 Fresh Eggs
- 1 tablespoon Butter or Oil
- Salt to taste
- Black Pepper to taste
- 1 to 2 tablespoons Milk or Cream (optional)
Using fresh eggs makes a huge difference. The yolks are richer and stand up better to cooking. If you can get farm fresh eggs, even better. But store bought works just fine too.
For the fat, butter adds a lovely flavor. However, oil works if you want a dairy free option. Just make sure it is a neutral oil so it does not overpower the natural taste of the eggs.
Step-By-Step Instructions
Now let us get cooking. Follow these steps closely for the best results. Remember, the key is low heat and gentle movement. Treat the eggs with kindness, and they will reward you with great texture.
Step 1: Crack and Beat the Eggs
Start by cracking your fresh eggs into a medium bowl. Be careful not to get any shell in there. If you do, use a larger piece of shell to scoop it out. It works like a magnet.
Next, grab a whisk or a fork. Whisk the eggs vigorously. You want the yolks and whites to be completely combined. The mixture should look uniform in color.
Keep whisking until it is slightly frothy. This introduces air into the mixture. That air helps create the fluffiness we all love in Scrambled Eggs. Do not skip this part.
If you are using milk or cream, add it now. Whisk it in thoroughly. This adds a bit of moisture and richness, but the eggs will still be delicious without it.
Step 2: Heat Your Pan and Add Fat
Place a nonstick skillet over medium low heat. This is crucial. If the pan is too hot, the eggs will seize up immediately. We want a slow and gentle cook.
Add your butter or oil to the pan. Let it melt and coat the bottom. You want it to warm up, but do not let the butter brown. Brown butter has a nutty taste that distracts from the fresh egg flavor.
Wait until the foam from the butter subsides slightly. That is your signal that the pan is ready. It should be hot enough to sizzle gently, but not aggressively.
Step 3: Pour in the Eggs
Pour the beaten eggs into the center of the pan. You might hear a very soft sizzle. That is perfect. If it hisses loudly, turn the heat down immediately.
Now, do nothing. Yes, you read that right. Let the eggs sit for a few moments without stirring. You want to see tiny curds beginning to form at the edges.
This brief pause allows the bottom layer to set just enough. It gives you something to work with when you start moving them around. Patience is your best friend here.
Step 4: Gently Stir and Fold
Grab a silicone spatula. This tool is essential for Healthy Homemade Recipes like this because it scrapes the pan cleanly without scratching it. Gently push the eggs from the edges toward the center.
You will see the cooked egg gathering in the middle. The liquid egg will flow out to the edges to take its place. Repeat this motion slowly around the pan.
Think of it as folding laundry, not stirring soup. You want to create soft, pillowy mounds. Stirring too fast breaks the curds into tiny, rubbery bits.
Keep sweeping the spatula across the bottom of the pan. This prevents overcooking on one side. The goal is even cooking throughout the entire batch.
Step 5: Season and Finish
Watch the texture closely. When the eggs look mostly set but are still slightly runny and wet, it is time to act. They should look a little undercooked.
Season them now with salt and pepper. Adding salt at the end prevents the eggs from becoming watery during the cooking process. It keeps the texture tender.
Remove the pan from the heat immediately. The residual heat in the pan will continue cooking the eggs for another minute. This is called carryover cooking.
Give them one final fold off the heat. Serve them right away. They should be creamy, soft, and absolutely delicious. This is how you master Scrambled Eggs.


How To Store Leftovers
Honestly, eggs are best enjoyed fresh. However, sometimes we cook too much. If you have leftovers, do not throw them away. You can save them for later.
Let the eggs cool down completely first. Then, transfer them to an airtight container. They will stay good in the refrigerator for up to three days.
When you are ready to eat them, be careful with reheating. Microwaving them on high can make them rubbery. Use a lower power setting and heat in short bursts.
You can also reheat them gently in a pan with a little bit of butter. This helps refresh the texture. Leftover eggs are great in breakfast burritos or on toast.
Having pre cooked eggs makes this one of the most practical Healthy Homemade Recipes for meal prep. You can quickly add them to a salad or a wrap for lunch.
Tips
Want to elevate your breakfast game even further? Here are some pro tips. First, use a smaller pan for fewer eggs. If the pan is too big, the eggs spread out too thin and overcook.
Always use low heat. I cannot stress this enough. High heat is the enemy of fluffy eggs. It dries them out instantly. Take your time.
Invest in a good silicone spatula. It hugs the curves of the pan and ensures no egg gets left behind to burn. It is a small tool that makes a big difference.
If you want extra richness, add a knob of cold butter right at the end. Stir it in off the heat. It melts into the eggs and creates a velvety sauce.
Do not overbeat the eggs if you prefer streaks of white and yellow. Some people love that texture. But for uniform fluffiness, whisk until one color.
Serve on a warm plate. Cold plates suck the heat right out of the eggs. Warming your plate keeps your breakfast hot until the last bite.
Experiment with toppings. Chives, parsley, or a dash of hot sauce can transform the dish. It keeps your rotation of Cooking Recipes Healthy and exciting.
Conclusion
Making the perfect plate of Scrambled Eggs is a simple pleasure. It does not require hours in the kitchen or fancy ingredients. It just takes a little bit of care and attention.
By following these steps, you elevate a humble ingredient into something wonderful. It is a skill that will serve you well for the rest of your life. Whether for a quick snack or a family feast, this method works.
So, grab your whisk and your favorite pan. Give this method a try tomorrow morning. You might just find it becomes your favorite of all Easy Cooking Recipes.
FAQ
Here are some common questions people ask about getting their eggs just right. Hopefully, this clears up any confusion you might have.
Can I Make This Gluten Free?
Yes, absolutely. Eggs are naturally gluten free. Just ensure your additives like sauces or seasonings are also free from gluten. It is one of the safest Healthy Breakfast Recipes Easy for gluten sensitive diets.
Should I Use Water or Milk?
This is a classic debate. Milk adds creaminess and richness. Water creates steam, which can make the eggs slightly fluffier and lighter. It really depends on your personal preference. Try both and see which one you like better.
Why Are My Eggs Watery?
Watery eggs usually happen because they were overcooked or salted too early. Salt draws out moisture. Try salting at the very end of the cooking process. Also, remove them from the heat while they still look slightly wet.
Can I Use a Cast Iron Skillet?
You can, but it must be very well seasoned. Eggs love to stick to rough surfaces. For most people, a nonstick pan is the best tool for this job. It makes cleanup effortless and keeps the eggs intact.
Is This Recipe Keto Friendly?
Yes, it is. Eggs and butter are staples of the keto diet. You can skip the milk or use heavy cream instead to keep the carb count low. It fits perfectly into a list of low carb Quick Cooking Recipes.
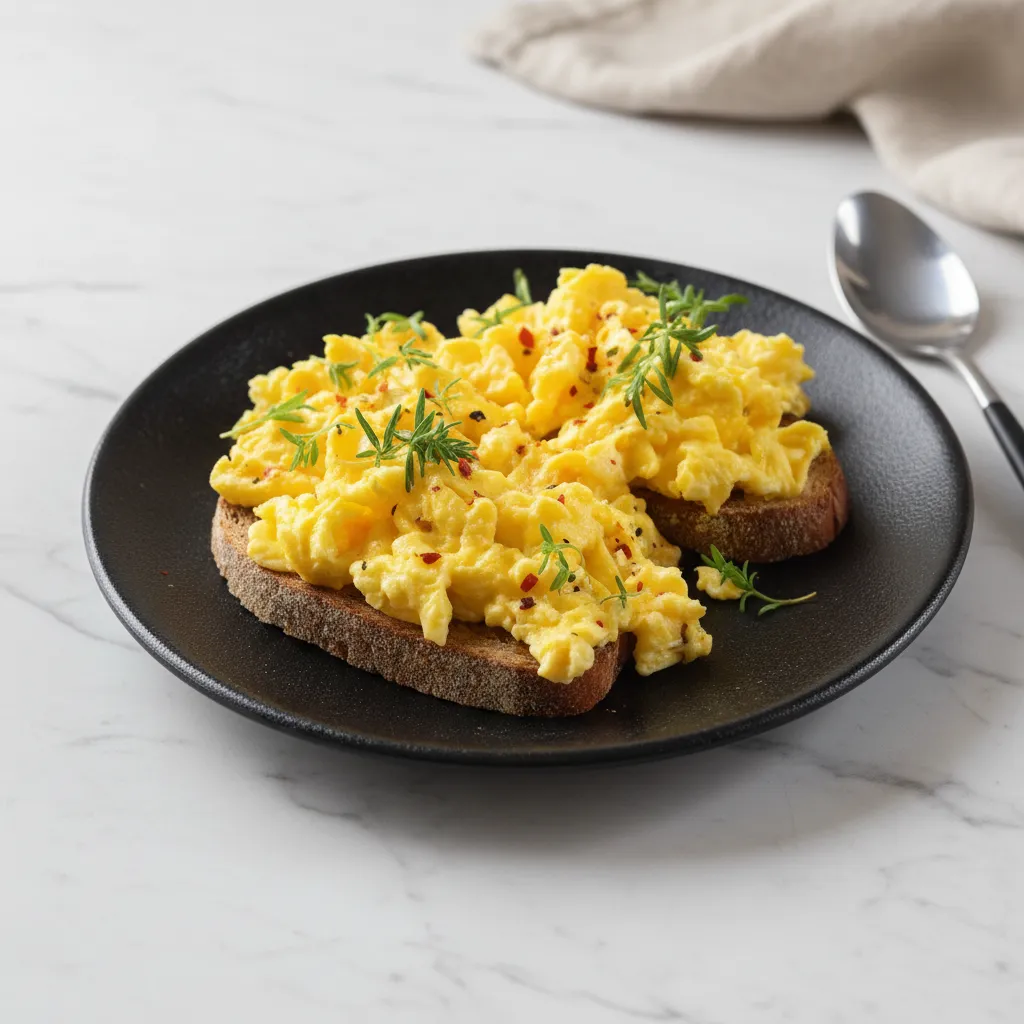
Perfect Fluffy Scrambled Eggs
Get ready for truly amazing Scrambled Eggs, perfect for any busy morning or a relaxed weekend. Forget dry, rubbery eggs! This no-fuss method guarantees fluffy, creamy curds every time. It’s a quick, budget-friendly, and healthy breakfast that’s super versatile – a real game-changer for your weeknight meals.
Requirements


Ingredients
Instructions
- Crack your fresh eggs into a medium bowl. Be careful not to get any shell in there. If you do, use a larger piece of shell to scoop it out. It works like a magnet. Next, grab a whisk or a fork. Whisk the eggs vigorously. You want the yolks and whites to be completely combined. The mixture should look uniform in color. Keep whisking until it is slightly frothy. This introduces air into the mixture. That air helps create the fluffiness we all love in Scrambled Eggs. Do not skip this part. If you are using milk or cream, add it now. Whisk it in thoroughly. This adds a bit of moisture and richness, but the eggs will still be delicious without it.
- Place a nonstick skillet over medium low heat. This is crucial. If the pan is too hot, the eggs will seize up immediately. We want a slow and gentle cook. Add your butter or oil to the pan. Let it melt and coat the bottom. You want it to warm up, but do not let the butter brown. Brown butter has a nutty taste that distracts from the fresh egg flavor. Wait until the foam from the butter subsides slightly. That is your signal that the pan is ready. It should be hot enough to sizzle gently, but not aggressively.
- Pour the beaten eggs into the center of the pan. You might hear a very soft sizzle. That is perfect. If it hisses loudly, turn the heat down immediately. Now, do nothing. Yes, you read that right. Let the eggs sit for a few moments without stirring. You want to see tiny curds beginning to form at the edges. This brief pause allows the bottom layer to set just enough. It gives you something to work with when you start moving them around. Patience is your best friend here.
- Grab a silicone spatula. This tool is essential for Healthy Homemade Recipes like this because it scrapes the pan cleanly without scratching it. Gently push the eggs from the edges toward the center. You will see the cooked egg gathering in the middle. The liquid egg will flow out to the edges to take its place. Repeat this motion slowly around the pan. Think of it as folding laundry, not stirring soup. You want to create soft, pillowy mounds. Stirring too fast breaks the curds into tiny, rubbery bits. Keep sweeping the spatula across the bottom of the pan. This prevents overcooking on one side. The goal is even cooking throughout the entire batch.
- Watch the texture closely. When the eggs look mostly set but are still slightly runny and wet, it is time to act. They should look a little undercooked. Season them now with salt and pepper. Adding salt at the end prevents the eggs from becoming watery during the cooking process. It keeps the texture tender. Remove the pan from the heat immediately. The residual heat in the pan will continue cooking the eggs for another minute. This is called carryover cooking. Give them one final fold off the heat. Serve them right away. They should be creamy, soft, and absolutely delicious. This is how you master Scrambled Eggs.
Notes
These eggs are best fresh, but leftovers can be saved! Cool completely, then store in an airtight container in the fridge for up to three days. Reheat gently in a pan with a little butter or in short bursts on low microwave power to keep them tender. Leftovers are great in burritos or on toast for quick meals.
For the best results, use a smaller nonstick pan if you’re making fewer eggs, and always keep the heat low – high heat is the enemy of fluffy eggs! A good silicone spatula is a must for gentle folding. For extra richness, stir in a knob of cold butter right at the end, off the heat. Serve on a warm plate and feel free to top with chives, parsley, or your favorite hot sauce to keep things exciting!
Nutrition
Calories
Sugar
Fat
Carbs