There is honestly nothing quite like the smell of chocolate filling up your kitchen. We have all been there. You are sitting on the couch after a long week, and suddenly the craving hits. You need something sweet, comforting, and rich. You need **Brownies**.
Sure, you could grab a box mix from the pantry. But let me tell you something. Making **Brownies** from scratch is almost as fast, and the taste is completely different. We are talking about that deep, real chocolate flavor that you just cannot get from a powder packet.
This recipe is my absolute go to for those nights. It is simple, reliable, and uses ingredients you probably already have in your cupboard. You do not need a fancy mixer or a bunch of bowls. It is straightforward baking at its best.
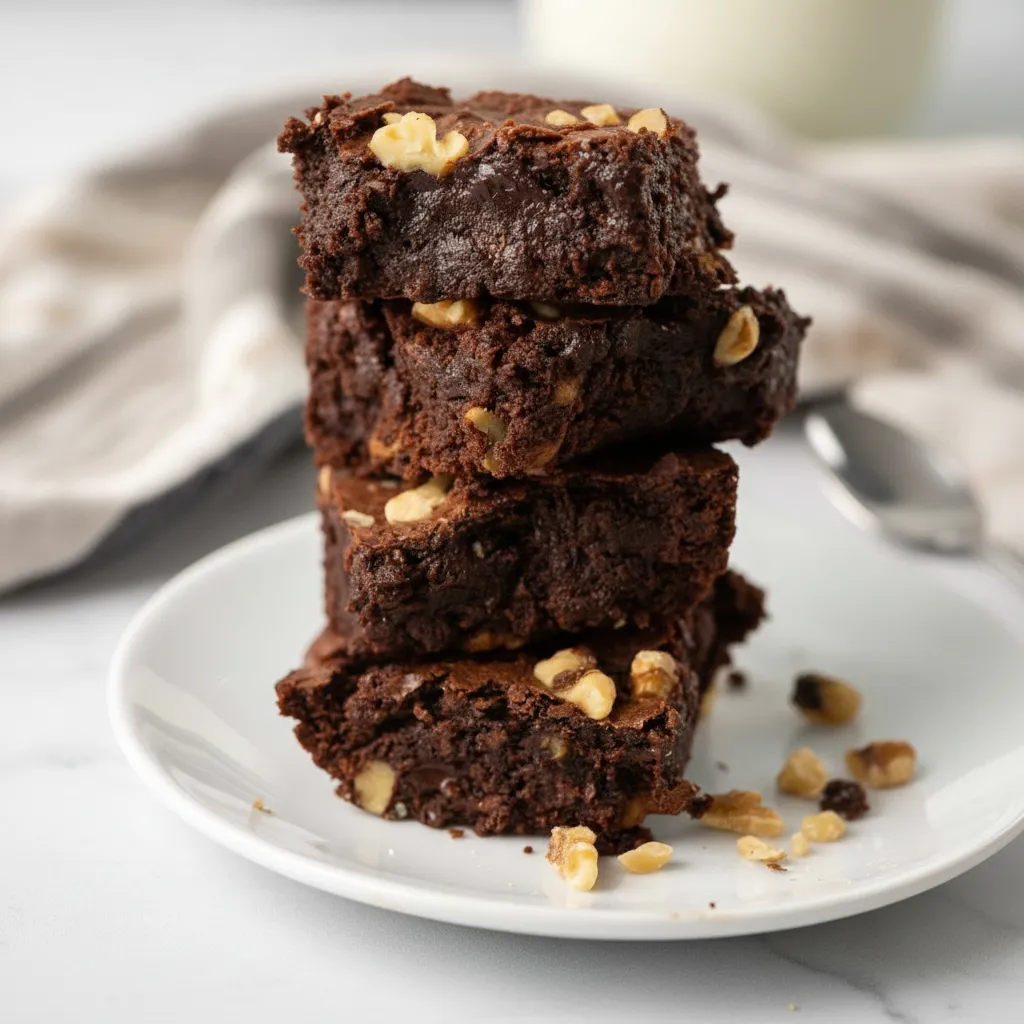
Plus, there is a certain **Brownies Aesthetic** that we all love. You know the one. It has that shiny, crackly top that shatters when you slice into it. Underneath, you find a dense and fudgy center that melts in your mouth. That is exactly what this recipe delivers.
Jump To:
Why You’ll Love This Recipe
You are going to fall in love with this recipe for so many reasons. First off, it is incredibly fast. We are talking about getting a batch of warm Dessert Brownies into the oven in just a few minutes. It fits perfectly into a busy schedule.
Another huge plus is the cleanup. Nobody likes washing a mountain of dishes after baking. This method uses just one medium saucepan to melt the butter and mix everything else. That means less time at the sink and more time enjoying your treat.
The texture is also spot on. Some people like cakey brownies, but I find that most of us crave that fudgy density. These **Brownies** strike the perfect balance. They are moist and rich without being raw or heavy.
This recipe is also super versatile. We include walnuts here for a classic crunch, but you can easily swap them out. If you have kids who are picky about nuts, just skip them. You can toss in chocolate chips or dried fruit instead.
It is also budget friendly. You do not need expensive chocolate bars to melt down. We use cocoa powder here, which keeps the cost down while still delivering a massive chocolate punch. It is a win for your wallet and your taste buds.
Finally, these make amazing **Brownie Bars** for sharing. They hold their shape well once cooled. You can wrap them up for a bake sale, bring them to a potluck, or just stack them on a plate for movie night. They always look impressive.
Ingredients
The beauty of this recipe lies in its simplicity. You do not need to run to a specialty store. Here is everything you need to get started on your **Brownies**.
- 1/2 cup unsalted butter
- 1 cup granulated sugar
- 2 large eggs
- 1 teaspoon vanilla extract
- 1/3 cup unsweetened cocoa powder
- 1/2 cup all purpose flour
- 1/4 teaspoon salt
- 1/4 teaspoon baking powder
- 1 cup chopped walnuts
Let’s chat about the butter for a second. Using unsalted butter gives you total control over the saltiness. If you only have salted butter, just skip the extra salt listed later. It works just fine.
For the cocoa powder, regular unsweetened cocoa is perfect. You do not need Dutch processed cocoa for this one. The regular kind gives it that classic brownie flavor we all grew up with.
The walnuts add a wonderful texture. However, feel free to omit them if you prefer a smooth texture or have an allergy. The recipe is very forgiving that way.
Step-By-Step Instructions
Making these **Brownies** is a breeze. Just follow these simple steps, and you will have a hot pan of chocolate goodness in no time.
Step 1: Preheat and Prep
Start by preheating your oven to 350 degrees F. Getting the oven hot before you start mixing ensures your **Brownies** bake evenly right from the start.
Next, grab an 8 by 8 inch baking pan. You want to lightly grease it first. Then, create a parchment paper sling. This means cutting a piece of parchment paper that fits the bottom but is long enough to hang over two sides.
This sling is a lifesaver. It lets you lift the entire block of **Brownies** out of the pan once they are cool. Don’t forget to lightly grease the parchment paper too. It helps everything release perfectly.
Step 2: Melt the Butter
Take a medium saucepan and place it on the stove. Add your unsalted butter and turn the heat to low. You want to melt the butter gently.
Keep an eye on it so it does not brown or burn. Once it is mostly melted, you can remove the pan from the heat. The residual heat will melt the last few chunks.
Now, stir in the sugar immediately. Mixing the sugar into the warm butter helps it start to dissolve. This is actually one of the secrets to getting that shiny top layer everyone loves.
Step 3: Add Wet Ingredients
Once the butter and sugar are combined, let it cool for just a minute so you do not scramble the eggs. Add the eggs one at a time.
Mix well after each egg is added. You want the mixture to look glossy and smooth. This creates the structure for your **Brownie Bars**.
Stir in the vanilla extract now. Vanilla is crucial because it enhances the chocolate flavor. It makes the chocolate taste more like chocolate, if that makes sense.
Step 4: Mix Dry Ingredients
Now it is time for the dry ingredients. Add the cocoa powder, flour, salt, and baking powder directly into the saucepan. There is no need to sift them into a separate bowl first.
Use a wooden spoon to mix everything together. Stir until the flour streaks just disappear. You want to be careful here.
Overmixing at this stage can make the **Brownies** tough instead of tender. Just mix until it is combined and smooth.
Step 5: Add Walnuts
If you are using the chopped walnuts, pour them in now. Give the batter a few gentle folds to distribute the nuts evenly.
You want every bite to have a little bit of crunch. If you are swapping walnuts for chocolate chips, this is the time to add those in as well.
Step 6: Bake
Pour the thick batter into your prepared pan. Use your spoon or a spatula to spread it out into an even layer. Make sure it reaches the corners.
Pop the pan into the oven. Bake for 20 to 25 minutes. The smell will start to fill the kitchen, and it will be amazing.
Check for doneness by inserting a toothpick into the center. It should come out with moist crumbs clinging to it. You do not want the toothpick to be completely clean.
If the toothpick is clean, they might be over baked. Moist crumbs mean they will be fudgy and perfect once they cool down.
Step 7: Cool and Serve
This is the hardest part. You have to let the **Brownies** cool completely in the pan. I know, it is tempting to dive in right away.
If you cut them while they are hot, they might fall apart. Letting them cool sets the structure. Once cool, use the parchment overhang to lift them out.
Place them on a cutting board and slice them into squares. Now you are ready to serve your delicious **Dessert Brownies**.


How To Store Leftovers
If you somehow have leftovers, you are lucky. These **Brownies** keep really well. The key is keeping the air out so they stay moist.
Store them in an airtight container at room temperature. They will stay fresh and soft for about 3 to 4 days. You can also cover the plate tightly with plastic wrap.
Do not store them in the fridge unless you like hard brownies. The cold temperature changes the texture of the butter and chocolate, making them firm and less fudgy.
If you want to keep them longer, the freezer is your friend. Wrap individual **Brownie Bars** in plastic wrap and then place them in a freezer bag.
They will last in the freezer for up to 3 months. When you are ready to eat one, just let it thaw on the counter for an hour. It will taste just as fresh as the day you baked it.
Tips
Let’s talk about a few tricks to ensure your **Brownies** turn out perfect every single time. It is often the little things that make a big difference in baking.
First, do not skip the parchment sling. Digging the first brownie out of a greased pan without paper usually results in a crumbled mess. The paper handles make it effortless.
Be careful not to overmix the batter once you add the flour. Mixing develops gluten. We want tender **Dessert Brownies**, not chewy bread. Stop mixing as soon as the white flour disappears.
Watch the baking time closely. All ovens are slightly different. Start checking at the 20 minute mark. Remember, they continue to cook a little bit in the hot pan after you take them out.
For the ultimate **Brownies Aesthetic**, try slicing them with a plastic knife. It sounds weird, but plastic knives tend to stick less to the fudgy center than metal ones, giving you cleaner cuts.
If you want extra decadence, serve these warm with a scoop of vanilla ice cream. The contrast between the cold ice cream and the warm chocolate is heaven.
Make sure your eggs are at room temperature if possible. They mix into the batter more evenly. If they are cold, just place them in a bowl of warm water for 5 minutes before using.
Conclusion
There you have it. A simple, reliable, and absolutely delicious recipe for homemade **Brownies**. It is proof that you do not need complicated techniques to make something wonderful.
Whether you are baking for a party or just treating yourself on a Tuesday night, these **Brownie Bars** deliver. They are comforting, chocolatey, and satisfying in every way.
I really hope you give this recipe a try. It might just become your new family favorite. Get your ingredients ready, turn on some music, and enjoy the process.
Baking should be fun and stress free. With this one pot method, it really is. So go ahead and satisfy that chocolate craving. You deserve it.
FAQ
Can I Double This Recipe?
Yes, you absolutely can. If you want to make a larger batch, simply double all the ingredients. However, you will need to bake it in a 9 by 13 inch pan instead of the square one. You may need to add a few extra minutes to the baking time, so keep an eye on that toothpick test.
Can I Make These Gluten Free?
You sure can. These **Brownies** work surprisingly well with a standard gluten free 1 to 1 flour blend. Just swap the regular flour for the gluten free blend in the same amount. The texture might be slightly different, but they will still be delicious and fudgy.
Why Are My Brownies Cakey?
If your **Brownies** turned out more like cake, it usually means there was too much flour or they were baked too long. Be sure to measure your flour correctly. The best way is to spoon it into the cup and level it off, rather than scooping directly from the bag which packs it down.
Can I Use Oil Instead of Butter?
You can use vegetable oil or melted coconut oil, but the texture and flavor will change. Butter adds a rich, creamy flavor that oil lacks. Oil tends to make **Brownies** even fudgier but you lose that savory buttery undertone. If you do swap, use the same amount.
Easy One-Pan Fudgy Brownies
This no-fuss recipe delivers incredibly fudgy and rich brownies with a classic crackly top. Made in just one saucepan, it’s a quick and easy dessert with minimal cleanup, perfect for any weeknight chocolate craving.
Requirements


Ingredients
Instructions
- Preheat oven to 350°F. Grease an 8×8 inch pan and line with a parchment paper sling, then grease the parchment.
- In a medium saucepan, melt the butter over low heat. Remove from heat and stir in the sugar until combined.
- Let the mixture cool for a minute, then beat in the eggs one at a time until glossy. Stir in the vanilla extract.
- Add the cocoa powder, flour, salt, and baking powder to the saucepan. Stir with a wooden spoon just until combined—do not overmix.
- Gently fold in the chopped walnuts.
- Pour the batter into the prepared pan and spread evenly.
- Bake for 20-25 minutes, or until a toothpick inserted in the center comes out with moist crumbs.
- Let the brownies cool completely in the pan before using the parchment sling to lift them out. Slice into squares and serve.
Notes
The parchment paper sling is essential for easy removal and clean cuts.
Do not overmix the batter after adding flour to keep the brownies tender and fudgy.
For the cleanest cuts, use a plastic knife after the brownies have cooled completely.
Nutrition
Calories
Sugar
Fat
Carbs