Turning eighteen is a major life event. It marks the official start of adulthood and independence. You want a celebration that feels special and personal. While big parties are fun, sometimes a small gathering with your closest friends is even better. That is where a small batch 18Th Birthday Cake comes in handy. You do not always need a massive sheet cake to mark the occasion.
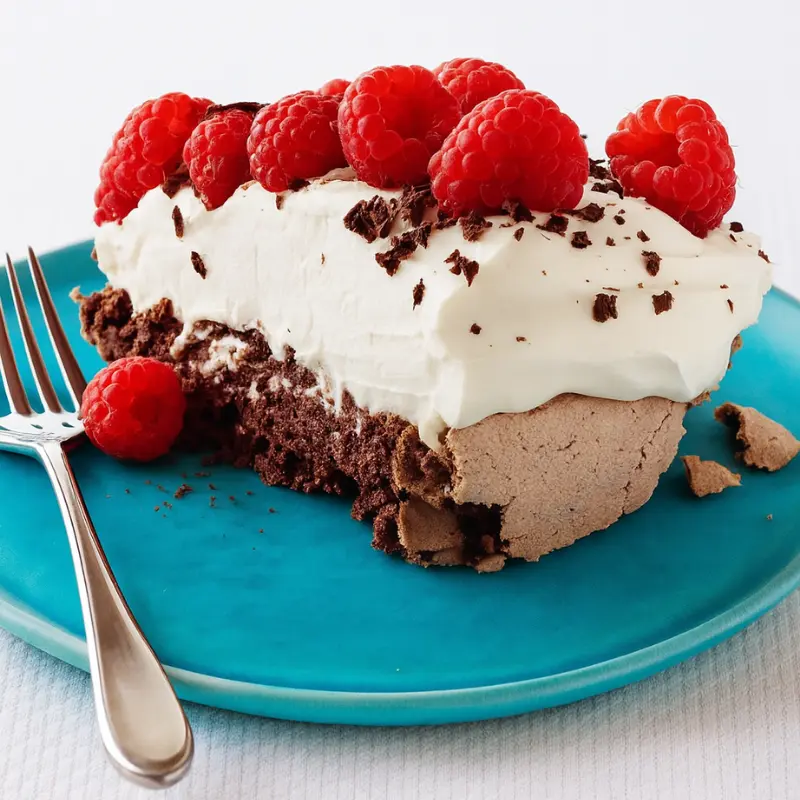
This recipe focuses on quality over quantity. It produces a rich, dark chocolate cake that is incredibly moist. The size is just right for a small group or a family dinner. Plus, it serves as a great base for 18Th Cake Ideas that lean towards a modern style. If you love the look of a Minimalist Bday Cake, this recipe gives you the sturdy structure and smooth finish you need to achieve that aesthetic.
Jump To:
Why You’ll Love This Recipe
There are so many reasons to bake this cake yourself. First, it is incredibly flavorful. The combination of buttermilk and hot coffee makes the chocolate taste deep and satisfying. It is not overly sweet, but it has that classic bakery style richness that everyone loves. If you are looking for Simple Aesthetic Birthday Cakes, this is a fantastic starting point.
Another reason is the ease of preparation. You do not need fancy equipment or hard to find ingredients. Most of what you need is likely already in your pantry. The process is straightforward, making it a great project for beginners or anyone who wants a homemade touch without the stress. This 18Th Birthday Cake proves that you can make something beautiful and professional looking right in your own kitchen.
Ingredients
This recipe uses standard baking staples. However, each ingredient plays a specific role in creating the tender crumb and fudgy texture. Here is what you will need to get started.
- 1/2 Cup (65g) all purpose flour
- 1/2 Cup (100g) granulated sugar
- 1/4 Cup (21g) unsweetened cocoa powder
- 1/4 tsp baking soda
- 1/4 tsp baking powder
- 1/8 tsp salt
- 1 large egg, room temperature
- 2 Tbsp vegetable oil
- 1/2 tsp pure vanilla extract
- 1/4 Cup (60ml) buttermilk, room temperature
- 1/4 Cup (60ml) hot coffee or hot water
- 1/2 Cup (113g) unsalted butter, room temperature
- 1 1/2 Cup (180g) powdered sugar
- 1 1/2 Tbsp whole milk, room temperature
- 1 tsp pure vanilla extract (for frosting)
- pinch of salt, or to taste
The hot coffee is the secret weapon here. It blooms the cocoa powder, which means it helps release the full chocolate flavor. Do not worry if you dislike coffee. You will not taste it in the final product. It simply makes the chocolate taste more like chocolate.
Step By Step Instructions
Making this 18Th Birthday Cake is quite simple. Just follow the steps closely to ensure your layers come out even and moist. Precision helps when working with small batches.
Step 1: Prep The Pan and Oven
Start by preheating your oven to 350ºF. This ensures the oven is at the right temperature when your batter is ready. Prepare three 4 inch cake pans or one 6 inch cake pan. Spray the sides with cooking spray. Then, fit the bottom of each pan with a parchment paper circle. This step is vital so your cake releases easily after baking.
Step 2: Mix The Batter
In a medium bowl, whisk together the flour, sugar, cocoa powder, baking soda, baking powder, and salt. Make sure there are no large lumps. Next, add the egg, vegetable oil, vanilla, and buttermilk. Whisk these wet ingredients into the dry mix until they are fully combined. Finally, pour in the hot coffee in a slow stream while whisking continuously. The batter will be very thin, but this is normal.
Step 3: Bake The Cake
Pour the batter evenly into your prepared pan or pans. If you are using 4 inch pans, bake for 18 to 22 minutes. If you are using a single 6 inch pan, bake for 24 to 28 minutes. You will know the cake is done when it springs back to the touch. A toothpick inserted into the center should come out clean. Let the cake cool completely before you try to remove it or decorate it.
Step 4: Make The Frosting
While the cake cools, make the buttercream. Place the butter in a stand mixer fitted with a paddle attachment. Whip it on medium high speed for about 4 to 5 minutes until it is creamy and light. Scrape down the bowl. Add the powdered sugar, cocoa powder, milk, salt, and vanilla. Cover the mixer with a towel to catch dust. Mix on low until combined. Remove the towel and whip on low for another 2 to 3 minutes until smooth.
Step 5: Assemble The Cake
Once the cake is fully cooled, you can assemble your Minimalist Bday Cake. Level the tops of your cake layers if needed. Place a dab of frosting on a cake board and set the first layer down. Spread frosting on top, then stack the next layer. Repeat until all layers are stacked. Spread a thin layer of frosting all over the outside to lock in crumbs. Chill this crumb coat for 30 minutes. Finally, add the remaining frosting and smooth it out. Pipe a cute border on top and add sprinkles for a festive finish.


How To Store Leftovers
If you have any cake left over, you want to keep it fresh. This cake stores very well. You can keep the frosted cake at room temperature in an airtight container for up to two days. The sugar in the frosting acts as a preservative for the butter, so it is safe on the counter for a short time.
For longer storage, place the cake in the refrigerator. It will stay good for up to five days. Just make sure it is in a sealed container so it does not absorb fridge odors. If you want to keep it even longer, you can freeze individual slices. Wrap them tightly in plastic wrap and then foil. They will last in the freezer for up to two months. Thaw them on the counter when you are ready to eat.
Tips
Here are a few helpful hints to ensure your 18Th Birthday Cake turns out amazing every time. Small details often make the biggest difference in baking.
First, use room temperature ingredients. This is especially true for the egg, buttermilk, and butter. Room temperature ingredients mix together much better than cold ones. This creates a uniform batter and a silky frosting. If your butter is too cold, your frosting will be lumpy.
Second, measure your flour correctly. Spoon the flour into your measuring cup and level it off with a knife. Do not scoop directly from the bag. Scooping packs the flour down, and you might end up with too much. This can make the cake dry instead of moist.
Lastly, do not skip the crumb coat. This thin layer of frosting catches all the loose crumbs so they do not show up in your final layer. It is the key to achieving that clean look seen in Simple Aesthetic Birthday Cakes.
Conclusion
Celebrating an 18th birthday is a special moment that bridges childhood and adulthood. This small batch chocolate cake is the best way to mark the day without overwhelming yourself with leftovers. It is rich, elegant, and totally customizable. Whether you stick to a simple design or go wild with decorations, this 18Th Birthday Cake will be a hit.
Get creative with your toppings or keep it sleek for a Minimalist Bday Cake vibe. No matter how you dress it up, the flavor will speak for itself. Happy baking and happy birthday!
FAQ
Can I Make This Gluten Free?
Yes, you can swap the all purpose flour for a high quality gluten free flour blend. Look for a blend that measures 1:1 with regular flour. The texture might vary slightly, but it will still be delicious.
What If I Do Not Have Buttermilk?
You can easily make your own. Add a teaspoon of vinegar or lemon juice to regular milk. Let it sit for about 15 minutes until it curdles slightly. This DIY version works wonderfully in this recipe.
Can I Double This Recipe?
Yes, you can double the ingredients to make a larger cake or more layers. Just be sure to watch the baking time, as having more batter in the oven might require a slight adjustment.
Can I Use Water Instead of Coffee?
Absolutely. While coffee enhances the chocolate flavor, hot water works fine too. The cake will still be moist and tasty, just slightly less intense in its chocolate profile.
What Are Some Other 18Th Cake Ideas?
You can top this cake with fresh flowers, gold leaf, or a custom cake topper. Changing the frosting color to pastels or keeping it stark white are also popular trends for 18Th Cake Ideas right now.
18th Birthday Cake
This small batch dark chocolate cake recipe is perfect for celebrating an 18th birthday. It’s incredibly moist, rich, and flavorful, offering a classic bakery style richness without being overly sweet. Easy to prepare with common pantry staples, this recipe is ideal for a small gathering or family dinner and provides a sturdy base for minimalist or elegantly decorated cakes.
Requirements


Ingredients
Instructions
- Start by preheating your oven to 350ºF. Prepare three 4-inch cake pans or one 6-inch cake pan. Spray the sides with cooking spray. Then, fit the bottom of each pan with a parchment paper circle. This step is vital so your cake releases easily after baking.
- In a medium bowl, whisk together the flour, sugar, cocoa powder, baking soda, baking powder, and salt. Make sure there are no large lumps. Next, add the egg, vegetable oil, vanilla, and buttermilk. Whisk these wet ingredients into the dry mix until they are fully combined. Finally, pour in the hot coffee in a slow stream while whisking continuously. The batter will be very thin, but this is normal.
- Pour the batter evenly into your prepared pan or pans. If you are using 4-inch pans, bake for 18 to 22 minutes. If you are using a single 6-inch pan, bake for 24 to 28 minutes. You will know the cake is done when it springs back to the touch. A toothpick inserted into the center should come out clean. Let the cake cool completely before you try to remove it or decorate it.
- While the cake cools, make the buttercream. Place the butter in a stand mixer fitted with a paddle attachment. Whip it on medium high speed for about 4 to 5 minutes until it is creamy and light. Scrape down the bowl. Add the powdered sugar, cocoa powder, milk, salt, and vanilla. Cover the mixer with a towel to catch dust. Mix on low until combined. Remove the towel and whip on low for another 2 to 3 minutes until smooth.
- Once the cake is fully cooled, you can assemble your Minimalist Bday Cake. Level the tops of your cake layers if needed. Place a dab of frosting on a cake board and set the first layer down. Spread frosting on top, then stack the next layer. Repeat until all layers are stacked. Spread a thin layer of frosting all over the outside to lock in crumbs. Chill this crumb coat for 30 minutes. Finally, add the remaining frosting and smooth it out. Pipe a cute border on top and add sprinkles for a festive finish.
Notes
First, use room temperature ingredients. This is especially true for the egg, buttermilk, and butter. Room temperature ingredients mix together much better than cold ones. This creates a uniform batter and a silky frosting. If your butter is too cold, your frosting will be lumpy.
Second, measure your flour correctly. Spoon the flour into your measuring cup and level it off with a knife. Do not scoop directly from the bag. Scooping packs the flour down, and you might end up with too much. This can make the cake dry instead of moist.
Lastly, do not skip the crumb coat. This thin layer of frosting catches all the loose crumbs so they do not show up in your final layer. It is the key to achieving that clean look seen in Simple Aesthetic Birthday Cakes.
Nutrition
Calories
Sugar
Fat
Carbs