There are few things in this world as comforting as the smell of butter melting on the stove. It starts as a simple, familiar scent, but as you let it cook, it transforms into something nutty, rich, and deeply aromatic. That is the foundation of these Brown Butter Chocolate Chip Cookies. If you have been searching for a dessert that feels classic yet brings a much deeper flavor profile to the table, you are in the right place.
Many home bakers stick to the standard creaming method, where you beat room temperature butter with sugar. While that makes a fine cookie, taking the extra ten minutes to brown the butter creates a depth of flavor that mimics toffee and caramel. It balances the sweetness of the sugar and the bitterness of the dark chocolate in a way that standard butter simply cannot.
This recipe is designed for the home cook who wants Soft Brown Butter Chocolate Chip Cookies without needing fancy equipment. We use a mix of dark and milk chocolate, a splash of lemon juice for texture, and a specific chilling method to ensure the dough hydrates perfectly. Let’s get into the details of making your new favorite treat.
Jump To:
Why You’ll Love This Recipe
You might be wondering if browning butter is really worth the extra step. The answer is a resounding yes. When you cook the butter, you are essentially toasting the milk solids found inside it. These solids turn into little amber flecks that taste like hazelnuts and toasted sugar. When you mix that into your dough, you get Buttery Chocolate Chip Cookies that have a savory edge to cut through the sweetness.
Another reason to love this specific version is the texture. We use cornstarch and a specific ratio of brown to white sugar. This ensures that the center stays soft and chewy while the edges get that satisfying crispiness we all crave. Plus, we use chopped chocolate instead of chips. Chocolate chips are designed to hold their shape, but chopped chocolate melts into luscious puddles that create layers of chocolate in every single bite.
Lastly, this recipe is incredibly forgiving. Even if you have never browned butter before, the instructions are straightforward. We also use a clever trick of adding a little extra cold butter at the end to cool down the mixture and ensure you have the exact right amount of fat. It is a foolproof way to get bakery quality results right in your own kitchen.
Ingredients
The magic of these Brown Butter Chocolate Chip Cookies lies in the specific combination of ingredients. Using high quality European butter makes a massive difference because it has a higher fat content and less water than American style butter, leading to a richer flavor.
Here is everything you will need to get started:
- 1 cup (220g) salted European butter + 2 tbsp
- 1 3/4 cup (228g) all purpose flour, spooned and leveled
- 1 tbsp cornstarch
- 1/2 tsp kosher salt
- 3/4 tsp baking soda
- 1/4 tsp baking powder
- 3/4 cup (150g) dark brown sugar, tightly packed
- 1/2 cup (100g) granulated sugar
- 2 tsp vanilla extract
- 1/2 tsp fresh lemon juice
- 1 large egg + 1 egg yolk
- 6 oz 70% dark chocolate, chopped into medium chunks
- 3 oz milk chocolate, finely chopped (hazelnut milk chocolate is highly recommended)
- Flaky sea salt, for sprinkling on top
Step-By-Step Instructions
Step 1: Browning the Butter
This is the most critical part of the recipe, but do not be intimidated. Start by slicing 1 cup of your butter. Place it into a medium saucepan over medium heat. You want to stir it constantly as it melts down.
Watch the visual cues closely. First, the butter will be melted and bright yellow. Then, it will get loud and bubbly as the water evaporates. After that, the bubbles will turn into a foam, and the pan will go quiet. This silence means the browning is happening. Keep stirring and watching for the color to turn into a rich amber. You will smell that signature nutty aroma.
Step 2: Measuring and Cooling
Once the butter is browned, remove it from the heat immediately so it does not burn. Pour it into a measuring glass. Because some water evaporates during the cooking process, you might be short of a full cup. Drop in 1 or 2 extra tablespoons of butter until the liquid reaches exactly 1 cup. Stir to melt that new butter in, which also helps cool the mixture down slightly. Set this aside.
Step 3: Preparing Dry Ingredients
While your beautiful brown butter cools, grab a small bowl. Whisk together the all purpose flour, cornstarch, salt, baking soda, and baking powder. The cornstarch is a little secret weapon here; it helps keep the cookies soft and tender rather than cakey or tough. Set this bowl aside for a moment.
Step 4: Mixing the Wet Ingredients
Check your butter. It can be warm, but it should not be piping hot. Pour it into a large mixing bowl. Add the dark brown sugar and the granulated sugar. Whisk these together thoroughly. Since the butter is melted, you do not need an electric mixer; a good hand whisk works perfectly.
Next, add the vanilla extract, lemon juice, whole egg, and the extra egg yolk. The lemon juice might seem odd, but it reacts slightly with the baking soda to create a better rise and texture. Whisk this mixture vigorously for about one minute. You want it to turn a shade lighter. This incorporates a bit of air and helps create that crackly top we all love on Salted Brown Butter Chocolate Chip cookies.
Step 5: Forming the Dough
Pour the dry ingredients into the wet mixture. Switch to a rubber spatula and fold the dough together gently. You do not want to overmix flour, as that creates gluten which makes cookies tough. Just before the flour is fully disappeared, dump in your chopped dark and milk chocolate.
Continue to fold until everything is combined. The dough will feel sticky, but it should hold its shape. Grab a large 2 ounce cookie scoop (or a 1/4 cup measure). Scoop the dough onto a parchment lined plate. A pro tip is to try and position a large chunk of chocolate at the bottom of the scoop. This ensures that when the cookie bakes, that chocolate ends up right on top for a beautiful finish.
Step 6: The Long Chill
Place the plate of dough balls into the refrigerator uncovered. Technically, you can bake them after 4 hours, but for the best Brown Butter Chocolate Chip Cookies, you really should chill them overnight. This resting period allows the flour to fully hydrate and the flavors to meld together, resulting in a much tastier cookie.
Step 7: Baking
When you are ready to bake the next day, preheat your oven to 350F. Line a large baking sheet with parchment paper. Place 3 or 4 cookies on the tray, spacing them well apart as they will spread.
Bake for 12 to 14 minutes. You are looking for edges that are golden brown and centers that look pale, puffed, and slightly underdone. Do not overbake them, or they will lose that soft texture. If they look a little wonky or misshapen, use the inside rim of a fork (or a round cookie cutter) to nudge the edges back into a circle immediately after taking them out of the oven.
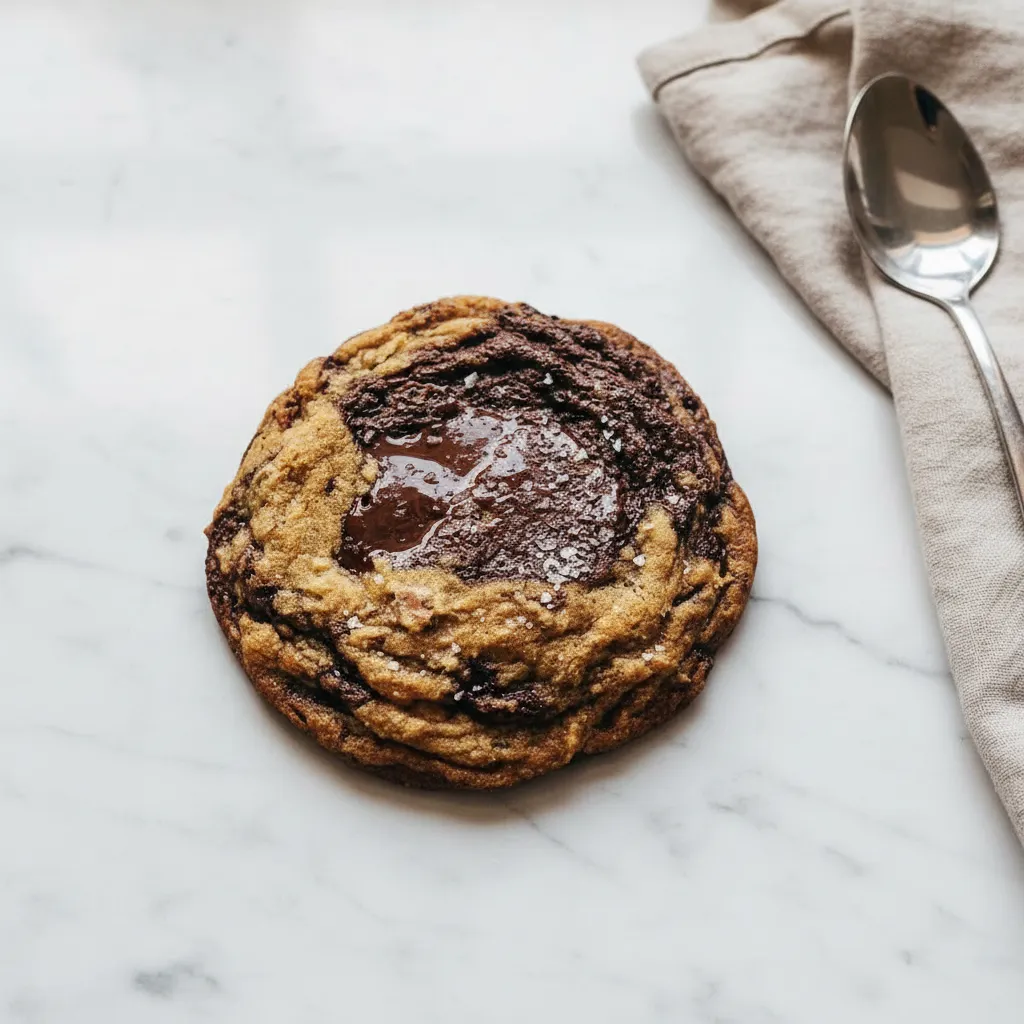
Finally, sprinkle a pinch of flaky sea salt on top while they are hot. Let them rest on the pan for a few minutes to set, then transfer to a cooling rack. They are best eaten warm or at room temperature.


How To Store Leftovers
If you somehow manage not to eat all of these Soft Brown Butter Chocolate Chip Cookies in one sitting, storing them correctly is key to maintaining freshness. Once the cookies have cooled completely, place them in an airtight container. They will stay fresh at room temperature for up to 3 or 4 days. A slice of white bread tossed into the container can help keep them soft.
For longer storage, the freezer is your best friend. As mentioned in the instructions, the dough freezes incredibly well. After the overnight chill in the fridge, transfer the dough balls into a freezer storage bag. They will keep for a few months. When a craving hits, you can bake them directly from frozen; just add an extra minute or two to the baking time. This is a great way to have fresh cookies on demand.
Tips
Making Brown Butter Chocolate Chip Cookies is easy, but a few small details make a big difference. First, be patient with the butter. It takes a few minutes to transition from melted to browned. If you pull it off too early, you miss out on flavor. If you leave it too long, it burns. Use a light colored pan if possible so you can see the color change clearly.
Another tip is to weigh your flour. If you scoop flour directly with the measuring cup, you often pack it down, leading to dry cookies. If you do not have a scale, use the spoon and level method: fluff the flour up, spoon it into the cup, and level it off with a knife. This ensures you are not adding too much dry volume to the wet ingredients.
Finally, do not skip the flaky sea salt. The salt on top contrasts beautifully with the brown sugar and chocolate. It wakes up your palate and makes the chocolate taste even more chocolatey. It is that finishing touch that makes these look and taste like they came from a high end bakery.
Conclusion
There you have it. This recipe for Brown Butter Chocolate Chip Cookies is truly special. It combines the nostalgia of a classic chocolate chip cookie with the sophisticated, nutty aroma of browned butter. Whether you are baking for a holiday party, a weekend treat, or just because you need something sweet, these cookies deliver every single time.
The mix of dark and milk chocolate, the slight tang from the lemon juice, and that rich toffee flavor create a bite that is unforgettable. So grab your butter, turn on the stove, and get ready to bake the best batch of cookies you have ever tasted. Enjoy!
FAQ
Can I Make This Gluten Free?
Yes, you can easily adapt this recipe. Simply swap the all purpose flour for a high quality 1 to 1 gluten free flour blend. Make sure your blend includes xanthan gum. The texture might change slightly, but the flavor of the brown butter will still shine through beautifully.
Why Do I Need To Use Lemon Juice?
It sounds strange, but lemon juice serves a chemical purpose here. The acid in the juice reacts with the baking soda. This reaction helps the cookies rise just enough while keeping the center soft. You will not taste the lemon at all in the final product; it is just there to improve the texture.
My Cookies Spread Too Much, What Happened?
If your cookies turned into puddles, the butter might have been too hot when you mixed it, or the dough was not chilled long enough. Make sure to let the brown butter cool before mixing, and do not skip the overnight chill in the fridge. Cold dough holds its shape much better in the hot oven.
Brown Butter Chocolate Chip Cookies
These delightful Brown Butter Chocolate Chip Cookies offer a deeper, more complex flavor than traditional recipes, with rich notes of toffee and caramel. Featuring a blend of dark and milk chocolate, a touch of lemon juice for texture, and a crucial chilling method, these cookies promise irresistibly soft, chewy centers and satisfyingly crispy edges, all made easily in your home kitchen.
Requirements


Ingredients
Instructions
- Brown 1 cup butter: Slice 1 cup of butter and place it into a medium saucepan over medium heat. Stir constantly as it melts, bubbles, foams, and eventually quiets down. Continue stirring until the color turns a rich amber and a nutty aroma develops.
- Measure and cool the butter: Immediately remove the browned butter from heat and pour it into a measuring glass. If it’s less than 1 cup, add 1 to 2 extra tablespoons of cold butter until it reaches exactly 1 cup, stirring until melted. This helps cool the mixture slightly. Set aside.
- Prepare dry ingredients: In a small bowl, whisk together the all purpose flour, cornstarch, kosher salt, baking soda, and baking powder. Set aside.
- Mix wet ingredients: Pour the slightly warm browned butter into a large mixing bowl. Add the dark brown sugar and granulated sugar, and whisk thoroughly until well combined.
- Add remaining wet ingredients: Stir in the vanilla extract, fresh lemon juice, whole large egg, and extra egg yolk. Whisk vigorously for about one minute until the mixture lightens in color and incorporates some air.
- Form the dough: Pour the dry ingredient mixture into the wet mixture. Using a rubber spatula, gently fold the dough until the flour is almost fully incorporated. Add the chopped dark and milk chocolate, then continue to fold until everything is just combined. The dough will be sticky.
- Scoop and chill: Using a 2-ounce cookie scoop or 1/4 cup measure, scoop the dough onto a parchment-lined plate. Try to position a large chunk of chocolate at the bottom of each scoop. Place the plate of dough balls into the refrigerator, uncovered, and chill overnight for the best flavor and texture (minimum 4 hours).
- Bake the cookies: The next day, preheat your oven to 350F. Line a large baking sheet with parchment paper. Place 3 to 4 chilled cookie dough balls on the tray, spacing them well apart.
- Finish baking: Bake for 12 to 14 minutes. The edges should be golden brown, and the centers should appear pale, puffed, and slightly underdone. Do not overbake. If cookies are misshapen, use the inside rim of a fork or a round cookie cutter to gently nudge the edges back into a circle immediately after removing from the oven.
- Serve and enjoy: Sprinkle a pinch of flaky sea salt on top of the hot cookies. Let them rest on the baking pan for a few minutes to set before transferring to a cooling rack. They are best enjoyed warm or at room temperature.
Notes
The secret to the rich flavor of these cookies is patience while browning the butter. Use a light-colored pan to monitor the color change from yellow to amber.
For accurate results, always weigh your flour or use the spoon and level method to avoid dry cookies.
Do not skip the overnight chill for the dough; it ensures proper hydration and depth of flavor.
A pinch of flaky sea salt sprinkled on hot cookies enhances the sweetness and chocolatey notes, creating a bakery-quality finish.
Store cooled cookies in an airtight container at room temperature for 3-4 days; a slice of white bread can help keep them soft.
For longer storage, freeze portioned dough balls for a few months and bake directly from frozen, adding an extra minute or two to baking time.
Nutrition
Calories
Sugar
Fat
Carbs