We all know that feeling when the afternoon slump hits. You look at the clock, and it is only three in the afternoon. Dinner feels like it is a lifetime away.
Your stomach starts to rumble. You need something to eat, and you need it fast. It is so tempting to grab a bag of chips or a candy bar.
But you know there is a better way. You want food that tastes great and makes you feel good too. Finding Healthy Snacks Easy to prepare can feel like a challenge sometimes.
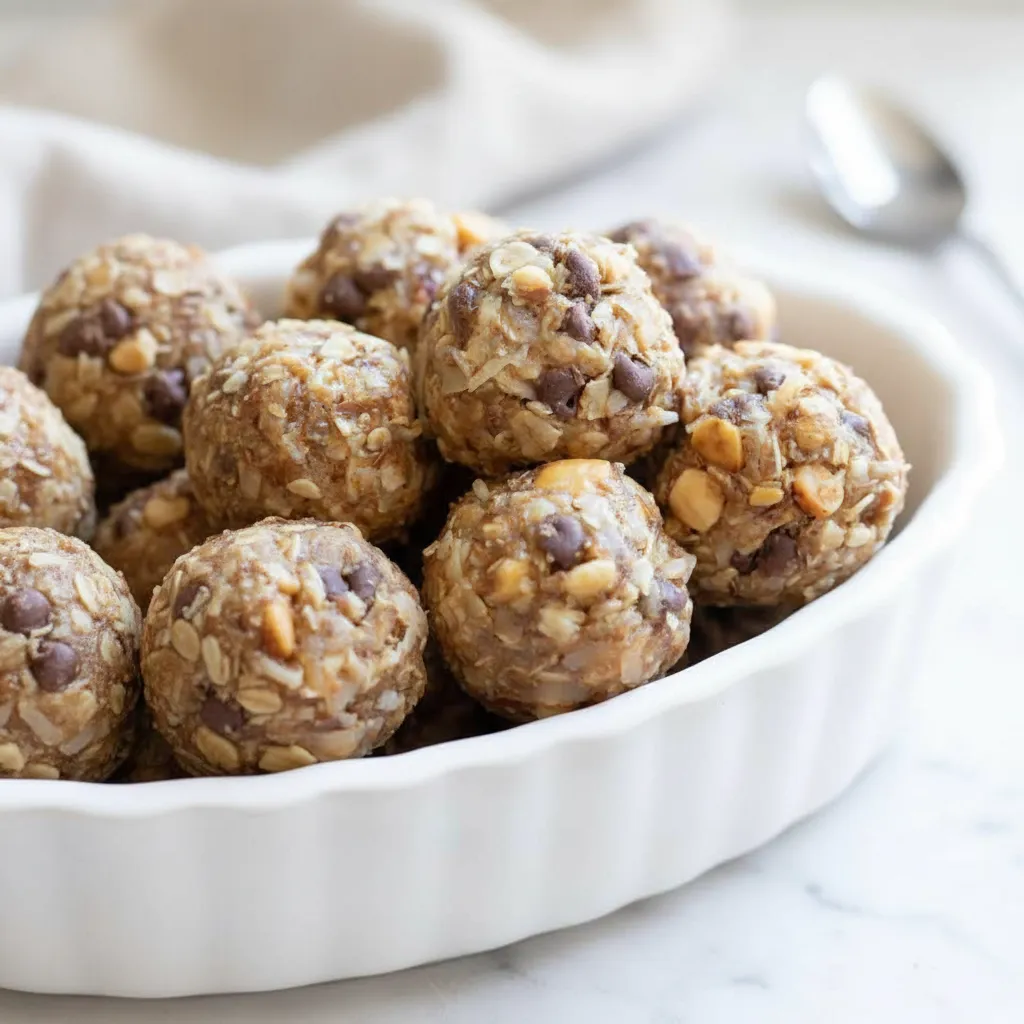
That is where this recipe comes in to save the day. These peanut butter energy balls are a total life saver for busy families. They are sweet, chewy, and packed with wholesome ingredients.
You do not need any fancy equipment to make them. You likely have most of the items in your pantry right now. Plus, they come together in about twenty minutes flat.
This is one of those Healthy Recipes Snacks that you will make over and over again. Let me show you how simple it is to whip up a batch.
Jump To:
Why You’ll Love This Recipe
There are so many reasons to keep this recipe in your back pocket. First of all, it requires absolutely no baking. You can keep your oven off and your kitchen cool.
This makes it a wonderful project for hot summer days. It is also safe for little ones to help with since there are no hot surfaces to worry about.
Another great thing is how budget friendly these are. Store bought energy bars can cost a fortune. Making them at home saves you so much money in the long run.
You control exactly what goes into them. There are no strange preservatives or ingredients you cannot pronounce. It is just real food that tastes amazing.
If you are looking for Quick Healthy Snacks, these really fit the bill. You can grab one on your way out the door to the gym or work.
They are also incredibly portable. You can toss a couple in a container for a school lunch or a hike. They hold up well and do not crumble easily.
The combination of peanut butter and honey is a classic for a reason. It satisfies that sweet tooth without going overboard on sugar. The chocolate chips add just enough fun to make them feel like a treat.
Plus, they are full of texture. The oats give them a nice chew, while the coconut adds a bit of crunch. It is a satisfying bite that keeps you full until your next meal.
Finally, this recipe is super flexible. You can swap things out based on what you have. It is very forgiving, which is great for beginner cooks.
Ingredients
The beauty of this recipe lies in its simplicity. You do not need a long list of expensive items. Here is what you will need to get started.
- 1 cup quick cooking oats
- 1 cup coconut flakes
- 1/2 cup natural, crunchy peanut butter
- 3 1/2 tablespoons honey
- 1/4 cup ground flaxseed meal
- 1/4 cup toasted wheat germ
- 1 teaspoon vanilla extract
- 1/4 cup mini chocolate chips
Let’s talk a bit about the oats. Quick cooking oats are best here because they are smaller. They absorb the moisture better and make the texture smoother.
For the coconut, you can use sweetened or unsweetened. It really depends on your preference. If you want to cut down on sugar, go for the unsweetened variety.
Peanut butter is the glue that holds everything together. A natural, crunchy peanut butter adds great texture. If you prefer creamy, that works too, but crunchy is fun.
Honey provides the sweetness and helps stick the dry ingredients together. You can adjust the amount slightly if you prefer things less sweet.
Flaxseed meal and wheat germ are the powerhouses here. They add a nutty flavor and some great nutrition. You won’t even notice them, but they do a lot of heavy lifting.
Vanilla extract gives it that cookie dough aroma. It makes the snack feel like a dessert. Do not skip it!
Finally, the mini chocolate chips are essential. Regular chips are too big and make the balls fall apart. The minis distribute chocolate in every single bite.
Step By Step Instructions
Making these Healthy Snacks Easy is a breeze. You just need a bowl and a spoon. No mixers required.
Step 1: Mix The Dry Ingredients
Grab a medium sized mixing bowl. Combine the oats, coconut flakes, flaxseed meal, and wheat germ. Give it a good stir to ensure everything is evenly distributed.
Step 2: Add The Wet Ingredients
Next, pour in the peanut butter, honey, and vanilla extract. This is where you might need to use some muscle. Stir everything together until the dry mixture is fully coated.
It might seem dry at first. Just keep mixing. The oats will start to soak up the honey and peanut butter.
Step 3: Fold In The Chocolate
Once the base is mixed, add the mini chocolate chips. Stir them in gently just until they are combined. You do not want to overwork the dough at this point.
Step 4: Form The Balls
This is the fun part. Using your hands, scoop out small amounts of the mixture. You want to make balls that are about one inch in size.
Press the mixture FIRMLY together in your hands. Do not try to roll them lightly like a cookie. You need to compress them so they stick together.
If they feel crumbly, just press harder. The warmth of your hands will help the peanut butter bind everything. Place the finished balls on a plate or in a container.


How To Store Leftovers
These are great Healthy Munchies Snacks to keep on hand. Proper storage is key to keeping them fresh. Since we use natural ingredients, they behave differently than processed snacks.
If you use natural peanut butter that needs refrigeration, you must refrigerate these balls. Honestly, they hold up better in the fridge regardless of the peanut butter brand.
Place them in an air tight container. They will stay fresh and tasty for up to a week. The cold texture makes them even chewier and more delicious.
You can also freeze them! These freezable treats are amazing for meal prep. Put them in a freezer safe bag or container.
They will last for up to three months in the freezer. When you want a snack, just take a few out. They thaw quickly on the counter in about twenty minutes.
Tips
Here are a few tricks to make sure your Healthy Snacks Easy turn out great every time. First, pay attention to the peanut butter.
Some natural brands are very thick or dry. If your mixture is crumbling, your peanut butter might be the culprit. You can add a tiny bit more honey or water to help.
Also, check your coconut. If it has been sitting in the pantry for a year, it might be dried out. Fresh, moist coconut helps bind the balls together.
When shaping, remember to press, not roll. If you gently roll them, they will fall apart. Squeeze them tight to make them solid.
If you are making a giant batch, mix the dry ingredients first. Then add the wet ones. It saves your arm from getting too tired mixing a huge bowl at once.
You can also prep the mixture ahead of time. Mix it all up, cover the bowl with plastic wrap, and put it in the fridge. You can roll the balls a day or two later.
Feel free to experiment with the sweetness. You can reduce the honey by about a third if you like. The mixture will be less sticky, but it still works if you press firmly.
Conclusion
Making Healthy Snacks Easy at home does not have to be a chore. These peanut butter energy balls prove that simple ingredients can taste amazing. They are quick, nutritious, and loved by both kids and adults.
Next time you need a pick me up, skip the vending machine. Whip up a batch of these instead. Your body and your wallet will thank you for making such a smart choice.
FAQ
Can I Make This Gluten Free?
Yes, absolutely. Just ensure you buy certified gluten free oats. The rest of the ingredients are naturally gluten free, but always check labels on processed items like wheat germ.
Can I Substitute The Peanut Butter?
You sure can. Almond butter or cashew butter works great. If you have a nut allergy, sunflower seed butter is a fantastic alternative that tastes wonderful.
Why Are My Balls Falling Apart?
Usually, this means the mixture is too dry. Try adding a little more honey or peanut butter. Also, make sure you are pressing them firmly rather than rolling them loosely.
Are These Vegan?
The recipe calls for honey, which some vegans avoid. You can swap the honey for maple syrup or agave nectar. Also, check your chocolate chips to ensure they are dairy free.
Peanut Butter Energy Balls
These sweet, chewy peanut butter energy balls are packed with wholesome ingredients and require no baking. Quick to make and budget-friendly, they’re the perfect healthy snack for busy families.
Requirements


Ingredients
Instructions
- Grab a medium sized mixing bowl. Combine the oats, coconut flakes, flaxseed meal, and wheat germ. Give it a good stir to ensure everything is evenly distributed.
- Next, pour in the peanut butter, honey, and vanilla extract. Stir everything together until the dry mixture is fully coated. It might seem dry at first, just keep mixing until the oats start to soak up the honey and peanut butter.
- Once the base is mixed, add the mini chocolate chips. Stir them in gently just until they are combined, being careful not to overwork the dough.
- This is the fun part. Using your hands, scoop out small amounts of the mixture. You want to make balls that are about one inch in size. Press the mixture FIRMLY together in your hands. Do not try to roll them lightly like a cookie. You need to compress them so they stick together. If they feel crumbly, just press harder. The warmth of your hands will help the peanut butter bind everything. Place the finished balls on a plate or in a container.
Notes
If you use natural peanut butter that needs refrigeration, you must refrigerate these balls. Honestly, they hold up better in the fridge regardless of the peanut butter brand. Place them in an air tight container. They will stay fresh and tasty for up to a week.
You can also freeze them! These freezable treats are amazing for meal prep. Put them in a freezer safe bag or container. They will last for up to three months in the freezer. When you want a snack, just take a few out. They thaw quickly on the counter in about twenty minutes.
Some natural brands are very thick or dry. If your mixture is crumbling, your peanut butter might be the culprit. You can add a tiny bit more honey or water to help.
Also, check your coconut. If it has been sitting in the pantry for a year, it might be dried out. Fresh, moist coconut helps bind the balls together.
When shaping, remember to press, not roll. If you gently roll them, they will fall apart. Squeeze them tight to make them solid.
If you are making a giant batch, mix the dry ingredients first. Then add the wet ones. It saves your arm from getting too tired mixing a huge bowl at once.
You can also prep the mixture ahead of time. Mix it all up, cover the bowl with plastic wrap, and put it in the fridge. You can roll the balls a day or two later.
Feel free to experiment with the sweetness. You can reduce the honey by about a third if you like. The mixture will be less sticky, but it still works if you press firmly.
Nutrition
Calories
Sugar
Fat
Carbs