Have you ever scrolled online, looking for the most amazing birthday cake ideas, and just felt a little overwhelmed? You see all these gorgeous creations and think, I could never make that. I totally get it. But what if I told you that a showstopping, bakery worthy cake is completely within your reach?
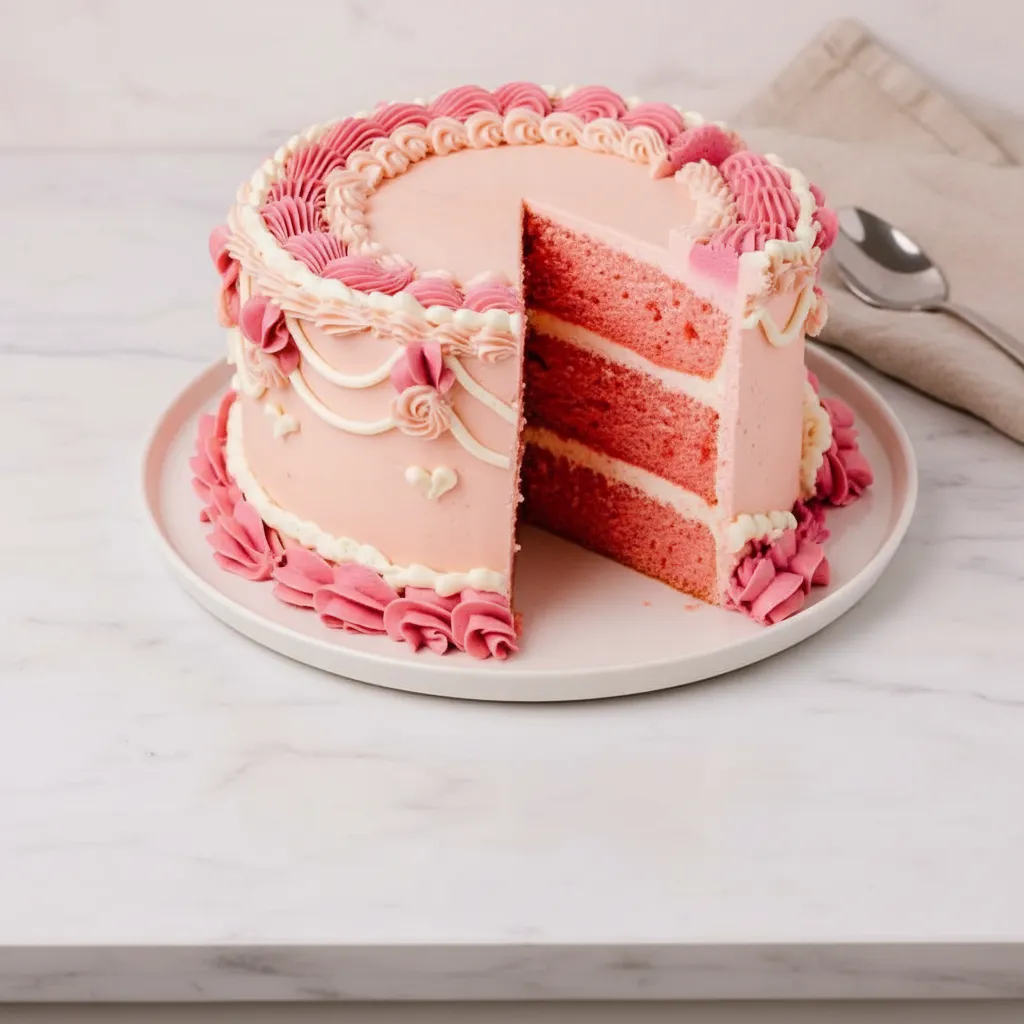
This recipe is all about making one of those truly pretty birthday cakes right in your own kitchen. We are talking soft, pink vanilla cake layers and a dreamy, fluffy cream cheese frosting. It’s a recipe designed to be fun, creative, and totally achievable. Let’s get baking!
Jump To:
Why You’ll Love This Recipe
Honestly, what’s not to love? This cake is a visual treat. Its delicate pink and white colors make it a fantastic choice for so many occasions. It is one of my favorite birthday cakes for women because of its elegant and playful look. The vintage style piping gives it such a classic charm.
But it is not just about looks. The flavor is incredible. The cake itself is moist and tender, with a beautiful vanilla note. And the cream cheese frosting? It has the perfect balance of sweetness and tang. It is light, fluffy, and so delicious you’ll want to eat it with a spoon.
Plus, this recipe is a great starting point for your own creativity. You can play with the colors, the piping styles, and the decorations. It is one of those birthday cake ideas that you can truly make your own. It is your canvas for creating some beautiful aesthetic cake designs.
Ingredients
For The Pink Cake Layers
- ¾ cup unsalted butter, softened
- ½ cup vegetable oil
- 1 ½ cups granulated sugar
- ¼ teaspoon sea salt
- 6 large egg whites, at room temperature
- 1 tablespoon pure vanilla extract
- 1 tablespoon vinegar (white or apple cider vinegar)
- ¼ teaspoon pink gel food coloring
- 3 cups cake flour (345g)
- 2 teaspoons baking powder
- ½ teaspoon baking soda
- 1 ¼ cup buttermilk, at room temperature
For The Cream Cheese Frosting
- 2 cups butter, softened
- ¼ teaspoon sea salt
- 6 to 7 cups powdered sugar
- 8 oz cream cheese, softened for 10 minutes at room temperature
- 1 tablespoon pure vanilla extract
- Pink gel food coloring
- Red gel food coloring
- Edible glitter spray (optional)
Step By Step Instructions
Step 1: Prepare The Cake Batter
First things first, let’s get that oven ready. Preheat it to 355°F or 180°C. Take three 8 inch round baking pans, grease them with a little cold butter, and line the bottoms with parchment paper rounds. This little step makes getting the cakes out so much easier.
In a large bowl, or in your stand mixer, combine the softened butter, oil, sugar, and salt. You’ll want to beat this with an electric mixer until it looks lighter in color and has more volume. Do not forget to scrape down the sides of the bowl to get everything mixed well.
Now, add half of the room temperature egg whites and blend them in. Then add the rest and blend again. Keep beating until the mixture gets nice and thick. Go ahead and add the vanilla extract and vinegar, and give it one more mix.
It is time for color! Add a pea sized amount of pink gel food coloring. Mix it in and add a little more until you get a nice pink shade. Remember, it will lighten up a bit when you add the flour, so make it just a touch darker than you want the final cake to be.
Step 2: Bake The Pink Cakes
Sift half of the cake flour, all the baking powder, and all the baking soda right into the batter. Pour in the buttermilk and gently fold everything together with a whisk. The goal is just to get it incorporated.
Next, sift in the rest of the flour. Fold it in well, still using your whisk, to break up most of the lumps. You want a mostly smooth batter, but be careful not to overmix. A few tiny lumps are perfectly fine.
Evenly divide your pretty pink batter between the three prepared pans. Smooth out the tops and give the pans a gentle tap on the counter. This helps release any big air pockets for a more even bake.
Bake for about 15 to 18 minutes. A good way to check for doneness is to insert a toothpick into the center. It should come out mostly clean, maybe with a few moist crumbs attached. Let the layers cool in the pans for about 8 minutes before turning them out onto cooling racks to cool completely.
Once they’re totally cool, you can trim them. Using a serrated knife, gently trim just the golden brown bits from the edges, top, and bottom. This gives you those clean, beautifully pink layers for your cake. It is a key step for creating those aesthetic cake designs.
Step 3: Make The Cream Cheese Frosting
While the cakes cool, let’s make that amazing frosting. In a large bowl or stand mixer, beat the softened butter with a paddle attachment. Keep going until it is creamy and a lighter color.
Add the salt, then begin adding the powdered sugar one cup at a time. Mix well after each cup and scrape the bowl down often. Once all the sugar is in, whip it until it is very creamy and light. The more you whip, the fluffier it gets!
Now, add the softened cream cheese in pieces. Blend well after adding each piece. You will notice the frosting get super light and fluffy. Finally, add the vanilla and beat it in. Just try not to eat it all before it gets on the cake!
Step 4: Assemble And Crumb Coat
Let’s build this beauty. Put a small dollop of frosting on your serving plate or cake stand. This acts like a glue to hold the first cake layer in place. Place the first layer down.
Spread about one third of a cup of frosting in an even layer on top of the cake. Place the next layer on and repeat. Continue until you have your last layer on top. Now you have a stacked cake!
Next is the crumb coat. This is a very thin layer of frosting you spread all over the top and sides of the cake. It traps all the loose crumbs. Use a long metal spatula or a cake scraper to make it smooth. Then, pop the cake in the freezer for 10 minutes to let that crumb coat set firm.
Step 5: Decorate Your Cake
This is where your birthday cake ideas come to life! While the crumb coat chills, divide your frosting. Put about one cup of frosting in a separate bowl for the white piping. Color the remaining frosting a lovely pale pink.
Once the cake is chilled, cover it with the pale pink frosting. Smooth the sides and top as best you can. It does not have to be totally flawless. The piping will cover a lot!
Now for the darker pink. Take about two thirds of your remaining pink frosting and add more red and pink food coloring to create a darker, richer pink. Now you should have three colors: white, pale pink, and dark pink.
Transfer each color into its own piping bag. For the dark pink, a large open star tip like a Wilton 1M is great for the bottom border. A large drop flower tip works well for the top. Use a small open star tip for the pale pink, and for the white, you can just snip the end of the bag for a simple round tip.
Now, have fun! Pipe borders, swoops, and little details all over the cake. This is how you create those really pretty birthday cakes. A little edible glitter spray at the end adds a nice finishing touch. And there you have it, a gorgeous homemade cake!


How To Store Leftovers
Because of the cream cheese frosting, this cake needs to be stored in the refrigerator. You can place it in a cake carrier or an airtight container. If you don’t have one, you can loosely cover it with plastic wrap, but try not to touch the frosting.
The cake will stay fresh in the fridge for up to 4 days. When you are ready for another slice, I recommend letting it sit at room temperature for about 20 to 30 minutes. This helps the frosting and cake soften up a bit for the best flavor and texture.
Tips
- Room Temperature Ingredients Are Key: Make sure your egg whites, buttermilk, and butter are at room temperature. This helps everything mix together smoothly for a better cake texture.
- Do Not Overmix: When you add the flour, fold it in gently. Overmixing can develop the gluten too much, resulting in a tougher cake. A few small lumps are okay.
- Use Gel Food Coloring: Gel colors are more concentrated than liquid ones. This means you can get vibrant colors without adding too much extra liquid to your batter or frosting.
- Chill For a Clean Crumb Coat: Do not skip chilling the crumb coat. This simple step makes applying the final layer of frosting much cleaner and easier, without crumbs getting mixed in.
- Practice Piping: If you are new to piping, practice a few designs on a piece of parchment paper first. You can scrape the frosting back into the bag and try again.
Conclusion
Baking a beautiful cake from scratch does not have to be intimidating. This recipe is proof that you can create something truly special right at home. It is more than just a cake; it is a project that is fun, creative, and so rewarding.
Whether you’re making this for a friend, a family member, or yourself, it’s one of those birthday cake ideas that shows how much you care. I hope you have a wonderful time making it and an even better time eating it. Enjoy every single slice!
FAQ
Can I Make This In A Different Pan Size?
Yes, you can! This recipe works well for two 9 inch round pans. The baking time might need to be adjusted slightly, so keep an eye on them. Start checking for doneness a few minutes earlier than the recipe states.
Is Cake Flour Necessary?
For the best results, yes. Cake flour has a lower protein content than all purpose flour, which results in a lighter, more tender cake crumb. It really makes a difference in recipes like this one. You can find it in most grocery stores.
How Far In Advance Can I Make This Cake?
You can bake the cake layers a day or two in advance. Once they are completely cool, wrap them well in plastic wrap and store them at room temperature. The frosting can also be made ahead and stored in an airtight container in the refrigerator for up to a week. Just let it come to room temperature and give it a good whip before using.
My Frosting Seems Too Soft. What Can I Do?
If your frosting is too soft to pipe, it might be a bit too warm. Try chilling it in the refrigerator for about 15 to 20 minutes. This will help it firm up. You can also add a little more powdered sugar, a quarter cup at a time, until it reaches a stiffer consistency.
Pink Vanilla Birthday Cake
This recipe makes a showstopping, bakery-worthy birthday cake in your own kitchen, with soft, pink vanilla layers and a dreamy cream cheese frosting.
Recipe Shop


Ingredients
Instructions
- Preheat the oven to 355°F or 180°C. Grease three 8 inch round baking pans with butter and line the bottoms with parchment paper rounds.
- In a large bowl or stand mixer, combine the softened butter, oil, sugar, and salt. Beat with an electric mixer until lighter in color and has more volume. Do not forget to scrape down the sides of the bowl.
- Now, add half of the room temperature egg whites and blend them in. Then add the rest and blend again. Keep beating until the mixture gets nice and thick. Go ahead and add the vanilla extract and vinegar, and give it one more mix.
- It is time for color! Add a pea sized amount of pink gel food coloring. Mix it in and add a little more until you get a nice pink shade. Remember, it will lighten up a bit when you add the flour, so make it just a touch darker than you want the final cake to be.
- Sift half of the cake flour, all the baking powder, and all the baking soda right into the batter. Pour in the buttermilk and gently fold everything together with a whisk. The goal is just to get it incorporated.
- Next, sift in the rest of the flour. Fold it in well, still using your whisk, to break up most of the lumps. You want a mostly smooth batter, but be careful not to overmix. A few tiny lumps are perfectly fine.
- Evenly divide your pretty pink batter between the three prepared pans. Smooth out the tops and give the pans a gentle tap on the counter. This helps release any big air pockets for a more even bake.
- Bake for about 15 to 18 minutes. A good way to check for doneness is to insert a toothpick into the center. It should come out mostly clean, maybe with a few moist crumbs attached. Let the layers cool in the pans for about 8 minutes before turning them out onto cooling racks to cool completely.
- Once they’re totally cool, you can trim them. Using a serrated knife, gently trim just the golden brown bits from the edges, top, and bottom. This gives you those clean, beautifully pink layers for your cake. It is a key step for creating those aesthetic cake designs.
- While the cakes cool, let’s make that amazing frosting. In a large bowl or stand mixer, beat the softened butter with a paddle attachment. Keep going until it is creamy and a lighter color.
- Add the salt, then begin adding the powdered sugar one cup at a time. Mix well after each cup and scrape the bowl down often. Once all the sugar is in, whip it until it is very creamy and light. The more you whip, the fluffier it gets!
- Now, add the softened cream cheese in pieces. Blend well after adding each piece. You will notice the frosting get super light and fluffy. Finally, add the vanilla and beat it in. Just try not to eat it all before it gets on the cake!
- Let’s build this beauty. Put a small dollop of frosting on your serving plate or cake stand. This acts like a glue to hold the first cake layer in place. Place the first layer down.
- Spread about one third of a cup of frosting in an even layer on top of the cake. Place the next layer on and repeat. Continue until you have your last layer on top. Now you have a stacked cake!
- Next is the crumb coat. This is a very thin layer of frosting you spread all over the top and sides of the cake. It traps all the loose crumbs. Use a long metal spatula or a cake scraper to make it smooth. Then, pop the cake in the freezer for 10 minutes to let that crumb coat set firm.
- This is where your birthday cake ideas come to life! While the crumb coat chills, divide your frosting. Put about one cup of frosting in a separate bowl for the white piping. Color the remaining frosting a lovely pale pink.
- Once the cake is chilled, cover it with the pale pink frosting. Smooth the sides and top as best you can. It does not have to be totally flawless. The piping will cover a lot!
- Now for the darker pink. Take about two thirds of your remaining pink frosting and add more red and pink food coloring to create a darker, richer pink. Now you should have three colors: white, pale pink, and dark pink.
- Transfer each color into its own piping bag. For the dark pink, a large open star tip like a Wilton 1M is great for the bottom border. A large drop flower tip works well for the top. Use a small open star tip for the pale pink, and for the white, you can just snip the end of the bag for a simple round tip.
- Now, have fun! Pipe borders, swoops, and little details all over the cake. This is how you create those really pretty birthday cakes. A little edible glitter spray at the end adds a nice finishing touch. And there you have it, a gorgeous homemade cake!
Notes
Make sure your egg whites, buttermilk, and butter are at room temperature. This helps everything mix together smoothly for a better cake texture.
When you add the flour, fold it in gently. Overmixing can develop the gluten too much, resulting in a tougher cake. A few small lumps are okay.
Gel colors are more concentrated than liquid ones. This means you can get vibrant colors without adding too much extra liquid to your batter or frosting.
Do not skip chilling the crumb coat. This simple step makes applying the final layer of frosting much cleaner and easier, without crumbs getting mixed in.
If you are new to piping, practice a few designs on a piece of parchment paper first. You can scrape the frosting back into the bag and try again.
Nutrition
Calories
Sugar
Fat
Carbs