There are some nights when all you want is a warm, comforting bowl of something amazing. You know the feeling. The day has been long, and the thought of a complicated dinner is just too much. That’s where this simple White Bean Chicken Chili comes to the save the day.
This recipe is all about big flavor with little fuss. It’s hearty, satisfying, and comes together so quickly. Using a rotisserie chicken is a great shortcut that makes this a perfect weeknight meal. Get ready to find your new favorite comfort food.
Jump To:
Why You’ll Love This Recipe
First off, this White Bean Chicken Chili is incredibly easy to make. We’re talking about a one pot meal, which means less time cooking and more importantly, less time cleaning up. Who doesn’t love that?
The flavors are just so good. We use cumin, coriander, and chili powder to create a warm and savory base. It has just enough spice to be interesting without being overwhelming. It’s a taste the whole family can enjoy.
This is also a fantastic Healthy White Chicken Chili. It is packed with protein from the chicken and fiber from the cannellini beans. It is a wholesome dish that will leave you feeling full and happy, not heavy.
And let’s talk about the convenience. This White Chicken Chili With Rotisserie chicken is a brilliant time saver. The chicken is already cooked and tender, so you just have to shred it and add it to the pot. It makes getting dinner on the table a breeze.
Ingredients
The ingredient list for this White Bean Chicken Chili is simple and straightforward. You can find everything at your local grocery store. Nothing fancy here, just good, wholesome ingredients.
For The Chili
- 1 tablespoon olive oil
- 1 large onion, chopped
- 1 tablespoon ground cumin
- 1 teaspoon ground coriander
- 1 teaspoon chili powder
- 1 can of green peppers or 1 large jalapeno pepper, seeded and chopped
- 2 cloves of garlic
- 2 15 ounce cans of Cannellini beans, drained and rinsed
- 1 small rotisserie chicken, deboned and shredded (approximately 4 cups)
- 1 cup whole corn kernels, plus more as garnish
- 4 cups Swanson® unsalted chicken stock
- 1 teaspoon kosher salt
- 1/4 teaspoon ground black pepper
- ¼ cup fresh cilantro, chopped
As Garnish (Optional)
- 1 ripe avocado, cut into small pieces
- 1 jalapeno, sliced
- 4 tablespoons of sour cream
Step By Step Instructions
Making this chili is a simple process. Just follow these steps and you will have a delicious meal ready in no time. It’s a great recipe for beginner cooks.
Step 1: Build The Flavor Base
First, heat the olive oil in a large pot or Dutch oven over medium high heat. Add the chopped onion, ground cumin, ground coriander, and chili powder. Cook this mixture for about 4 to 6 minutes, stirring it often.
You want the onion to become soft and translucent. This step is important because it toasts the spices and sweetens the onions, creating a deep flavor foundation for your White Bean Chicken Chili.
Step 2: Add The Aromatics
Next, stir in your chopped green peppers or jalapeno and the garlic. Sauté everything for just about 30 seconds. You’ll know it’s ready when you can smell that wonderful garlic aroma. Be careful not to let it burn.
Step 3: Combine The Main Ingredients
Now it’s time to add the stars of the show. Pour in the rinsed cannellini beans, the shredded rotisserie chicken, and the corn. Then pour in the chicken stock and add the salt and pepper. Give everything a good stir to combine.
Step 4: Simmer To Perfection
Put the lid on your pot and bring the chili to a boil. Once it starts bubbling, reduce the heat to medium. Let it simmer gently for 15 to 20 minutes. This gives the flavors time to meld together.
The chili will also thicken up slightly during this time. You’re looking for a consistency that is hearty but still has a nice amount of broth. What a great White Bean Chili Recipe.
Step 5: Add The Fresh Herbs
Right at the end, stir in the freshly chopped cilantro. This adds a burst of fresh, bright flavor that really lifts the whole dish. Cilantro is a classic addition to any chili.
Step 6: Serve And Garnish
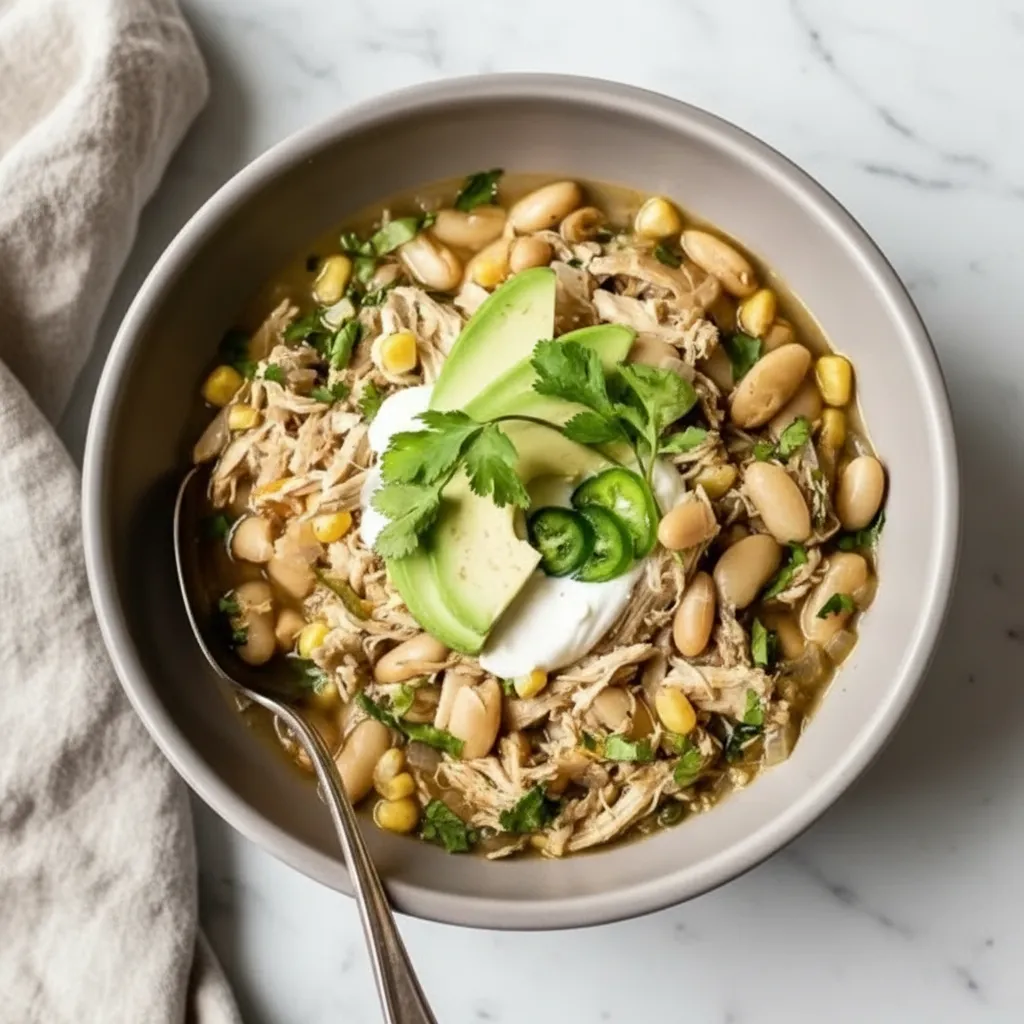
Your delicious White Bean Chicken Chili is ready to serve! Divide it among four bowls. Now for the fun part: the toppings. Add some cubed avocado, sliced jalapenos, and a dollop of sour cream if you like.


How To Store Leftovers
One of the best things about chili is that the leftovers are often even better the next day. Storing this White Bean Chicken Chili is simple. First, let the chili cool down completely to room temperature.
You can store it in an airtight container in the refrigerator for up to four days. To reheat, just warm it up on the stovetop over medium low heat or pop it in the microwave until it is hot.
This chili also freezes very well. Portion it into freezer safe containers or bags. It will keep in the freezer for up to three months. It’s a great meal to have on hand for busy days.
Tips
Want to make your chili even creamier? Before adding the beans to the pot, take about half a cup of them and mash them with a fork. Stirring this paste into the chili will give it a richer, thicker texture.
You can easily adjust the spice level. For a milder chili, use canned green chiles instead of a fresh jalapeno. If you love heat, feel free to add an extra jalapeno or a pinch of cayenne pepper.
This White Chicken Chili With Rotisserie chicken is a great shortcut. If you don’t have one, you can use about 1 and a quarter pounds of boneless, skinless chicken thighs or breasts. Just cook and shred them before adding to the chili.
You can also make a healthy crockpot chicken chili. Just add the onion, spices, chiles, garlic, corn, beans, and stock to your slow cooker. Place raw chicken thighs on top, then cook on low for 4 to 6 hours. Shred the chicken and stir it back in. It’s so easy!
Conclusion
And there you have it. A truly satisfying and simple White Bean Chicken Chili that is sure to become a regular in your meal rotation. It is the kind of recipe that feels special but is easy enough for any night of the week.
Whether you’re making it for your family or as a cozy meal for yourself, this White Bean Chili Recipe delivers on comfort and flavor every single time. I really hope you enjoy making and eating it as much as I do.
FAQ
Can I Use Different Beans?
Absolutely. While cannellini beans are great for their creamy texture, you could also use Great Northern beans or navy beans. Even chickpeas would work in a pinch. The core of this White Bean Chicken Chili is very flexible.
Is This Recipe Spicy?
This recipe has a mild warmth to it. The level of spice really depends on whether you use green chiles, which are very mild, or a jalapeno. You can easily control the heat by adding more or less pepper to suit your taste.
What Can I Serve With This Chili?
This chili is a wonderful meal all on its own. However, it is also great served with warm cornbread, tortilla chips for dipping, or a simple side salad. A scoop of rice in the bottom of the bowl is also a nice addition.
Can I Make This Vegetarian?
Yes, you can easily adapt this to be a vegetarian dish. Simply omit the chicken and use vegetable broth instead of chicken stock. To make it hearty, you could add an extra can of beans or some diced sweet potatoes.
Chocolate Protein Ice Cream
A light, creamy, and flavorful homemade protein ice cream, made effortlessly in your Ninja Creami. Enjoy this satisfying, high-protein dessert with your favorite mix-ins.
Requirements


Ingredients
Instructions
- In a Ninja Creami pint, combine the protein shake, protein powder, cocoa powder, sweetener, and salt. Add optional guar gum or pudding mix for extra creaminess.
- Mix with a frother or whisk until the base is completely smooth with no clumps.
- Secure the lid and freeze on a level surface for at least 24 hours until solid.
- Place the frozen pint into the machine and process using the ‘Lite Ice Cream’ setting.
- If the texture is crumbly, add a tablespoon of milk or shake and use the ‘Re-Spin’ function.
- If desired, create a well in the center, add mix-ins, and use the ‘Mix-In’ function to combine. Enjoy immediately!
Notes
Taste the base before freezing and adjust sweetener if needed. Frozen desserts tastes less sweet, so aim for slightly sweeter than you prefer.
Do not fill the pint past the max fill line, as the mixture will expand during freezing and processing.
A full 24-hour freeze is essential for the best, creamiest texture. Rushing this step can result in an icy or soupy consistency.
Feel free to experiment with other flavors like vanilla protein with frozen berries or adding mint extract for a mint-chip version.
Nutrition
Calories
Sugar
Fat
Carbs